Configure message options
When you send a message using a form or scenario, you can configure the form settings to customize the message for your situation. Before you send a message you can add or remove recipients, and you may be able to adjust other values such as setting customized properties, selecting a conference bridge, configuring advanced message handling options, or defining response options.
The following video provides a quick overview of how to configure form settings when sending an example alert:
Here's how to configure the sections you might see on your form. The sections and their options are set for you by the form designer.
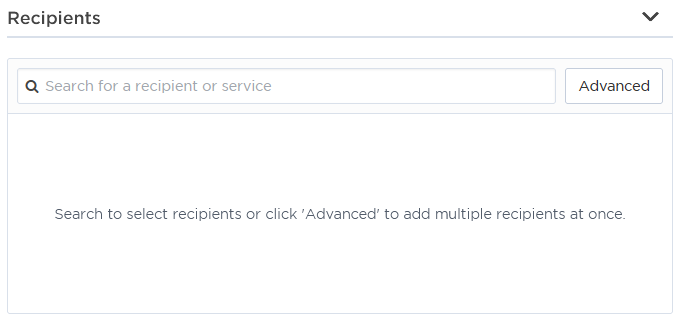
If the form includes a Recipients section, you can search for users, groups, devices, services, or sites that you have permission to message and add them to the list of recipients who should receive notifications. (To target sites as recipients, the Site Recipients section must be included on the form layout.)
If there are default recipients, they are displayed in the Recipients section each time you open the form. You can easily remove or add additional recipients before you send the message.
When a user is notified as a targeted recipient, member of a group, or as a member of a group that owns a service, xMatters considers all of their preferred scheduling and device settings when determining how to notify them. If a device is targeted directly, either as a recipient or as a member of a group, the user's settings are ignored and xMatters immediately sends the notification to the device.
To add recipients:
- To quickly add individual recipients, type the name of a user, group, service, or site into the search bar, and select them from the drop-down list of available options. Sites only appear as recipients if the Site Recipients option has been added to your message form.
- To add multiple recipients at a time, or to select sites off a map, click Advanced to open the Recipients screen.
- Under Available, select a recipient type from the drop-down menu and begin typing the name of the recipient in the search bar.
- The default option is All, but you can change the recipient type to Users (which includes Devices), Groups, Services, or Sites.
- When you add a group as a recipient, members of the group are notified based on the group's escalation schedule and delays. This also applies to Services, where the group that owns the service is notified.
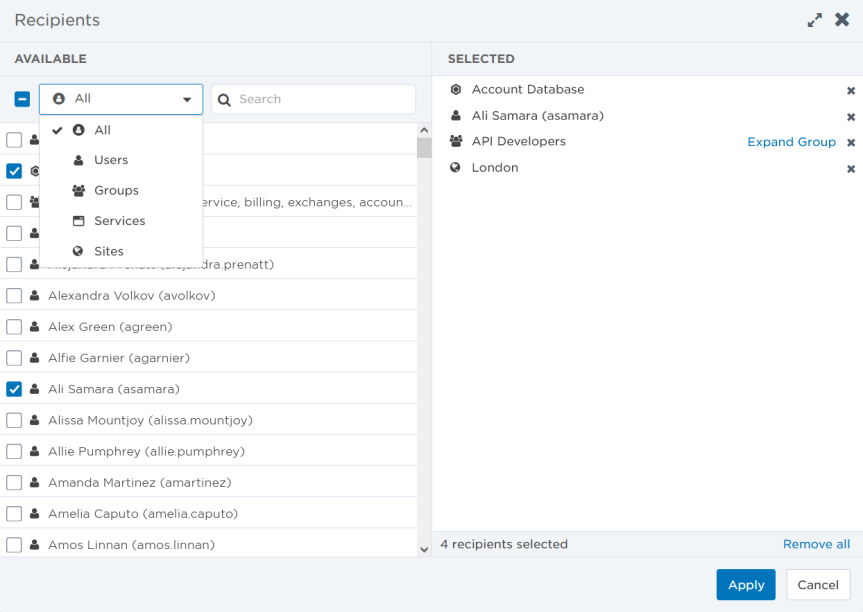
- Add recipients by selecting the check box beside their name. The recipient is added to the Selected window. You can remove recipients from the list either by deselecting the check box by their name in the Available list, by clicking their x icon in the Selected list, or you can click Remove all to remove all selected recipients.
- If you want to see the individual recipients within a group to selectively remove some members, click Expand Group next to the group's name. Once expanded, the members become separate recipients in the list; features like group escalation schedules and delays no longer apply.
- Once you've finished selecting all the recipients you want to notify, click Apply.
The message form summarizes the number of people that are targeted by the notification. The actual number of recipients that are notified depends on the schedules and escalation order of the selected users and groups, and how users respond to the notification. For example, if a user selects a response option with an action to end the alert, no further recipients are notified.
If you target a large number of people, you'll be asked to confirm that you want to notify all the listed recipients prior to sending the message; this ensures you won't notify a large number of people unintentionally.
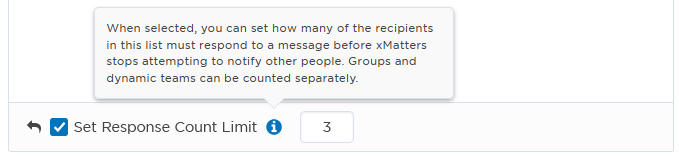
Some message forms may be configured to count responses; this feature allows you to control the number of recipients that must respond to a message before xMatters stops attempting to notify a group.
All recipients added to a form that is configured for response counts are listed in the Recipients section. You can set one response count level for all recipients, or separate specific groups to assign them a different response count level.
To specify response counts:
- All of the recipients in the Recipients section are treated as a single response group. Select Set Response Count Limit and enter a response limit number.
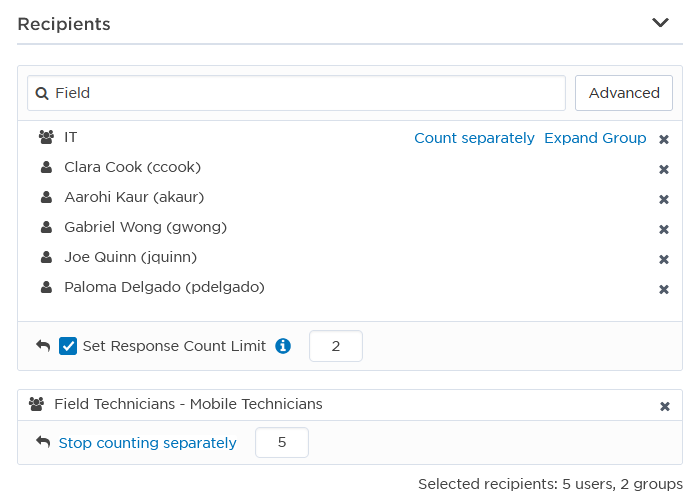
- To give a group a different response limit, click Count separately.
- xMatters creates a new section containing only that group or team.
- In the field provided for each response group, type the number of responses you want to receive from that response group before xMatters stops notifying them.
- To combine a separated response group with the Recipients response group, click Stop counting separately for that group.
- Note that this discards any response counts you have specified for the separated group. Ensure that you update the required response counts for the Recipients response group accordingly.
Example
Here's how xMatters notifies recipients with varying response count limits:
- xMatters begins notifying all listed recipients.
- Once five responses are received from the Field Technicians' group, xMatters stops notifying the remaining members of the Field Technicians group.
- Once a total of two responses are received from any combination of the other listed recipients, xMatters stops sending out notifications.
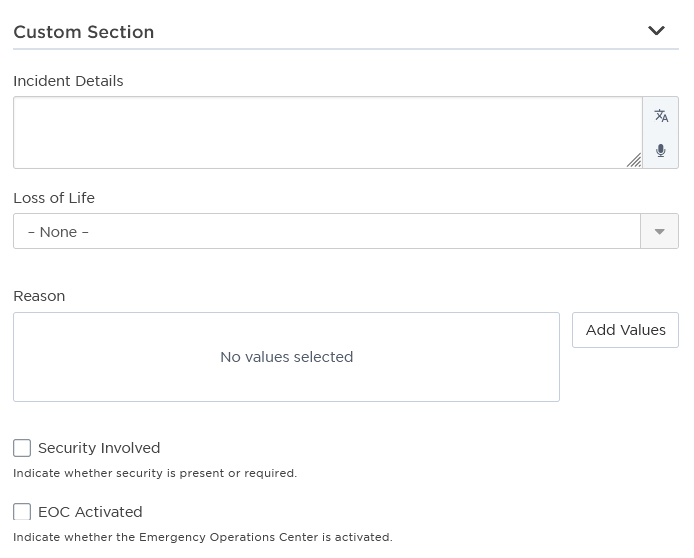
Custom form sections contain the drop-down lists, text fields, list boxes, check boxes, and hierarchy lists that a form designer has added to the form and populated with information. Your form may have one or more custom sections, and the name of these sections may have been customized to better reflect the type of information fields included in that section (for example, 'Message Content').
As a message sender, you select the information from the provided fields to send to your recipients. These message options sections are typically named based on the grouping of form elements they include. For example, a custom section might include configurable settings for Incident Details, Loss of Life, Reason, Security Involved, and EOC Activated.
Lists and combo box properties are designed to allow message senders to quickly find and select the values they need. For lists, this means you can select multiple values with fewer mouse clicks. For combo boxes, you can search for a value rather than scrolling through the list of available options.
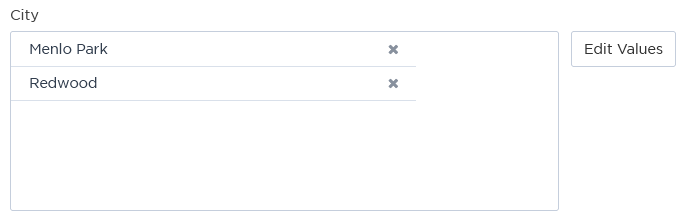
Lists
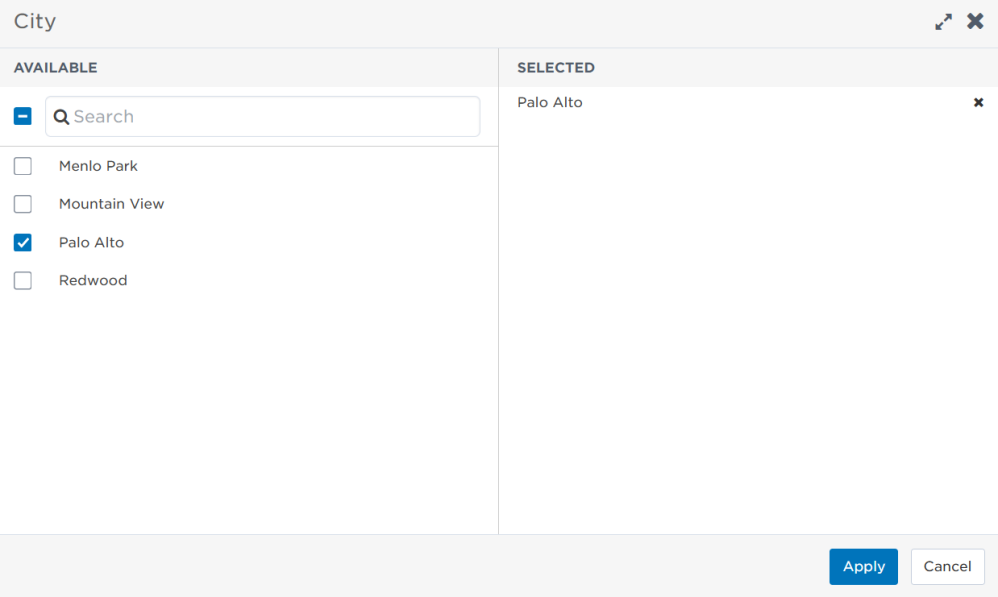
When a form designer creates a multi-select list, they might select items to appear as defaults. You can use the default options for your message or click Edit Values to select other values from the list of available options. You can also delete the default options from the list.
If the form designer did not set a default value for a list, click Add Values to search for values. Select the values you want to add to the message, and then click Apply to return to the message form.
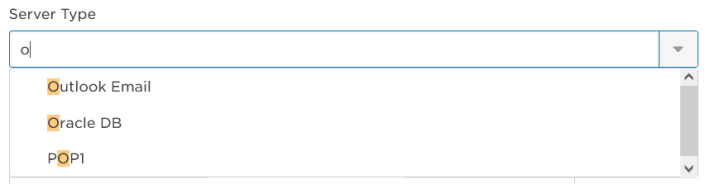
Combo boxes
It's possible for a form designer to add dozens, or even hundreds of options to a combo box. The combo box search feature lets you can type in the box rather than scrolling through the list of options. If there are multiple options that match your search, they're all displayed so you can choose the one you want.
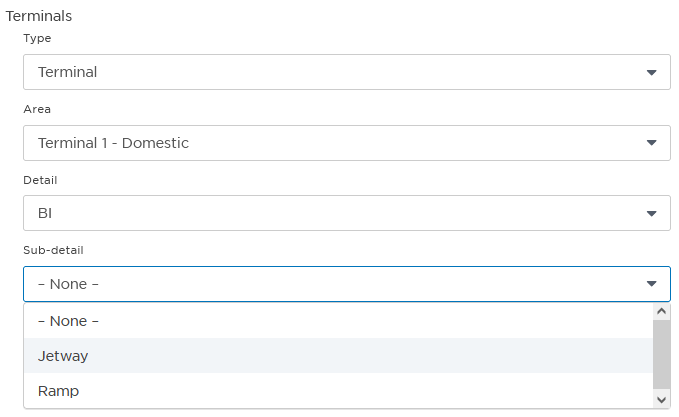
Hierarchy property
One custom field option that might be less familiar than the others is a hierarchy list, which is like a series of drop-down lists: once you make your selection in the first drop-down list, a second list is dynamically populated with the appropriate choices. This process repeats for all remaining drop-down lists in the series.
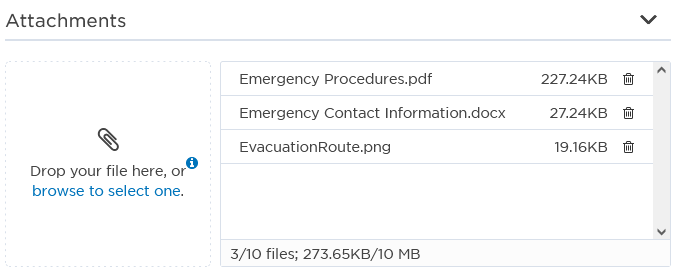
If the form includes an Attachments section, you can upload up to 10 files to be included with email messages (total file size cannot exceed 10MB). You can attach response plans, maps, pictures, screenshots and so on to provide message recipients with additional context.
Supported file types include:
- Image formats: BMP, GIF, ICO, JPEG, PNG, SVG, TIFF
- Multimedia formats: MP3, MP4, WAV, MOV, AVI, WMV, MPG, MPEG, VOX
- Microsoft Office formats: DOC, DOCX, XLS, PPT etc.
- Open Document formats: ODT, ODS, ODP, ODG
- Other formats: CSV, HTML, TXT, XML, XMLA, PDF, ZIP, X-ZIP, BIN
To add attachments:
- Drag and drop files into the attachments section, or click browse to select one to select a file from your computer's file directory.
- Navigate to the file you want to include.
- Select the file.
- Click Open.
- If required, repeat these steps to add more files.
You can remove an attachment by clicking the associated trash can icon.
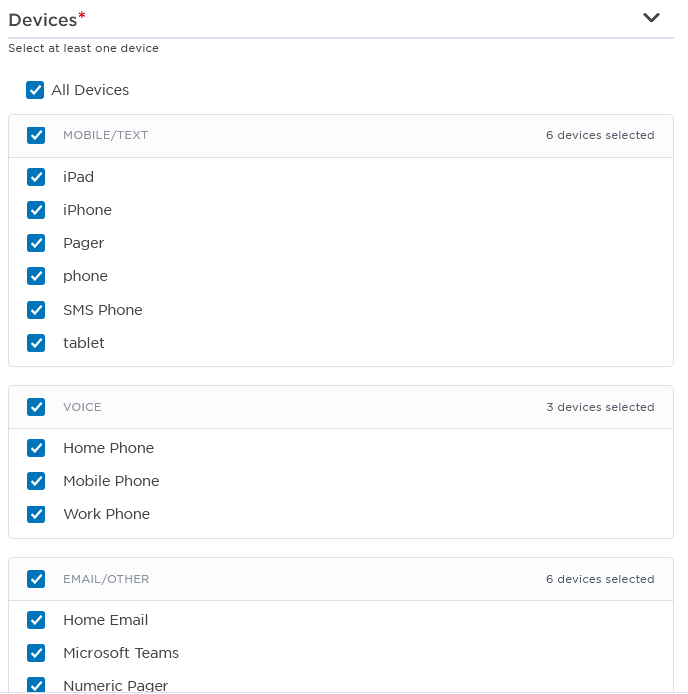
The devices section provides message senders with granular control over which device types are targeted. If recipients do not have a device with the specified name, they will not receive notifications. (Fax appears as an option under Email/Other only if your company has fax configured as a device type.)
Some device information is only available to company supervisors. If you see "(privileged)" beside a device name and asterisks instead of a phone number, email address, or country name it means you don't have permission to view or edit that information. For more information, see Device Management.
To configure device options, do one of the following:
- Click the All Devices check box to send messages to any devices configured for the recipients
- Click the Mobile Text, Voice, or Email/Other check boxes allows to add or remove devices names related to each device type.
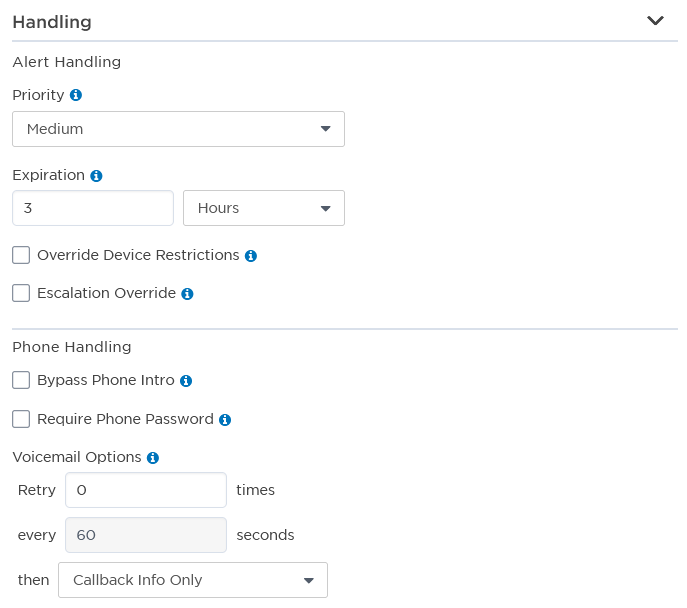
If the form includes a Handling section, you can configure one or more settings that control some aspects of the message sending process. Form designers can control which options appear in this section, or whether the section appears at all. For more information about the different controls in this section, see Handling options.
If the form includes a Sender Overrides section, you can override the default values that are used for the sender of the notification. By setting the sender information to meaningful values, you can help recipients identify that the notification has been sent from xMatters.
- Display Name: allows you to customize the name associated with a notification or alert. The display name is shown as the sender of notifications in the xMatters Inbox, the mobile app, and for email notifications. The display name is also displayed in the Recent Alerts report, Alerts widget and Properties report in the xMatters web user interface, and in the Recent Alerts report in the xMatters mobile apps.
- Caller ID: allows you to override the caller ID displayed for voice and SMS notifications. Use of this functionality must follow the Truth in Caller ID Act of 2009. This functionality is supported for use with the Voxeo service provider, and is not compatible with SIP.
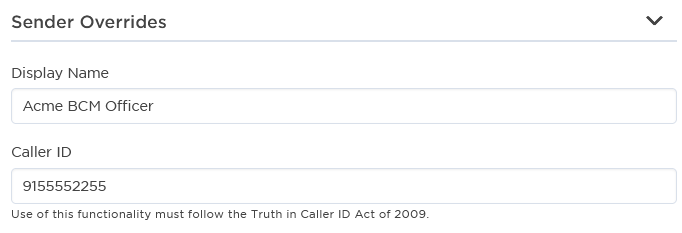
Default values for the Caller ID and Display Name fields can be set for each company. If defined, these values are displayed in gray text. If you do not specify values for these fields, then the default values are used for notifications.
To configure the Display Name:
- Type the name of the sender in the Display Name field.
To configure the Caller ID:
- Type the phone number in the Caller ID field.
If the form includes a Response Overrides section, you can override the response options configured for the notification by the xMatters form designer. This section gives you the ability to edit the response number and order, configure text, email, or voice responses (and recordings), associate responses with a conference bridge, and configure contribution values, response actions, response counts, and response commenting.
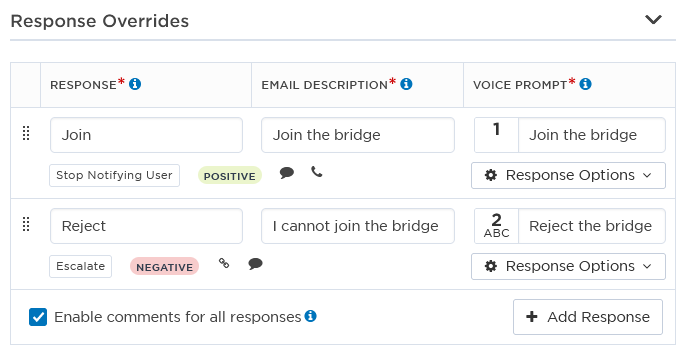
See Define response options for detailed information on configuring response options for notifications.
Managing translations and recordings
If your company has more than one language configured, the Response, Email Description, and Voice Prompt fields will include the option to manage translations, and the Voice Prompts field will include an additional option to Add Recording. These options allow you to override any default translations or recordings for your company's languages that are configured for the form.
The recording for a voice prompt may include more than one language file. To override a voice prompt recording, you will need to remove all the associated language files for that response.
Forms with a Site Recipients section allow you to send messages to users based on the site they belong to. This allows you to target users at a specific location or in a certain geographical area. For example, if a severe snowstorm is approaching in the Boston area, you could send a notification to users at sites in the storm's path. If a contaminated food item has been distributed to grocery stores in California, you could send an high-priority alert to the employees of the specific stores that may be affected.
When you select a site, the users located at the site are targeted for notification, regardless of whether they are included in the Recipients section of the form. The system automatically prevents duplicate messages to users who are included as both recipients and site recipients.
Viewing the site map
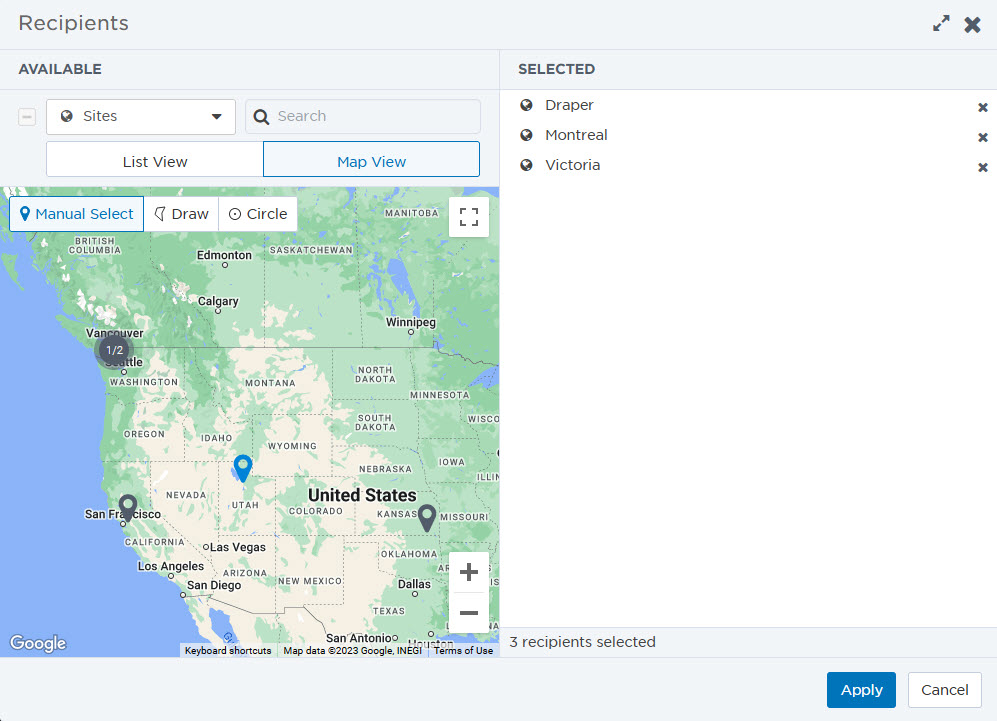
The advanced recipients selector includes a Map View that displays the geocoded sites in your system. Individual sites are represented by pins on the map. When several sites are located in close proximity to each other, they are clustered together and represented by a circle and the number of sites in the cluster.
You can view the selected sites in the following ways:
- Pins that represent individual sites appear blue when the site is selected (unselected sites are dark gray).
- Site clusters display the number of selected sites out of the total number of sites in the cluster.
- The panel located to the right of the map displays a list of selected sites.
- The number of selected sites and the total number of selected recipients are displayed below the map.
If the location information for a site has not been configured, then it will not appear on the map. You can still select sites which have not been geocoded from the List View of sites.
You can refine the area of the map that is displayed:
- Use the zoom (+/-) tool to adjust the map's zoom level.
- Click and drag the map to view a specific geographical area.
- Click the Toggle fullscreen view button to view the map in fullscreen view. Click this button again to close this view.
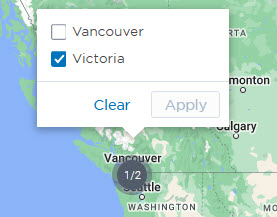
- Click a site cluster to view a list of sites in the cluster that you can adjust your selection for.
Selecting sites
The Map View provides a set of tools you can use to select sites on the map. Sites selected with one tool remain selected when you make another selection using the same or a different tool. For example, you can use the draw tool to select the sites contained within a large area, and then use the manual tool to select sites that fall outside of the area defined by the shape you drew.
To select sites, do one of the following:
- Click Manual Select, and then click the pin for each site you want to select. You cannot manually select a cluster of sites; however, you can click the cluster icon to zoom in and view the sites in the cluster.
- Click Draw and draw a shape around an area. The sites located in the area are selected.
- Click Circle and then specify a radius for the circle in miles or kilometers. You can then click a point on the map to select the sites within the specified radius.
When you use the Draw or Circle tool to draw an area on the map, the sites that are physically located within the area are added to the selection. When a cluster of sites is located close to the edge of an area, it is possible for some of the sites to be located within the area and other sites to be located outside of the area. In this case, only the sites that are physically located within the area are added to the selection, regardless of where the cluster icon is displayed.
To deselect sites, do one of the following:
- Click Manual Select and then click a selected site.
- Locate the name of the site in the list to the right of the map, and then click the x button next to it.
If a form includes a Conference Bridge section, message senders can specify which conference bridge to use. Message senders can choose an externally-hosted conference bridge, a new xMatters-hosted conference bridge, or an existing xMatters-hosted bridge, depending on what type of bridges are allowed by the form.
xMatters-hosted bridges remain accessible for three days, plus the current day. Note that the list of existing bridges displays the available conference bridges depends on the permissions of the User accessing the form.

To select a conference bridge:
Click the Hosted Bridge drop-down list, and do one of the following:
- Select Create New xMatters Hosted Bridge.
- Select an xMatters-hosted bridge that is already in progress.
- Select an externally-hosted bridge. If the Bridge Number field displays an input box, enter the bridge number that you want to use with the external provider.
A text field allows you to add text and voice message content to your forms. For example, a message sender might use a text field named Unscheduled Email Outage to add content such as "Server will be down for from 3-4pm to deal with a firewall configuration issue".

Additionally, depending on your company's language settings, message senders can add text or voice content in multiple languages during form initiation.
Although the following sections are written from the perspective of someone defining text field values during form initiation, the same concepts apply when defining a workflow scenario. For more information about scenarios, see Create and manage scenarios.
If multiple languages are configured for your company, text fields will include optional multilingual options. This enables message senders to define alternative messages for languages other than the company's default language. The default language for the field is set to the message sender's preferred language (as defined on the User Details page).
Even if multiple languages are available, there is no requirement to configure content for all of them. Recipients will still receive messages with the system presenting the content using the following order:
- The recipient's preferred language.
- If no translation is available in that language, the message will be in the language configured for the recipient's site.
- If neither of those languages is available, the message will be in English.
To configure message content for a text field:
- Do one of the following:
- If required, modify the default content.
- If there is no default content, type your own content into the field.
- If your company has multiple languages available, and you want to define content for them, click the Add Translations icon.
- In the Manage Translations dialog box, add content in the fields for each individual language you want to add content for.
- Click Save.The bottom of the text field summarizes which languages translations have been provided for.
- If you later want to modify the translations, click one of the language pills below the text field, or click the Manage Translations icon for the text field. Both of these actions will open the Manage Translations dialog box where you can modify translations for all available language options for your company.
Message senders can also add voice recordings to text property fields when initiating a form, and can optionally add recordings for multiple languages. You can create new recordings, or search for and add existing recordings. The voice content will be played wherever the related property appears in voice interactions.
You can create a voice recording using your computer's microphone. If no recording is present, the content of the field will be read by a Text-to-Speech engine.
To create a new recording for a text field:
- Click the Add Recording icon for the text field, and then click Create recording.
- Click Record.
- If it is your first time creating a recording, xMatters prompts you to allow access to use your microphone.
- When you have finished the recording, click Stop
- If your company has multiple languages configured, you can create recordings for other languages. Click the Edit Translations icon, and then in the Manage Translations dialog box, click the Add recording icon for individual languages to create additional recordings. Not all languages support voice recordings.
- If you later want to remove a recording, click the options icon (the three vertical dots) and click Remove recording. You must remove an existing recording for a language before you can create a new recording to replace it.
To associate an existing recording with a text field:
Your company has a Voice Recordings library of existing system and custom recordings that you can associate with your text field. An existing recording has one or more language files included with it, and when you add the recording to a text field you are opting to apply the individual language files to the available languages in your text field. You are only able to edit or add additional language content to an existing recording from the Voice Recordings screen in the web user interface.
- Click the Add Recording icon for the text field, and then click Find recording.
- In the Find Recordings dialog box, select or search for a recording. If any custom recordings are available for your company, they will be listed by default when you open the Find Recordings dialog box. You can use the search bar to find any custom or system recording included in your company's Voice Recordings library.
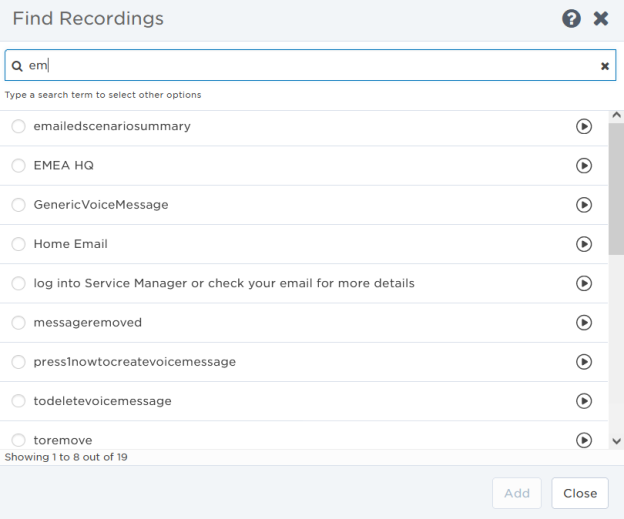
- To hear a preview of any recording, click the play icon.
- After making your selection, click Add.
- If you later want to remove an existing recording, click the options icon (the three vertical dots) and click Remove recording.