Define response options for messaging forms
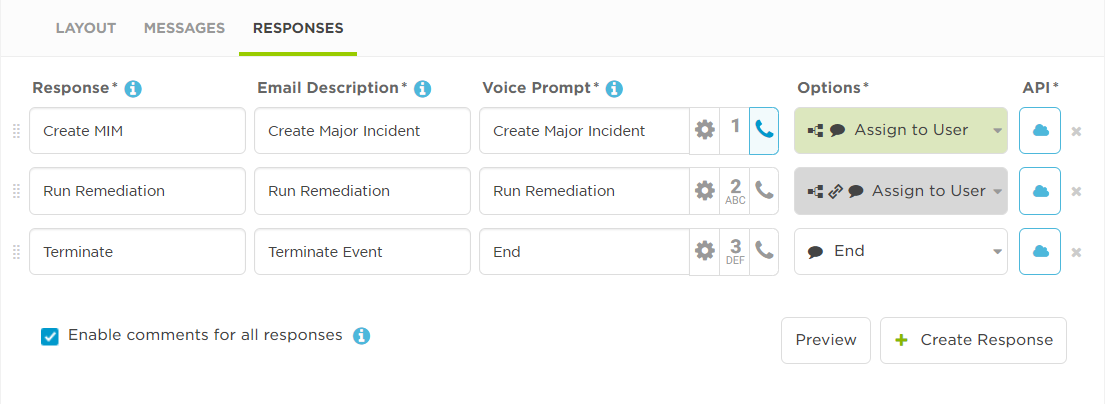
The Responses tab is available for Messaging forms. Use it to add response options to your notifications that allow recipients to respond by text, mobile app message, email, or phone.

Response options are highly flexible and allow you to:
- Customize text, mobile app, and email notification response option text and descriptions, including translations.
- Add recorded or text-to-speech (TTS) prompts to voice (phone) notifications, including adding new recordings directly from the Responses tab, and translations.
- Specify which voice notification responses will add the recipient to a conference bridge.
- Assign contribution values to responses for performance reporting purposes (e.g., Accept = Positive).
- Configure what alert action the system should take for a response (e.g., Unavailable = Escalate), or configure whether the response should count towards meeting a required number of responses.
- Configure response options to redirect users to a web address after they respond.
- Specify the response number, regardless of its order on the Responses tab.
- Build automated workflows in Flow Designer that are triggered by a response option. For example, a "Create Major Incident" response could create a ticket in your service desk, create and post to a chat channel, and create a post to a status website, all as a result of selecting the response in the notification.
The following steps describe at a high level how to add response choices to your forms; each feature is covered in greater detail in subsequent sections.
- On the Responses tab of the Form Details page, click Create Response (repeat for the number of responses you want to configure).
- If you're working with Flow Designer, simply double-click the Response trigger or click Add Response to open a dialog box with the same configuration options.
- Click the response number, and then click the number that you want to assign to this response (see also Specify response number and order).
- Add text to the Responses and Email Description fields (see also Configure text and email responses).
- If you want to add translations for other languages, click the translation icon beside the Response or Email Description field, select the desired language, add text for the language, and then click OK.
- To add a voice response, type a response phrase, then click the settings drop-down icon to do any of the following (see also Configure voice responses):
- To make a recording to associate with the phrase, select Add Recording. If no recording exists for the phrase, the system will automatically use a Text-to-Speech engine to speak it to the recipient.
- To associate an existing phrase with the text, click Find Recording. If no recording exists for the phrase, the system will automatically use a Text-to-Speech engine to speak it to the recipient.
- If you want to add translations for other languages, click Edit Translations.
- If you want the response to start a conference bridge or add the recipient to an existing bridge, click the Conference Bridge button (this button is available only when the Conference Bridge Section has been added to the form). See also Associate responses with a conference bridge.
- Click the Options drop-down list to choose values for Action or Contribution (see also Configure response actions and Configure response contribution values).
- To redirect a user to a URL after they respond, click Add URL and enter a valid URL address (see also Configure response redirects).
- To enable or disable the ability to comment when users respond to notifications in email or the xMatters Inbox, select or clear the Enable for all responses check box at the bottom of the response list. To control commenting for individual responses, click the Options drop down list for a response and select Enable comments.
- Click Save Changes (or Save in Flow Designer).
The order of responses on the Responses tab determines the order which responses are presented to recipients. You can reorder the responses by dragging them to where you want them on the tab.
The number you assign to a response corresponds to the button the recipient of a voice notification should press to select that response choice.
While text phone devices also present the response options based on the number assigned to them on the number pad, the actual number required for each response may be different. For example, if you create three response choices of ACCEPT, IGNORE, and CLEAR, numbered 1, 2, and 3, all voice notifications will prompt recipients to press 1 to acknowledge, 2 to ignore, and 3 to clear. Each text message will present the response choices in the same order, but may require a different number, due to the way simple SMS responses are processed by xMatters; e.g., "Press 5 to ACCEPT, 6 to IGNORE, or 7 to CLEAR."
