Mobile Incident Management
xMatters Incident Management lets you review, work, and initiate incidents from a simple, intuitive command center. Whatever your role in the incident response process, you can use the Incident Console to track the progress of an incident, collaborate with resolvers, and make relevant updates. With the xMatters mobile app, you can also manage incidents when you're on the go!
Manage incidents from the xMatters mobile app
- View incidents
- Filter the Incidents list
- Initiate an incident
- View and update incident details
- Manage resolvers
- Collaborate across teams
- Identify impacted services
- View and add notes to the Timeline
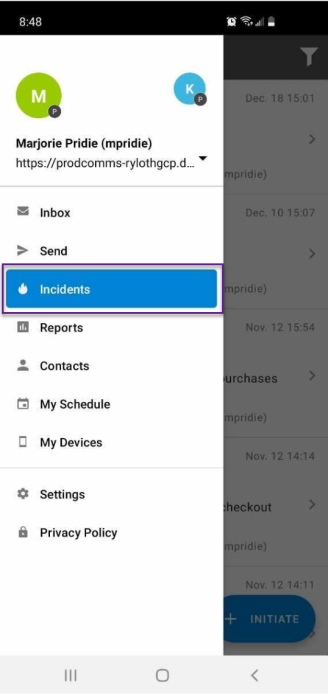
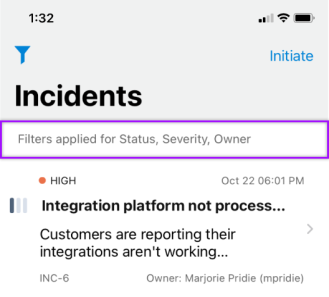
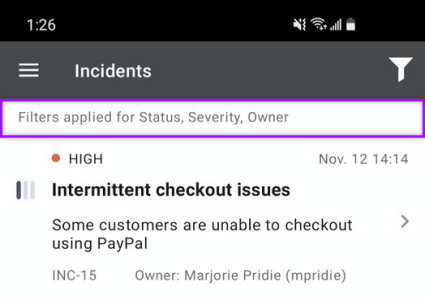
View incidents
From the app menu, tap Incidents.
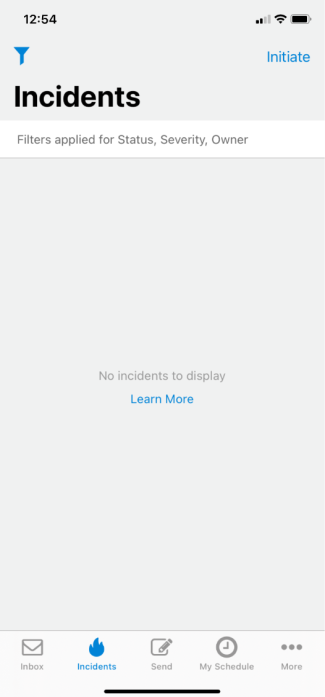
The Incidents screen displays a list of the incidents in your system that you have permission to view.
iOS:

Android:

You can view the following information for each incident:
| Information | Description | ||||||||||
|---|---|---|---|---|---|---|---|---|---|---|---|
| Incident ID | The incident's identifier in xMatters or an external system. | ||||||||||
| Date and time | When the incident was initiated in xMatters. | ||||||||||
| Summary & Description |
Contextual information about the issue impacting the service or system. |
||||||||||
| Owner (Incident Commander) | The first name, last name, and username of the person currently in charge of the incident. | ||||||||||
| Severity |
The impact on the service or system and the level of response that's required:
|
||||||||||
| Status |
The state of the incident resolution process:
|


If there are no incidents to display, you either don't have permission to view any of the incidents currently in your system, or the filters you've applied to the list didn't return any results:
Filter the Incidents list
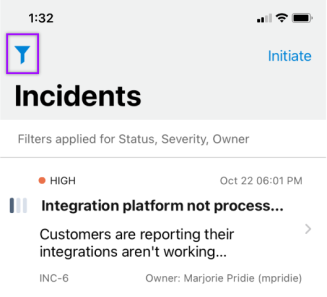
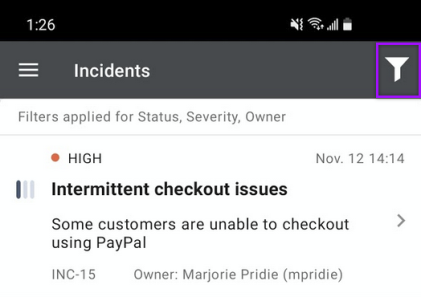
You can filter the Incidents list to quickly find incidents based on their status or severity, or where you're the incident commander.
The top of the Incidents list indicates which filters you've applied:
To apply filters or edit their values, tap the filter icon at the top of the screen:
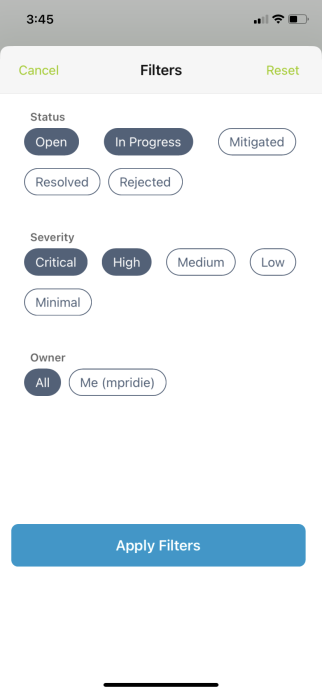
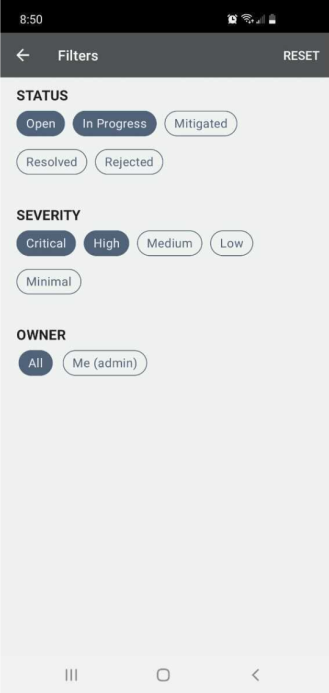
Filter by status and severity
To filter by status or severity, select the status and severity values of the incidents you want to see. You can select multiple values for each filter.
To update the Incidents list, tap Apply Filters on iOS, or the back arrow on Android.
This example will display Open or In Progress incidents that are Critical or High severity:
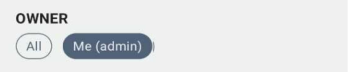
Filter by incident commander
To filter for the incidents you're the incident commander of, tap the Me (username) filter.
To update the Incidents list, tap Apply Filters on iOS, or the back arrow on Android.

Clear filter values
To remove filters from the Incidents list, do one or more of the following:
- To clear all filter values, tap Reset at the top of the Filters screen.
- Tap any selected values for the Status or Severity filters to deselect them.
- To view incidents with any incident commander, tap All.
To update the Incidents list, tap Apply Filters on iOS, or the back arrow on Android.
Initiate an incident
When you initiate an incident in xMatters, you provide details about the incident and identify who you want to engage to resolve it. This starts an incident resolution workflow in xMatters which notifies resolvers to engage and builds out the Incident Console with the details you provided.
To initiate an incident:
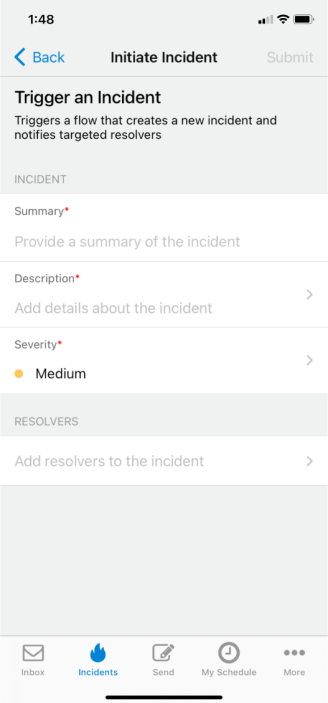
- On the Incidents screen, tap Initiate.
- xMatters displays the incident resolution workflows you have access to, including an option to Initiate an Incident using the generic xMatters 'Incident Management Workflow'.
- From the list of available options, tap the incident submission form you want to submit.
- Forms must be enabled for the mobile app for them to appear in the list of options.
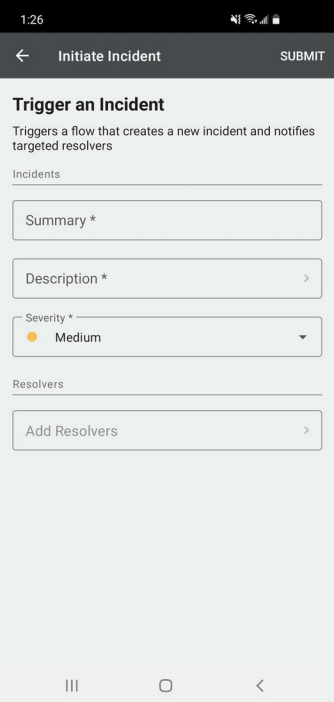
- On the Initiate Incident screen, provide details about the incident, including a high-level Summary, a concise Description, and an estimate of its current Severity.
- This information is included in the message sent to the targeted resolvers and is used to populate the incidents details in xMatters.
- In the Resolvers section, add the people or groups you'd like to target to engage in resolving the incident.
- If you target a group, only the first on-call resource that responds is added to the incident as a resolver.
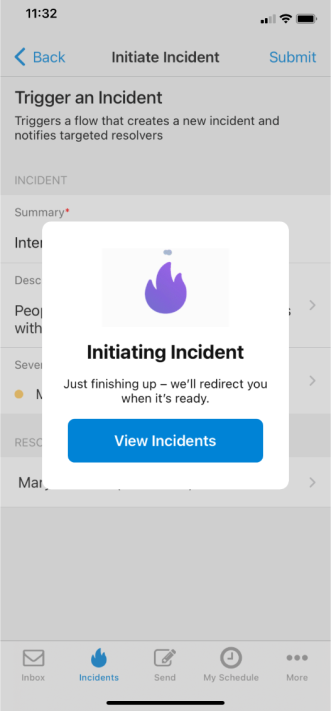
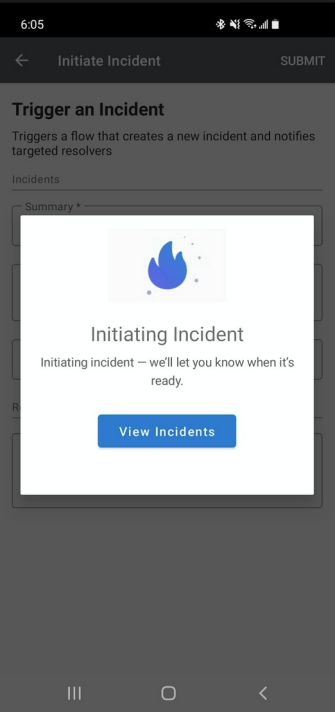
- Tap Submit.
You're automatically redirected to the Incident Console once your incident is initiated in xMatters. Alternatively, you can tap View Incidents to return to the Incidents screen while the incident is initiated. Once it appears in the Incidents list, tap the incident to open the Incident Console.
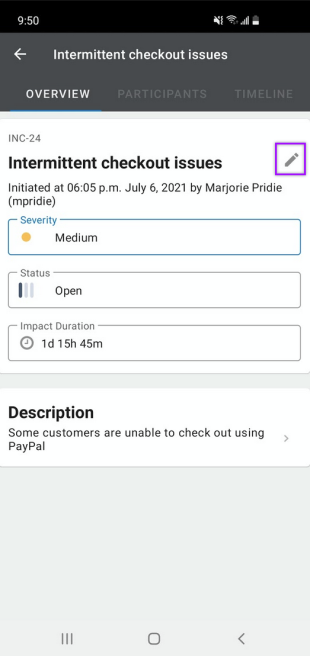
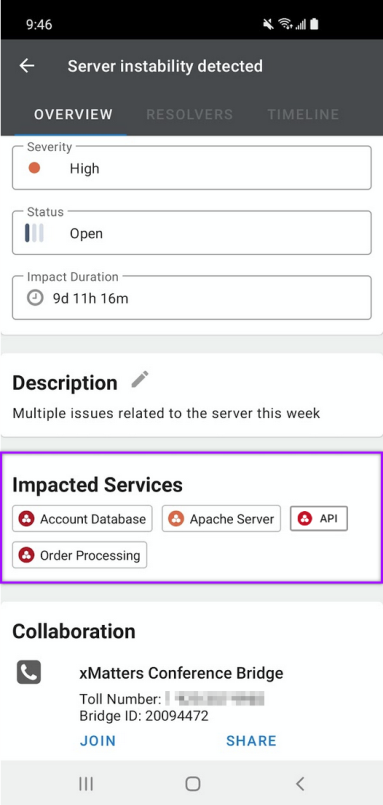
View and update incident details
On the Incidents list, tap an incident to open the Incident Console.
The Incident Console is your heads-up display for working an incident. You can find and update incident details, gather your resolution team, and connect to chats or conference bridges associated with the incident.
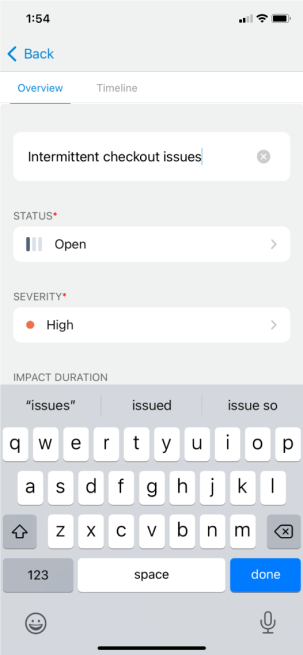
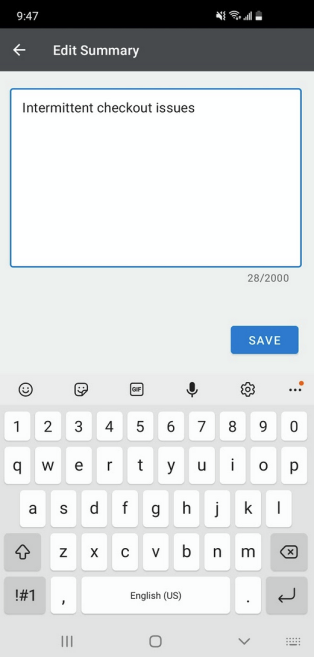
Summary
The incident summary appears as the title of the incident. The summary is usually short and includes key information to help categorize the incident. As the incident progresses, you can update the summary to clarify details about the incident or provide further contextual information as it becomes available.
To update the summary of an incident:
iOS: Tap the field to edit its value, then tap done.
Android: Tap the pencil icon to edit the incident summary and then click Save.
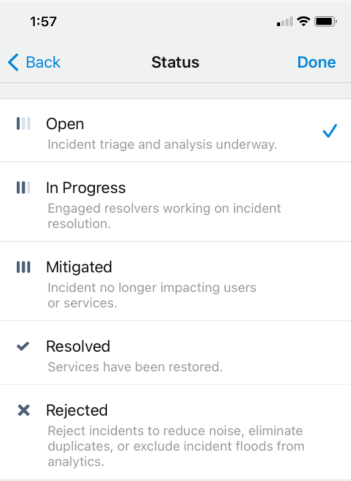
Status
The incident status indicates the state of the incident resolution process. Incidents default to an 'Open' status when they are initiated in xMatters. When someone starts working the incident, they can set its status to 'In Progress' to indicate they're engaged in resolving the issue. They can then move the incident through the remaining resolution states as the incident's lifecycle progresses.
To update the status of an incident:
iOS: Tap the Status field and select a new value, then tap Done.
Android: Tap the Status field and select a new value.

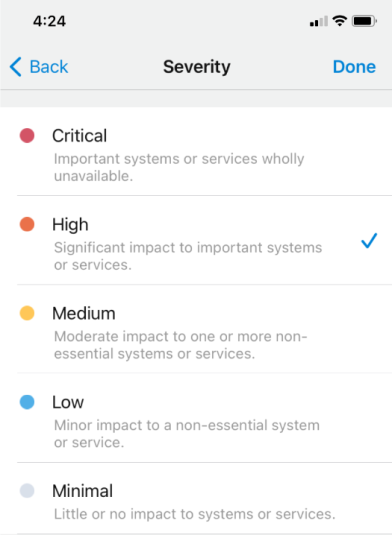
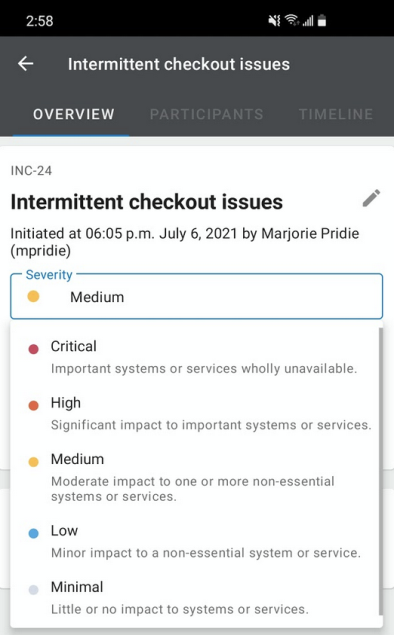
Severity
The severity of an incident indicates the impact on the service or system and the level of response that's required. Your organization may establish different criteria to classify the severity of an incident and how this field is updated as an incident progresses.
To update the severity of an incident:
iOS: Tap the Severity field and select a new value, then tap Done.
Android: Tap the Severity field and select a new value.
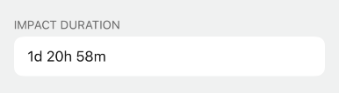
Impact Duration
Impact duration is the length of time the incident impacted the business. By default, the impact duration starts when the incident is initiated in xMatters and ends when the incident is moved to the 'Mitigated' status (or the 'Resolved' status, if you bypass 'Mitigated').
You can't currently update the incident's impact duration from the mobile app.

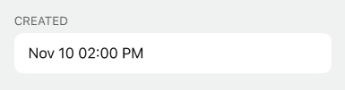
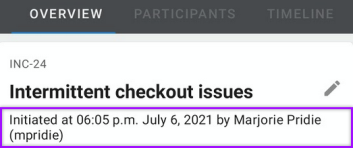
Created / Initiated At
iOS: The Created field displays the date and time the incident was initiated in xMatters.
Android: The date and time the incident was initiated at, and who it was initiated by, is displayed under the incident summary.
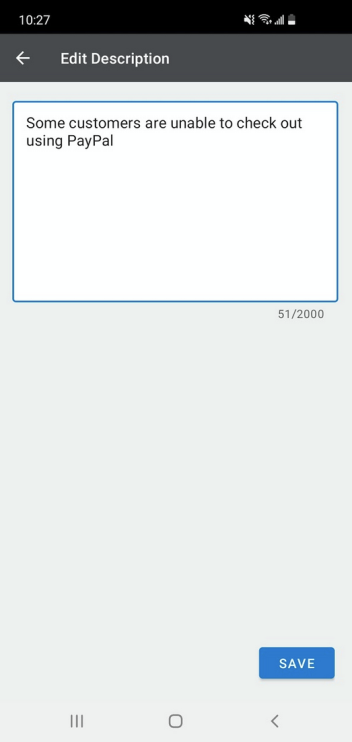
Description
The incident description provides contextual information about the issue impacting the system or service. The initial value for this field is provided by the person or workflow that initiates the incident in xMatters. This information helps you triage the incident, understand which services or systems are affected, and identify who you need to engage to resolve the issue.
To edit the incident description:
- Tap an incident description to edit its value.
- The description can be up to 2000 characters long.
- To save your changes:
- iOS: Tap Done.
- Android: Tap Save.

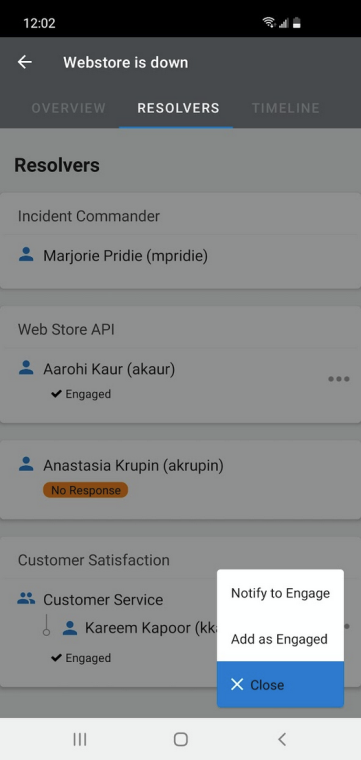
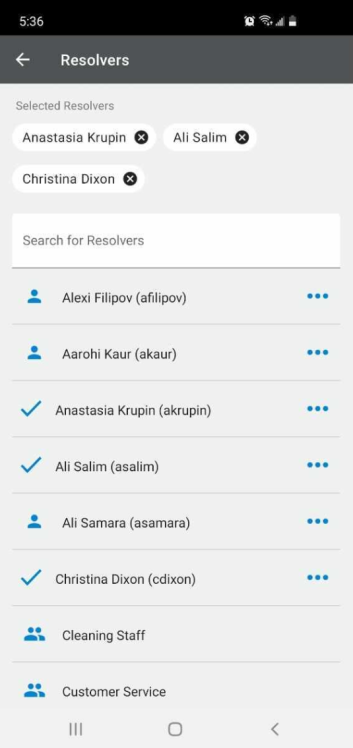
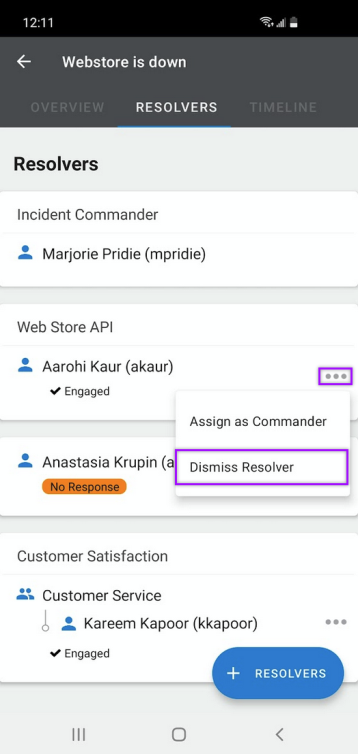
Manage resolvers
The Resolvers tab of an incident displays who's engaged in the incident and their role in the resolution process. As an incident progresses, you can add additional resolvers, renotify users or teams that haven't responded, and dismiss resolvers when you no longer need them.
By default, the person who initiates an incident is assigned the Incident Commander role. If you need to hand off responsibility of the incident, you can reassign another engaged resolver as the Incident Commander. You can't currently assign or edit other incident roles from the mobile app.
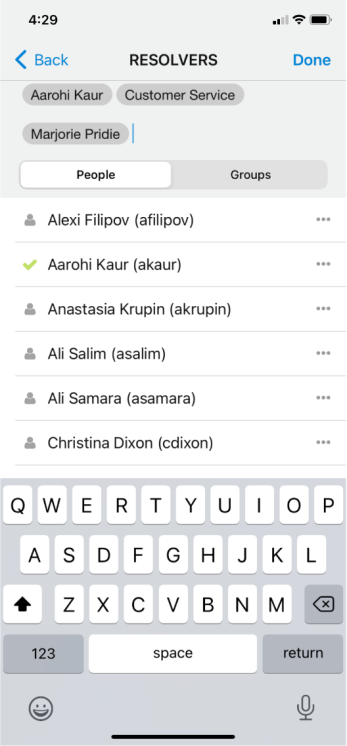
Add resolvers
You can add resolvers to an incident by sending them a notification requesting they engage, or by adding them directly to the Resolvers list without sending them a notification. Adding resolvers directly is useful when someone is already working an incident and you want to add them to the Resolvers list without making them stop to acknowledge a message.
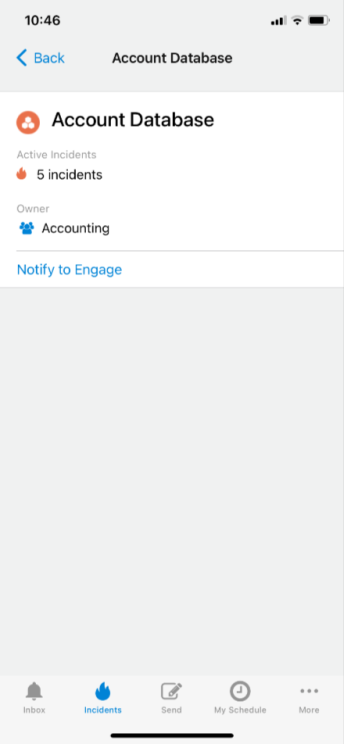
If the incident has impacted services, you can also notify a service to engage as a resolver and a notification will be sent to the group that owns the service.
When you notify a resolver to engage, the Resolvers list displays their name and the status of the notification process: whether xMatters is 'Notifying' them or if there was 'No Response'. Resolvers who accept the request to engage (or those that were directly added as engaged) are marked as 'Engaged' in the incident.
To add additional resolvers:
- On the Resolvers tab of an incident, tap Add Resolver on iOS, or + Resolver on Android.
- Select one of the following options:
- Notify to Engage: Send a notification to users or groups requesting they engage.
- Add as Engaged: Skip the notification process and display the resolver as engaged in the incident.
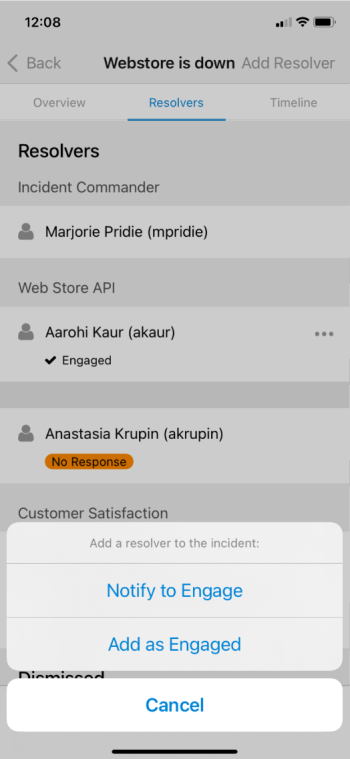
- Select the resolvers you want to add.
- Tap Done on iOS, or the back arrow on Android.
To add impacted service owners as resolvers:
Do one of the following:
- Search for the name of the service when you're adding resolvers from the Resolvers tab, and either add the service directly or the group that owns the service.
- In the Impacted Services section on the Overview tab, tap the name of an impacted service to view its details screen, and then tap Notify to Engage.
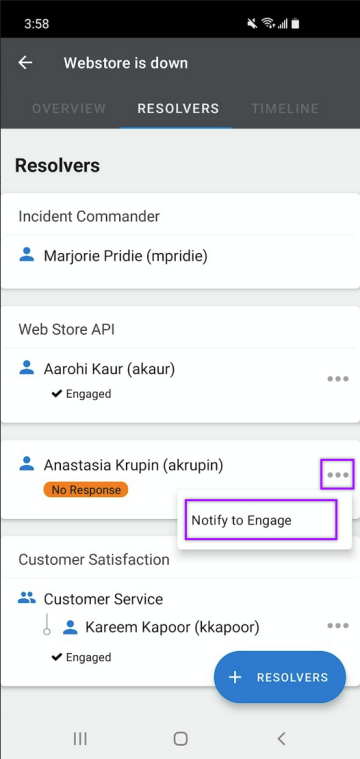
Renotify resolvers to engage
If a resolver hasn't responded to a notification, or you previously stopped notifications to them (in the web user interface), you can notify them again.
To renotify a resolver to engage:
Tap the options menu (the ellipses icon) for the resolver you want to renotify, and then tap Notify to Engage.

Dismiss resolvers
You can dismiss resolvers from an incident. This is helpful for indicating which resolvers are no longer needed to actively engage in resolving the incident, and for keeping an accurate record of when and how long each resolver was engaged.
To dismiss a resolver:
Tap the options menu (the ellipses icon) for the resolver you want to dismiss, and then tap Dismiss Resolver.
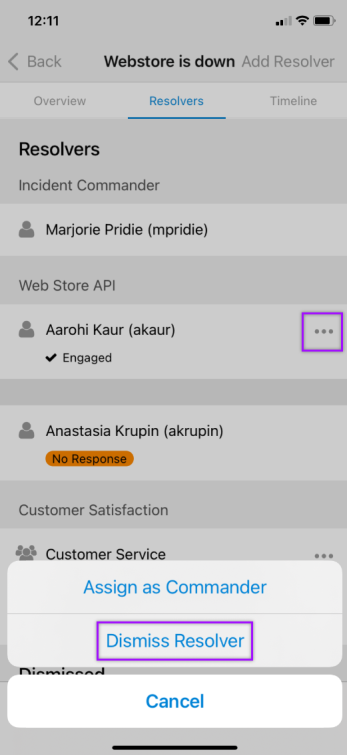
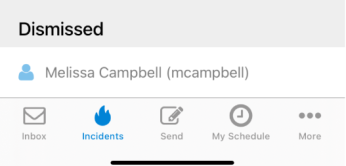
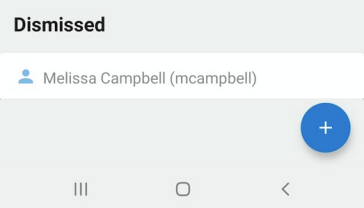
When you dismiss a resolver from an incident, they're listed in a Dismissed section at the bottom of the Resolvers list, and an entry is added to the timeline for their dismissal.
Reassign the Incident Commander role
The Incident Commander is the resolver in charge of the incident. It's their responsibility to guide the incident to resolution, oversee resolution activities, and make the final call on decisions related to the incident. By default, the user that initiates the incident is assigned as the Incident Commander. If you need to hand off responsibility of the incident during the resolution process, you can replace the current commander with any engaged resolver.
To reassign the Incident Commander role:
- Tap the options menu (the ellipses icon) for an engaged resolver, and then tap Assign as Commander.
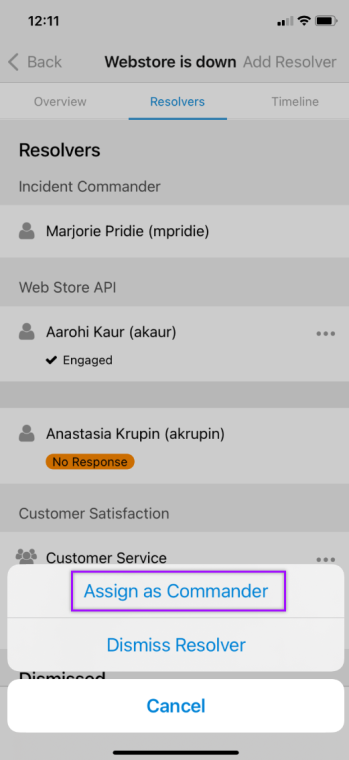
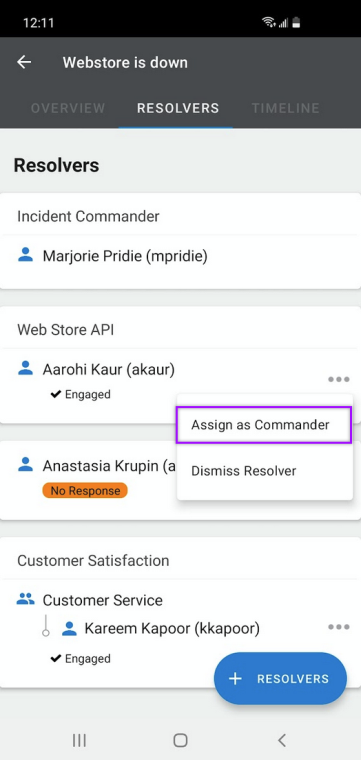
- In the confirmation dialog box, tap Confirm on iOS, or OK on Android.
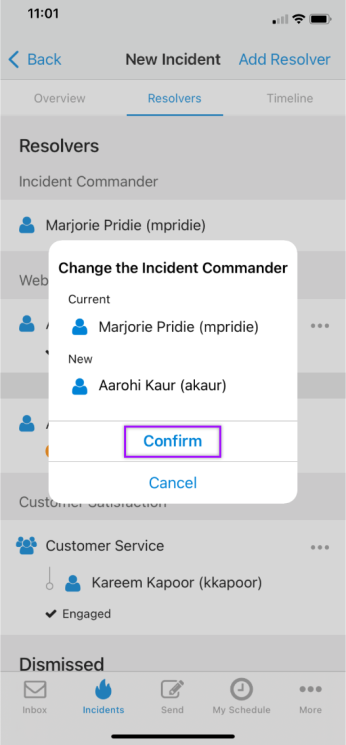
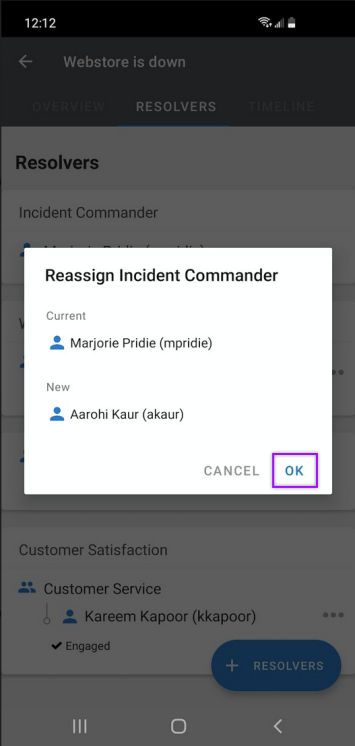
When you reassign the Incident Commander, the replaced resolver is added or returned to the list of resolvers. If the resolver was engaged as part of a group before they became the Incident Commander, they'll be listed under that group when they're returned to the list.
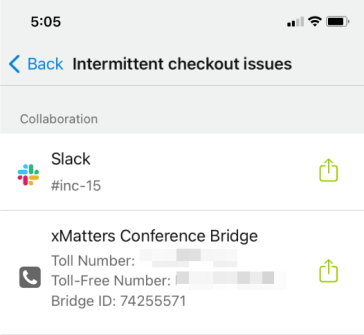
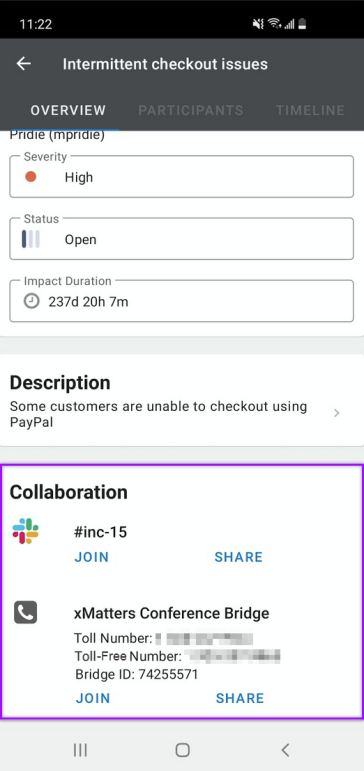
Collaborate across teams
The Collaboration field or section appears for an incident when there are chats, meeting rooms, or conference bridges associated with the incident. You can join a collaboration channel or share its details with someone else.
On iOS, the collaboration field indicates how many collaboration channels are associated with the incident:

Tap Collaboration to view details about the collaboration channels:
On Android, the Collaboration section appears on the Overview tab of the incident:
To join a chat channel:
iOS: Tap the name of the channel.
Android: Tap Join below the channel name.
To open the channel in the chat app, you need to have the associated app installed on your mobile device.
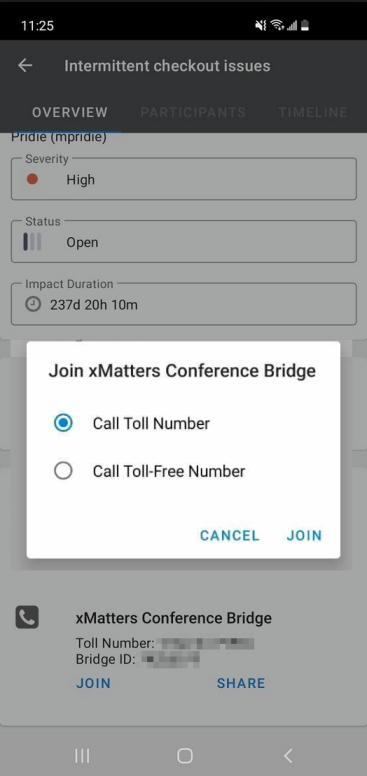
To join an xMatters conference bridge:
Tap the conference bridge on iOS, or Join on Android, to display options for dialing either the toll or toll-free number:
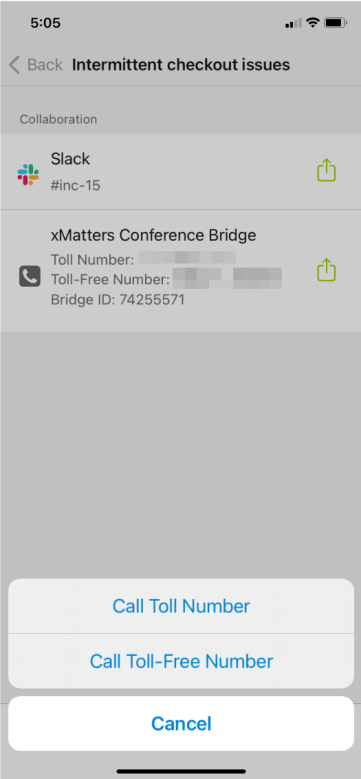
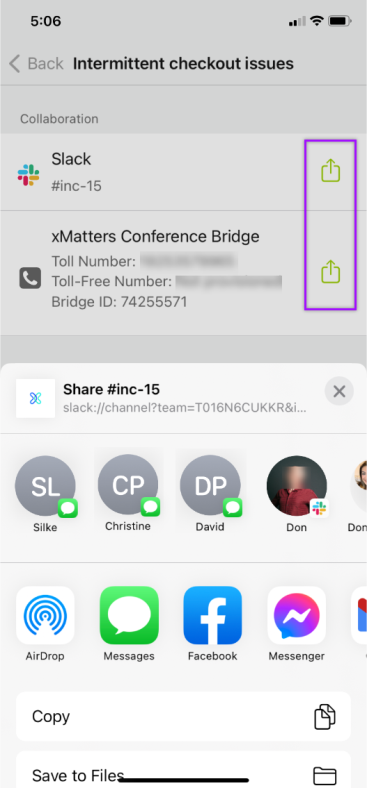
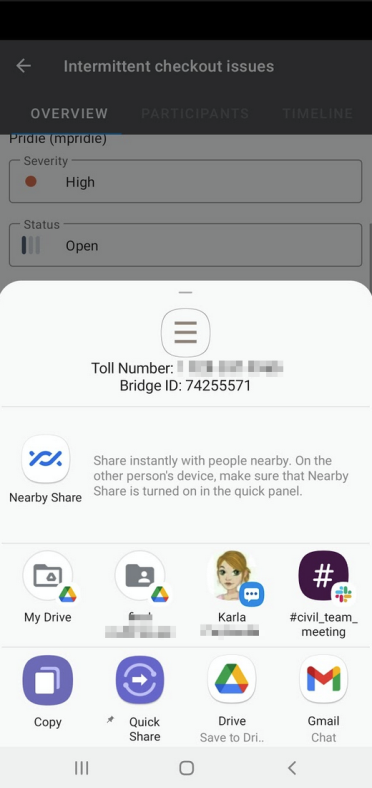
To share collaboration details:
Tap the share icon on iOS, or Share on Android, to share details of a collaboration channel with someone else using your device's sharing capabilities:
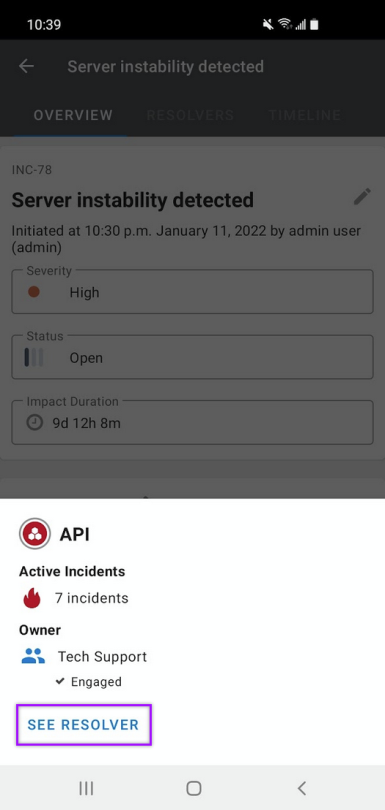
Identify impacted services
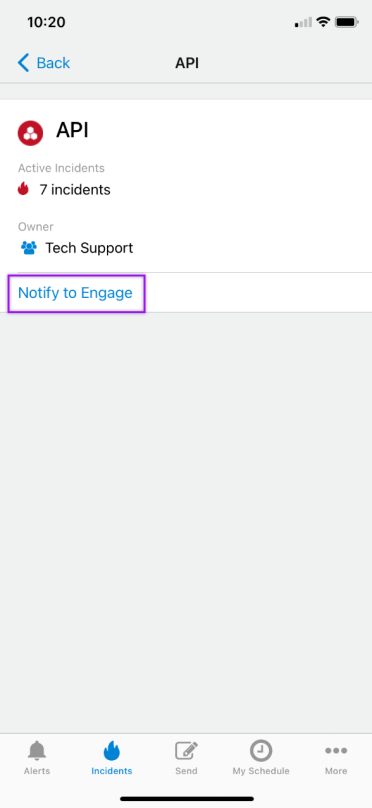
The Overview tab of an incident includes an Impacted Services section where you can identify which services are reported as affected by the incident.

The service's appearance conveys information about the service:
| Appearance | What does this mean? | |
|---|---|---|

|
Bold Outline | Owner was notified to engage |
|
Regular outline | Owner has not been notified to engage |
|
Dashed outline | Undefined service does not exist in the Service Catalog |
|
Grayed-out & struck-through | Deleted service |
Tap on a service to view more details about it, including its name, description, whether it's reported in any other active incidents, or to notify the group that owns the service to engage.
Notify impacted service owners to engage
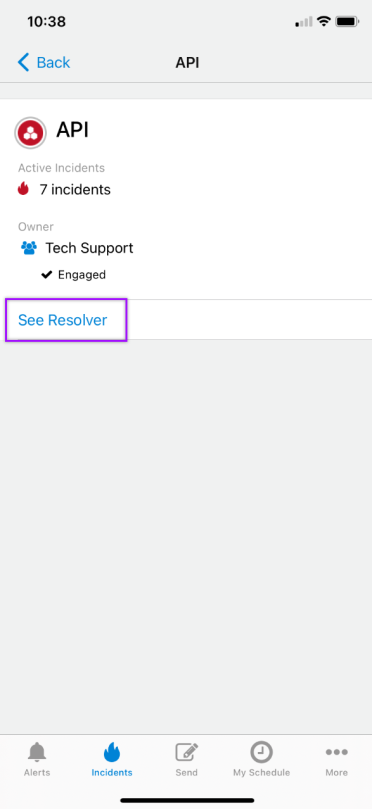
You can easily notify the group that owns a service to engage as an incident resolver by tapping Notify to Engage when viewing a service's details.
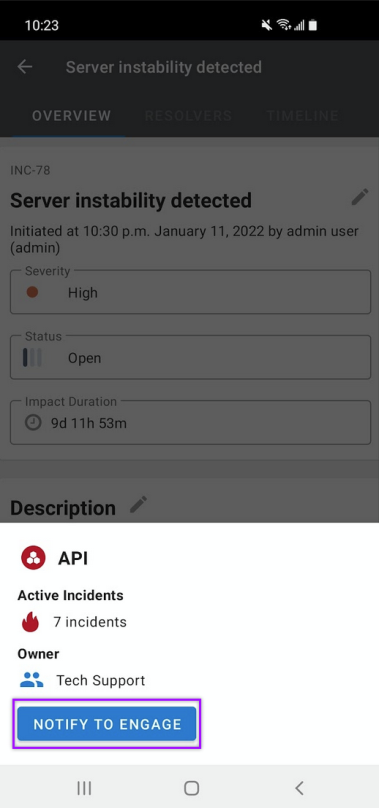
Once you've sent the request, tap See Resolver to view the service and its in the Resolvers list.
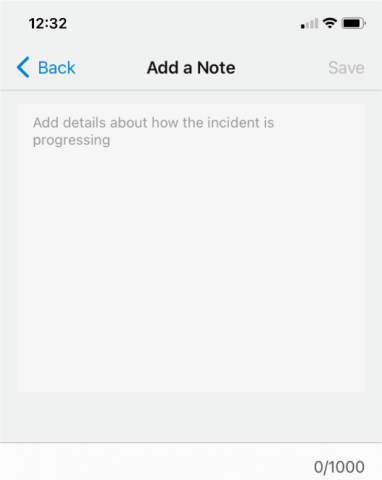
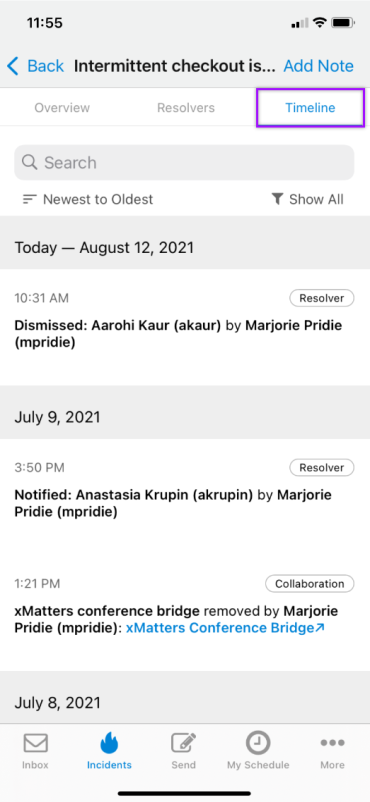
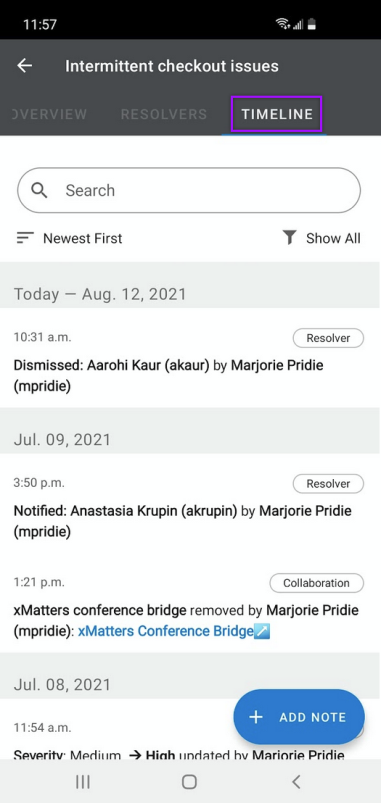
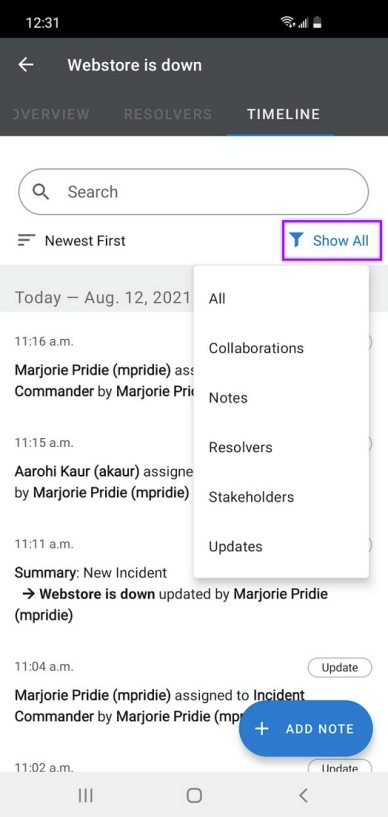
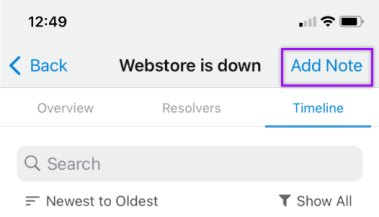
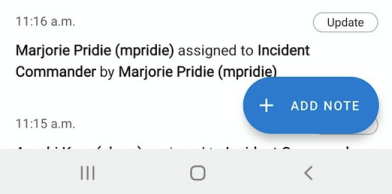
View and add notes to the timeline
The incident Timeline lets you keep track of everything that happened during the incident, by automatically recording incident activity in real-time and noting who made the change. Any resolver can manually add notes to the timeline with additional information about how the incident is progressing.
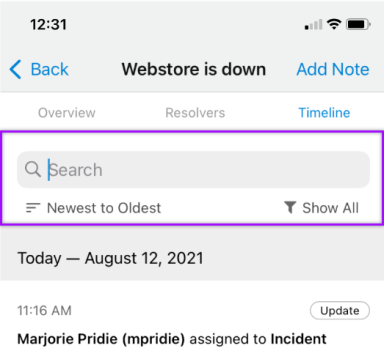
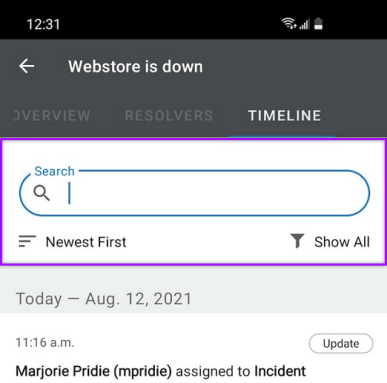
To view the timeline for an incident:
Tap the Timeline tab.
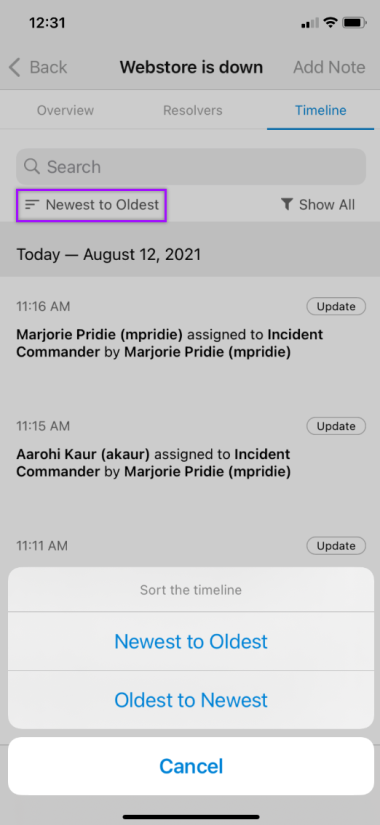
To sort the timeline:
Tap the sort option to arrange the timeline entries chronologically.
- iOS: 'Newest to Oldest' or 'Oldest to Newest'
- Android: 'Newest First' or 'Oldest First'
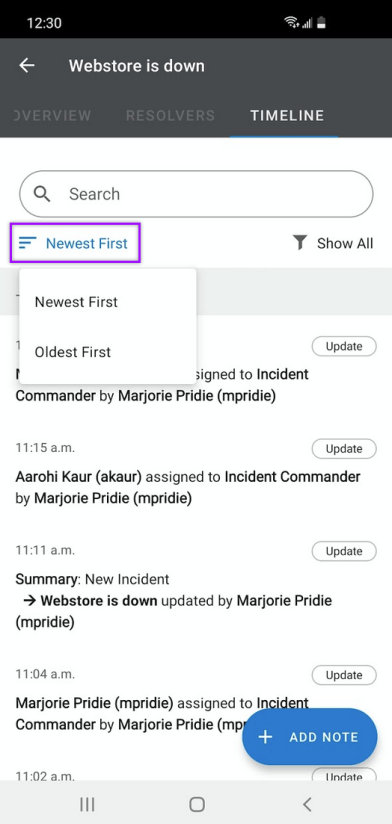
To search the timeline:
You can narrow the timeline entries by searching for a keyword in the name of a user or group, or the content of a note.
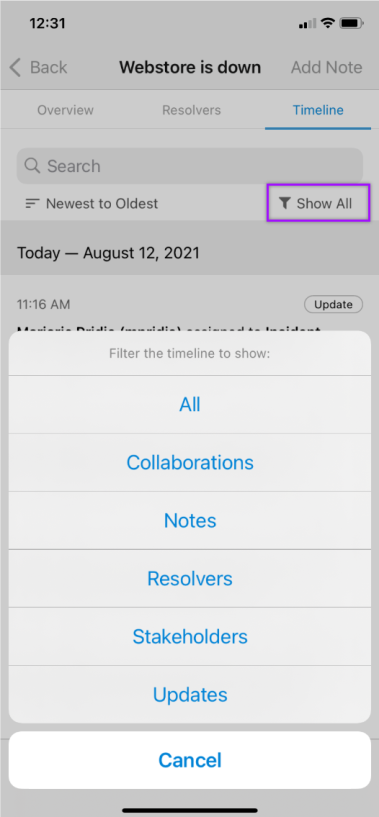
To filter the timeline by the type of entry:
Tap the filter drop-down menu to select the type of timeline entries you want to display.
To add a note to the timeline:
-
On the Timeline tab, tap Add Note on iOS, or + Add Note on Android.
-
In the Add a Note field, enter up to 1000 characters, then tap Save.