Status page details
A status page can be used a single source of truth for updates on a customized selection of services and related incidents geared towards a subset of stakeholders in your organization. For example, you can create a status page dedicated to technical leadership to see high-level incident and service status updates. At a glance, they can find out if any critical system infrastructure is not operational and make the decision to allocate more resource. A separate status page can provide updates on client-facing applications that support teams can use to communicate with customers.
Once you add a status page from the main Status Pages list, create a bigger picture on what may be affecting the health of the system by modifying its details and adding services and active incidents to display on the status page.
Status page details

You cannot change the visibility of a status page after you create it.
A status page can have Internal or Public visibility. Public status pages are available to organizations with an Advanced plan.
- Internal visibility: Only users with xMatters accounts can access the status page.
- Public visibility: Anyone with the page link can access the status page unless you configure email verification to restrict user access.
- A public status page is identified by the Public label beside its name.

Hover over the Public label for more info about the status page's user access restrictions.
To edit internal status pages:
Click the name or description at the top of a status page to modify them.

To edit public status pages:
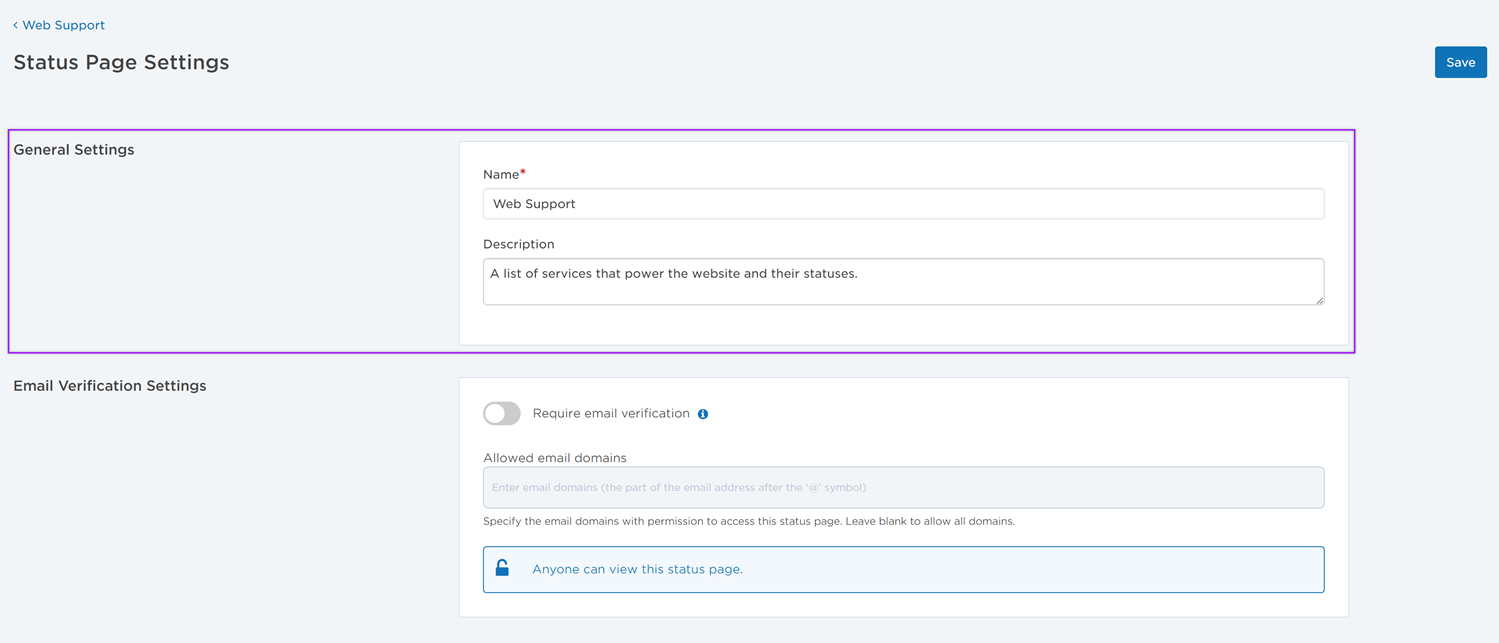
Click the Settings button at the top of a status page.

Under General Settings, you can update the page's name and description.
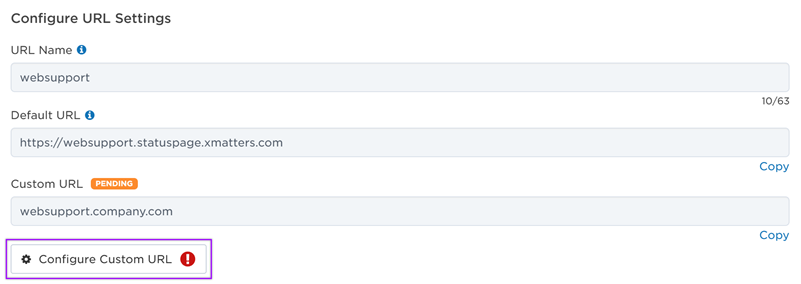
You can view status page's URL name and default URL under the URL Settings section of the settings page.

The status page's URL name is included in the page's default URL, which links to the status page's read-only display. The URL name was provided when the status page was created and cannot be changed.
The default URL of a public status page is generated with the following format: [url name].statuspage.xmatters.com. This link cannot be modified, but you can add a custom URL if you want a link that is more specific to your organization. You can use both default and custom URLs to open the status page.
If your status page is public, you can configure a custom URL with your organization's domain. You can use both the default URL and the custom URL to open the status page's read-only display.
To add a custom URL for users to access a public status page:
- Click the Settings button at the top of a status page.
- On the Status Page Settings page, go to the URL Settings section.
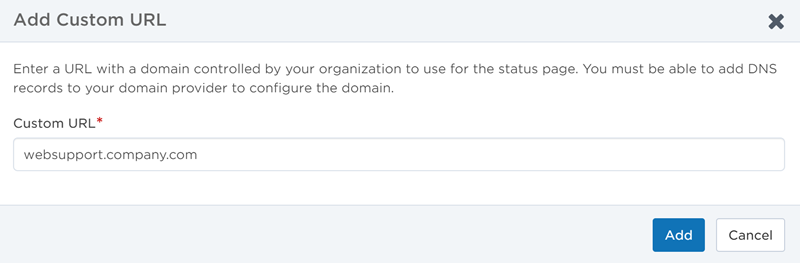
- Click on Add Custom URL.
- Type the custom URL you want as the status page's link then click Add.
- You cannot change the custom URL after this step, so double-check for any typos or other errors.
- Copy the DNS records on the Configure Custom URL dialog and add them to your domain provider to connect the custom URL to the status page.
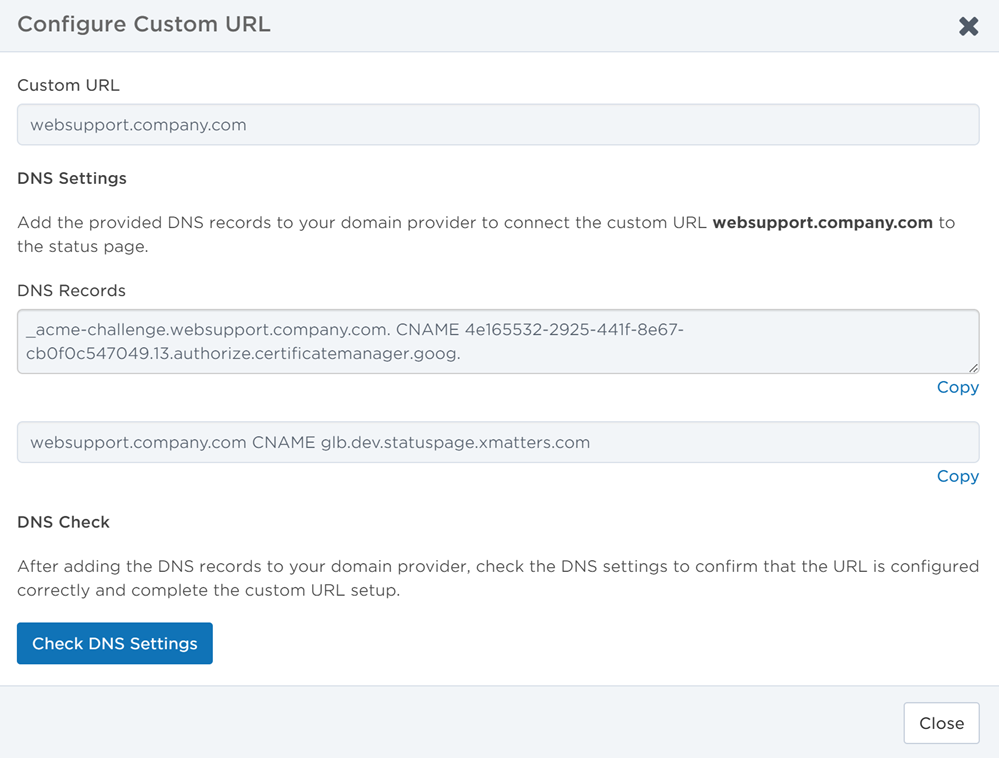
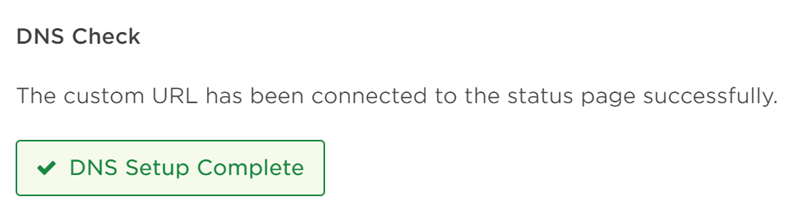
- Once you update the DNS settings on your domain provider, click the Check DNS Settings button at the bottom of the Configure Custom URL dialog. If the check is successful, then the setup is complete and users can now access the status page with the custom URL.
- If there are any issues with your domain provider's DNS settings, you can troubleshoot then go back to the Configure Custom URL dialog from the settings page to perform the check again.
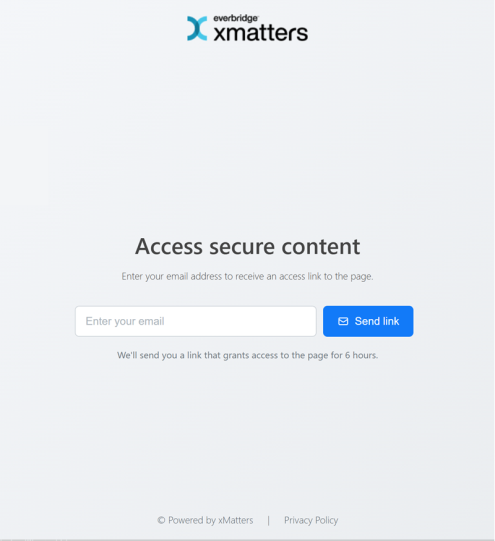
If your status page is public, the read-only display is accessible to anyone with the page link. However, you can choose to enable email verification and restrict email addresses to allowed domains to limit the number of users who can access the status page.
To enable email verification for a public status page:
- Click the Settings button at the top of a status page.
- On the Status Page Settings page, go to the Email Verification Settings section.
- Toggle on Require email verification. Users must now validate their email addresses before they can access the page, and the email addresses must be verified at one of the allowed domains listed.

Once you configure the Require email verification option, users who open the status page URL will be taken to an access request page where they must enter an email address with one of the allowed domains. If their email is validated, they will be sent a link that grants access to the status page for six hours. Once the link expires, they must request access again.
To view the read-only status page display , click the URL at the top of the details page. You can also retrieve the link from the main Status Pages list or share a custom URL if you configured one for the status page.

The read-only display is a user-friendly view of the status page that incident resolvers and other stakeholders can easily reference to know the status of incidents and services relevant to them. Through the use of recognizable iconography, color, and text, the read-only display is designed for users to easily identify the severity of the problem and immediately work on mitigation and resolution.
Users viewing the read-only display can subscribe to status page updates.
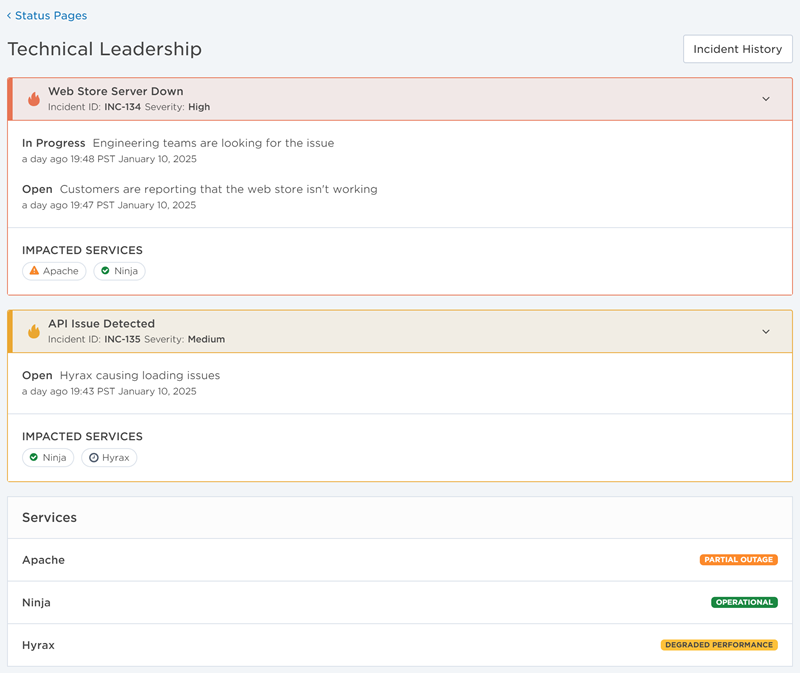
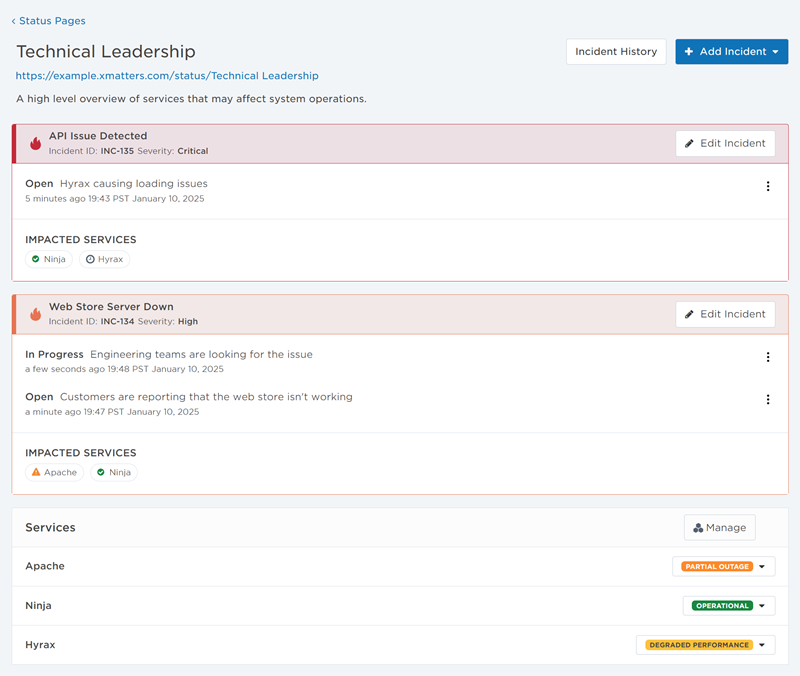
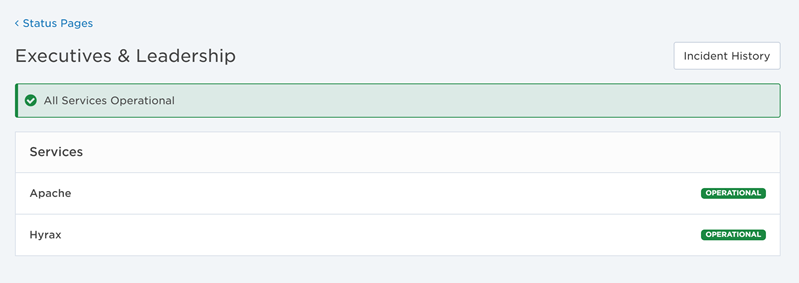
As a stakeholder, you can find out at a glance if your system operations are at full health when you see a green banner displayed at the top of the page stating All Services Operational. The banner appears when there are no active (Open, In Progress, or Mitigated) incidents on the status page and all its services have the Operational status.
To subscribe to status page updates, you must be on the read-only status page display view.
To subscribe to the status page and receive notifications whenever incidents on this status page are updated, click Subscribe to Updates on the read-only status page view. Notifications are sent to your active devices using your configured device availability. You can view your status page subscription on the Subscriptions tab of your user profile or on the main Subscriptions page direct from the side navigation menu.

To unsubscribe from the status page and stop receive notifications whenever incidents on this status page are updated, click Unsubscribe from Updates on the read-only status page view. The status page will be removed from the Subscriptions tab of your user profile.

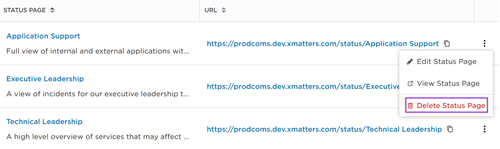
To delete a status page, find it on the main Status Pages list and click its options menu (vertical ellipses icon) and select Delete.
Status page services
To add or remove services:
- In the Services section, click Manage.
- Do one of the following:
- Search: Search and select an existing Application-type service to add to the status page.
- If you don't see the service you need, you can add a new one from this dialog window.
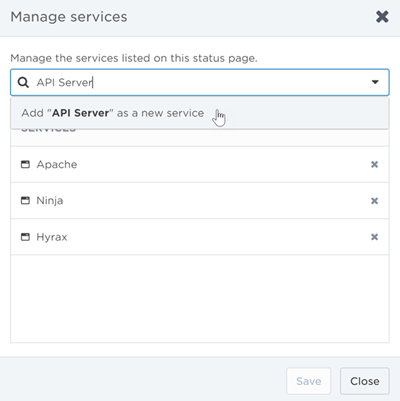
- Remove: Click the X next to the name of the service you want to remove from the status page. (This does not delete services from the Services Catalog.)
- Search: Search and select an existing Application-type service to add to the status page.
- Click Save.
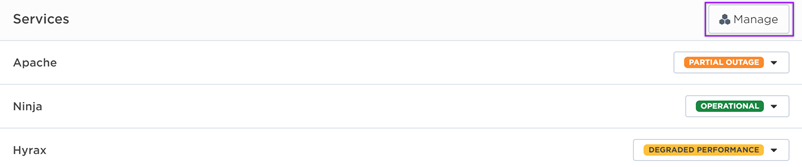
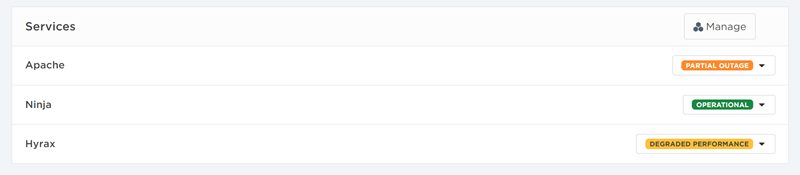
To update the status of a service:
- In the Services section, find the service and click its status.
- Select a different status from the drop-down menu. You can assign the following statuses to a service on the status page:
- Operational
- Under Maintenance
- Degraded Performance
- Partial Outage
- Major Outage
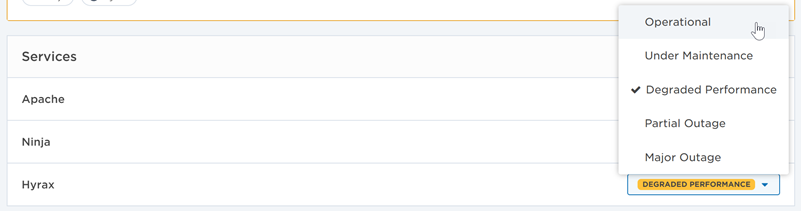
These statuses can be interpreted and assigned to services on a status page according to the best practices of your organization. The status of a service can differ between status pages.
Status page incidents
You can initiate a new incident or add an existing active incident to a status page.
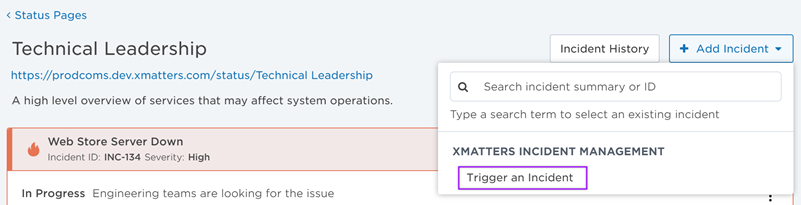
Initiate a new incident and add it to a status page
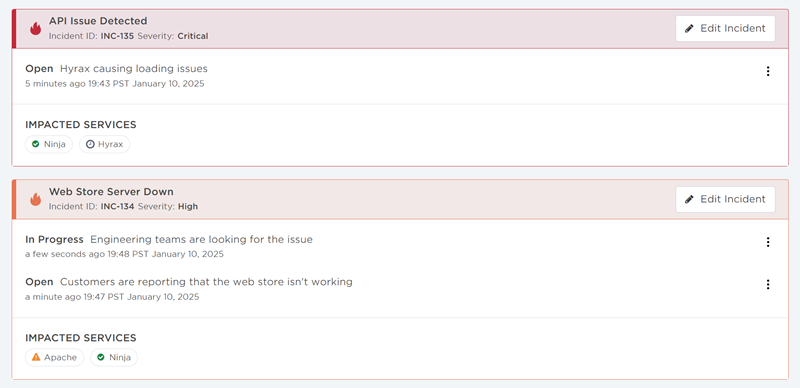
When you initiate a new incident on a status page, an xMatters incident is also created and displayed on the Incidents list and have its own Incident Console. The two incidents are linked together by a shared incident ID, but any updates made to one of the incidents do not affect the other incident.
- On top of the page, click Add Incident.
- From the drop-down menu, select Trigger an Incident.
- On the Trigger an Incident side panel, fill in the following fields:
- Summary: Short overview of the incident
- Severity: Severity level of the incident.
- Status and Status Message: Status of the incident and a short message that gives context to the selected status.
- Impacted Services: Services that are impacted by the incident. You can only select services that are already on the status page.
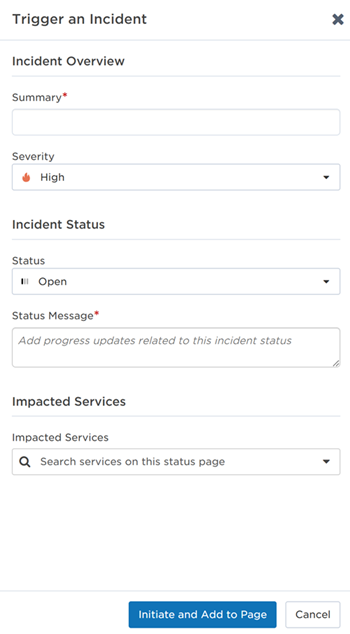
- Select the Notify Subscribers checkbox if you want to send a notification about the creation of this incident to status page subscribers.
- Click Initiate and Add to Page.
Add an existing active incident to a status page
When you add an existing incident to a status page, it is linked to the original xMatters incident with a shared incident ID. Any updates made to the status page incident do not affect the xMatters incident and vice versa.
- On top of the page, click Add Incident.
- Type the summary or ID of an existing active (Open, In Progress, or Mitigated) incident.
- On the side panel that appears, the fields are pre-filled with information from the existing incident. You can choose to modify them or leave them as is.
- If the existing incident has impacted services, only services already on the status page will be carried over.
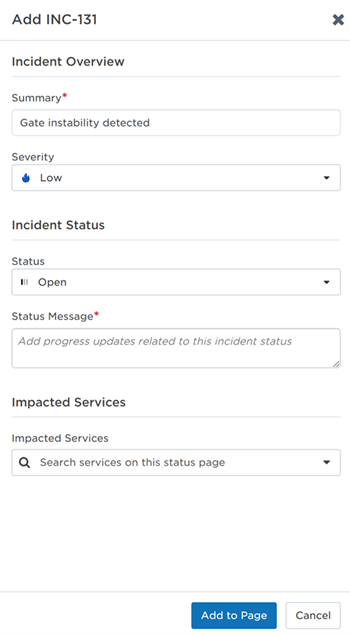
- Select the Notify Subscribers checkbox if you want to send a notification about adding this incident to the status page to subscribers.
- Click Add to Page.

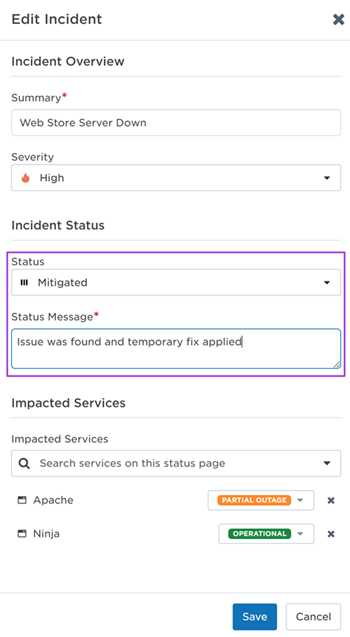
- Find the incident on the status page and click Edit Incident.
- Set or edit the incident's details as required.
- If you change the incident status, you must provide an accompanying message with a short progress update. This appears on the status page as an incident status update.
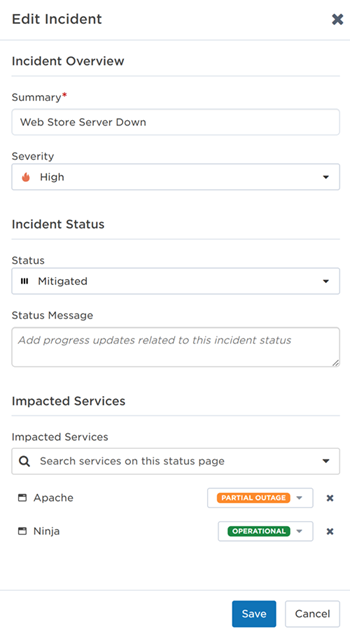
- Select the Notify Subscribers checkbox if you want to send a notification about the incident update to status page subscribers.
- Click Save.
- Find the incident on the status page and click the drop-down button beside Edit Incident.
- Select Remove Incident.
- Removing the incident from the status page will permanently delete its details and status updates from the system, but the linked xMatters incident will be unaffected.
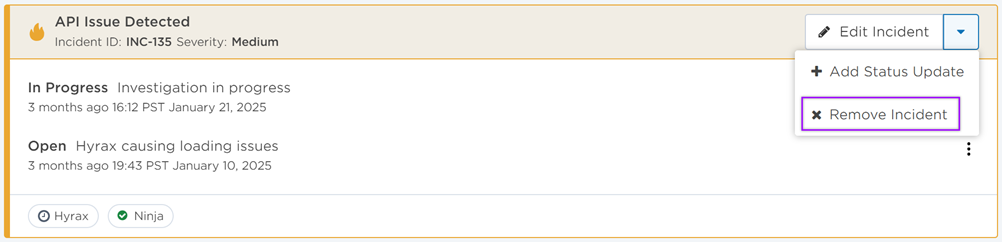
- On the confirmation dialog, click Remove.
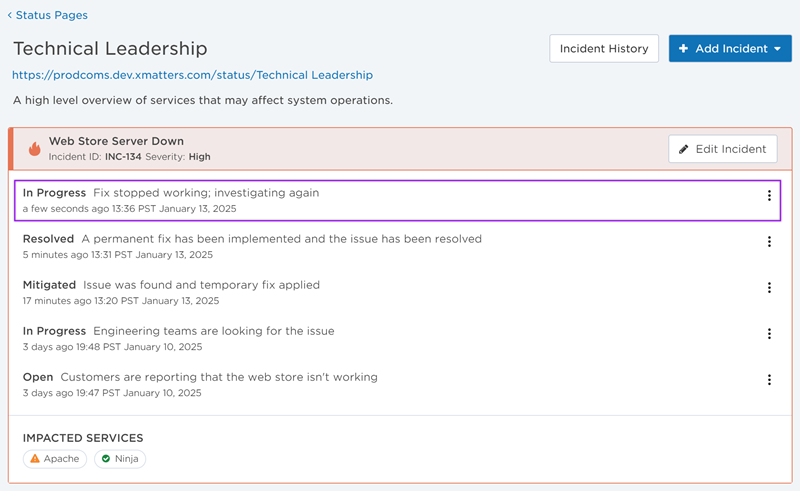
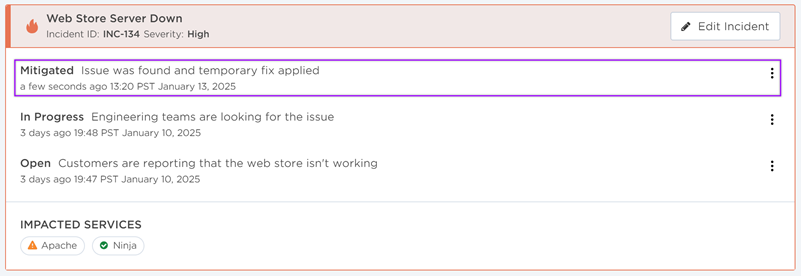
Incident status updates provide stakeholders with useful context on changes to an incident's status. For example, if you revert an incident from Mitigated status back to In Progress, you can provide a short update to explain the status rollback by including a status message saying: "Customers have reported that the web store is down."
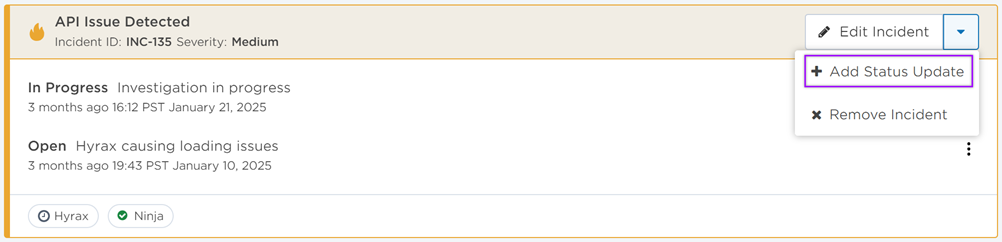
To add an incident status update:
Edit the incident and change the status on the side panel. Select the Notify Subscribers checkbox if you want to send a notification about the new status update to status page subscribers.
You can also click the drop-down button beside Edit Incident and select Add Status Update to open the side panel.
Once you save your changes, the new status and accompanying status message will appear at the top of the incident's status updates. Status updates are listed in chronological order from newest to oldest based on time updated.
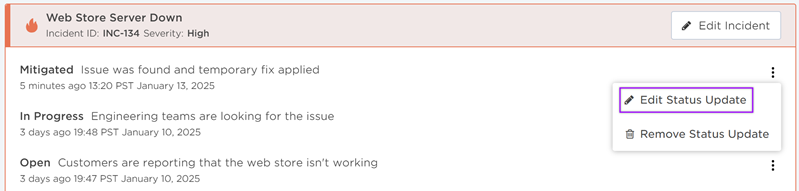
To edit an incident status update:
- Click the status update options menu (vertical ellipses icon) and select Edit Status Update.
- Modify the Incident Status, Timestamp, and Status Message as required.
- Status updates ordered from newest to oldest based on time updated, so the position of an edited status update may change if the timestamp is updated.
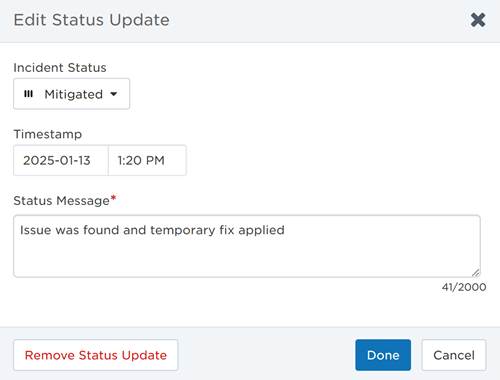
- Click Done.
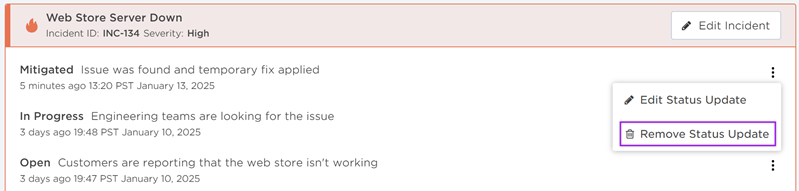
To remove a incident status update:
- Click the status update options menu (vertical ellipses icon) and select Remove Status Update
- You can also remove a status update from the Edit Status Update modal.
- If you remove the latest status update, the incident status will revert back to the status selected in the previous update.
- If the incident only has one status update, you cannot remove it.
- On the Remove Status Update dialog, click Delete.
Once an incident's status has been updated to Resolved or Rejected, it is moved to the Incident History page.
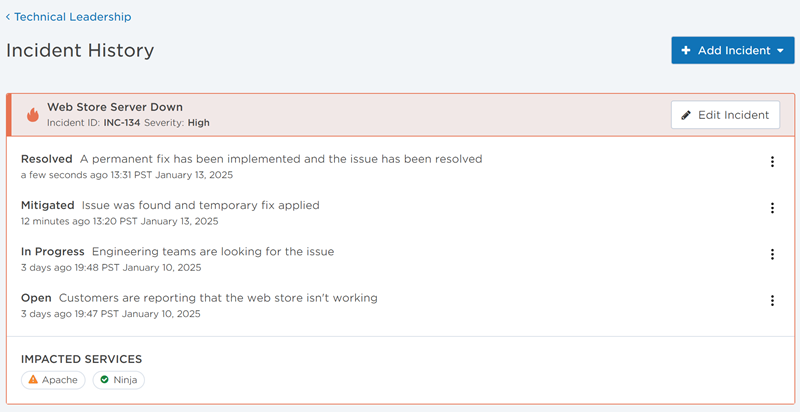
To view resolved or rejected incidents, click Incident History at the top of the status page.

From the Incident History page, you can still edit an incident and change its status. If you change the incident status back to active (Open, In Progress, or Mitigated), the incident will be moved back to the main status page.