Create message content for email and app notifications
The Email / App message editor allows you to create content for email and mobile app notifications that are sent when the associated form is initiated. It includes a WYSIWYG editor with inline editing and formatting features that will be familiar to most users.
You can include form properties in the subject and body of the message. When a notification is delivered, these fields are replaced with the form values specified by the message sender.
- On the Forms tab, click Edit > Messages.
- Click the Edit button beside Email / Fax / Push Message to open the Email / Fax / Push Message editor.
- If you have multiple languages defined in your deployment, select the language you want to edit at the top of the message editor.
- Add content to the Subject field, including form properties. For more information on creating a useful subject, see Specify a message subject.
- Add content to the message body. For more information about including properties in message content, see Working with properties in message content.
- If you make a mistake, use Undo to step back or Redo to step forward.
- Optionally, add response options to the message body. You can add response options anywhere in your message by including the Responses property in your message content.
- Add images to the message body. For more information about inserting images into email messages, see Include images in email content.
- Format the message using the available options in the inline editor, or click Code View to format the underlying HTML. For formatting tips, see Formatting Messages.
- Click Save.
- To preview your message, click View Form, and then click Preview Message. You may also want to test your message by sending a notification to yourself.
If your system has more than one language defined, remember to specify the message content for each language. For information on how xMatters determines which language to present to a user, see Multi-language capabilities.
Best practices for creating Email / App message content
The following sections describe some tips and best practices for creating useful messages.
To best understand how to create a helpful message subject, it's important to know how this value is displayed in email messages, on the xMatters mobile app, and the xMatters web user interface. This enables you to create a summary of important information that quickly provides recipients with the information they need.
The text you provide in the subject field is used in the following places:
- Email message subject line
- Mobile app push notifications
- Alert names in the Communication Center, All Alerts and Recent Alerts reports. In addition to the message subject, these components display the name of the form (or canvas, for formless alerts) that was used to send the notification. (See the Alerts report for more information.)
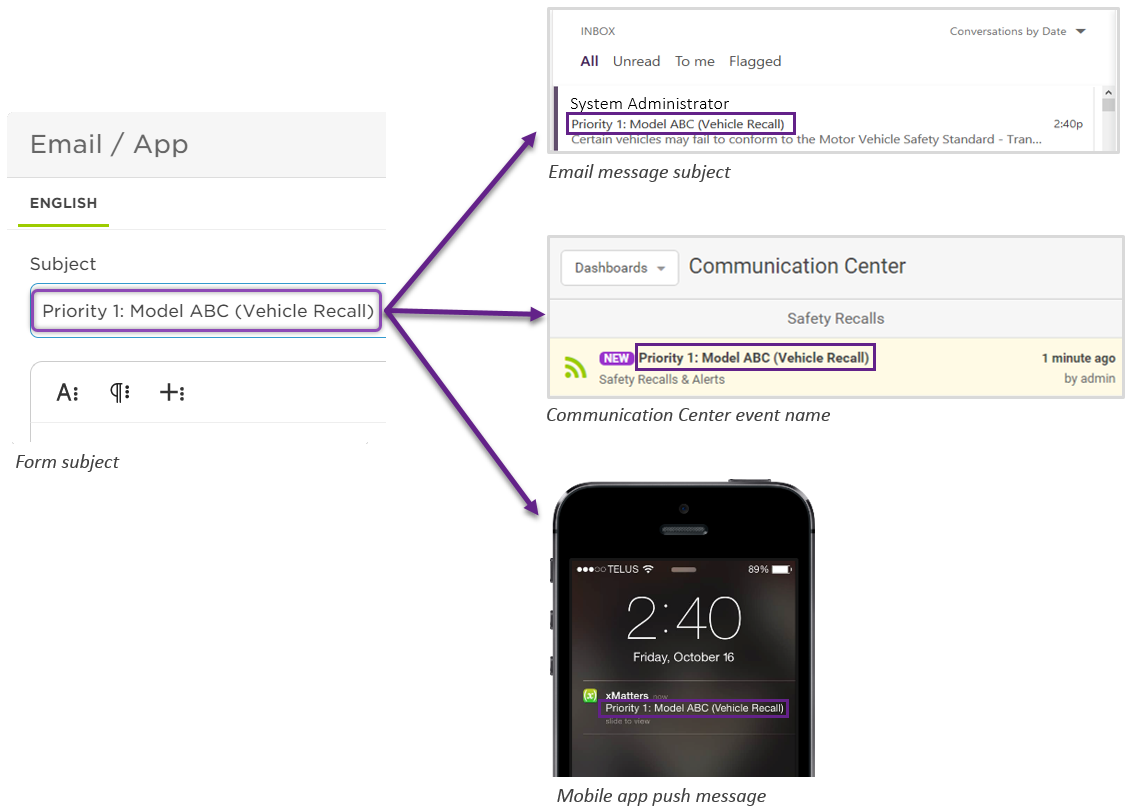
Tips for specifying a message subject
It's a good practice to include dynamic information like severity, priority, hostname, or alert type near the beginning of the message subject. This allows someone monitoring incoming alerts in the Communication Center or mobile app to quickly scan through and identify high-priority issues without having to drill into the details of each alert.
The following examples compare identical product safety recall messages that have been labeled in two different ways:

The subject lines on the left include the recall category and product information at the beginning of the message. On the right, the same alerts include the severity of the recall at the beginning of the subject, which makes it easier to understand which notifications require attention.
The form name can be used to provide additional context for alerts with dynamic subject names:
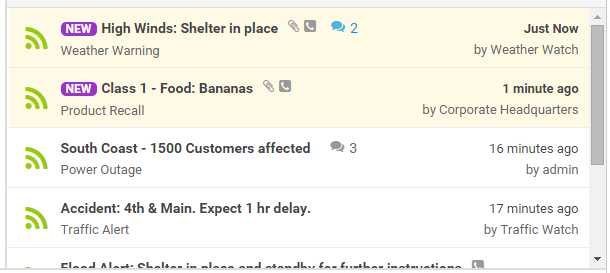
If an Alerts widget is less than a certain width, its form name is not visible. See Customize widgets and dashboards for more information about adding, naming, resizing, and configuring alerts widgets to monitor the status of alerts in your system.
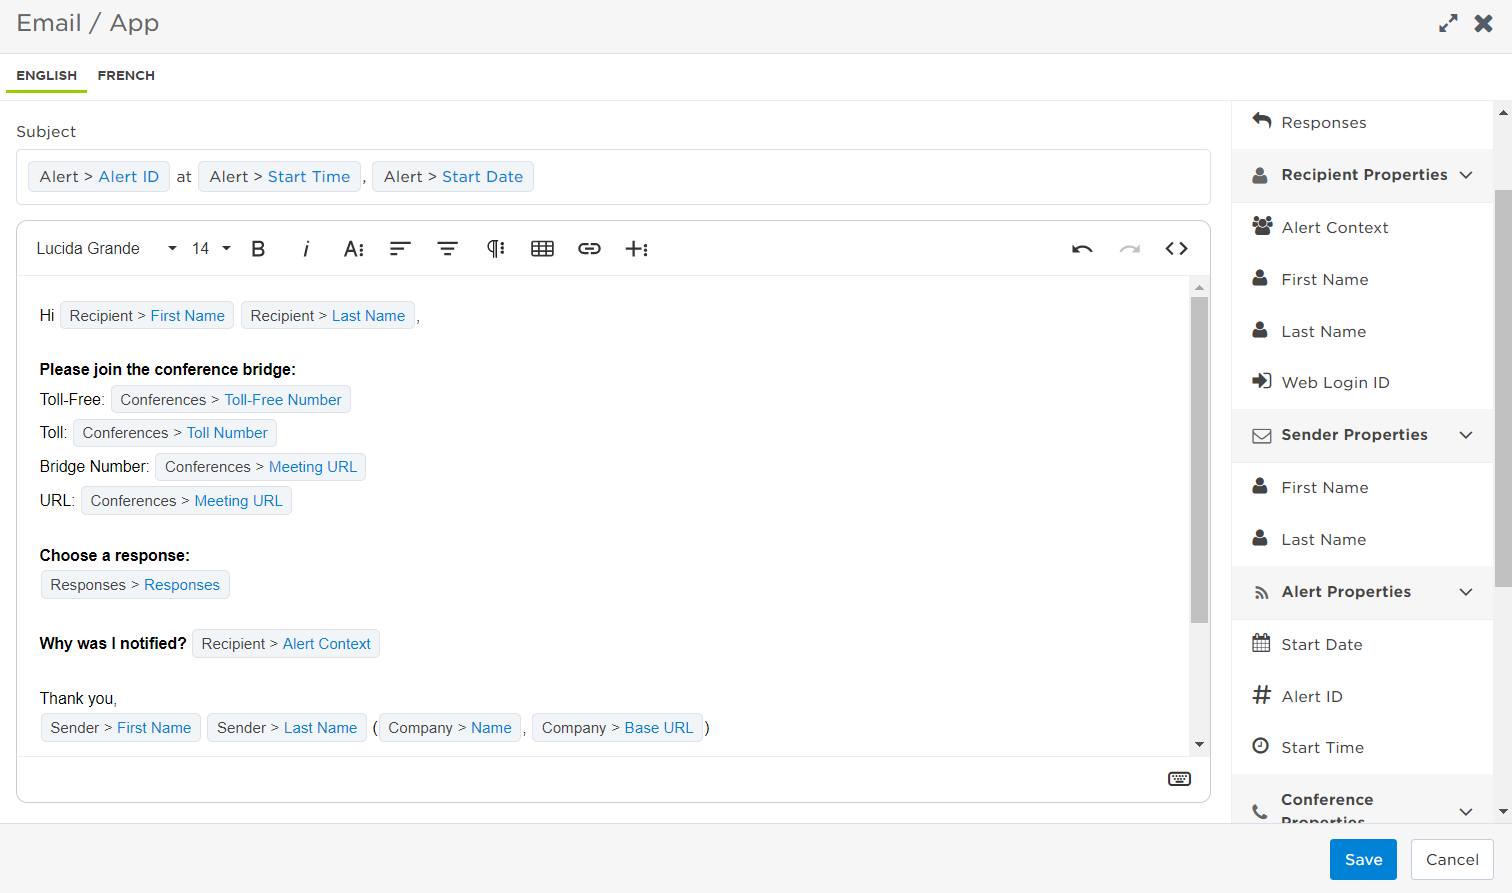
You can customize the message by dragging properties or variables from the sidebar onto the message canvas. If you don't see the one you need, type a name in the search bar to find it in the list. The value inserted into the message is based on the information specified when creating the alert.
You can add recipient, sender, alert, responses, and company properties to a message in both content and code view. If you're using a messaging form to create your alert, you can also add form properties and conference properties if the form layout includes a conference bridge section. If you're using the Create Alert step for formless alerting in a flow, you can also add flow variables. For more information on using properties and variables to customize notifications see Personalize notifications.
For example, assume that you have added a number property named Data Center Number into your message so in the editor your message reads: "Power failure at Data Center Data Center Number". If the message sender specifies a Data Center Number value of 4, the message sent to recipients would read: "Power failure at Data Center 4".
If you're using a messaging form, only properties that have been added to the form layout are available in the sidebar of the message editor. To use recipient or sender properties, you must have the appropriate permission settings. Ask your company supervisor for access, or contact Support.
You can insert images into the body of your email message by either uploading images to the image library, or by providing an image URL.
A total of 60 images can be uploaded per company (with a maximum file size of less than 1 MB per image). Supported images types for upload are .jpg, .jpeg, .gif, and .png files. Once uploaded, images are available for use in all forms for your company.
For banner images at the top of email messages, a width of 640 pixels is recommended for best results across a variety of screen resolutions.
To upload an image to xMatters:
- On the Email / App message editor, click Insert Image (the picture icon).
- In the Image Library, drag and drop image files into the Insert Image box, or click browse to select one to select an image from your computer's file directory.
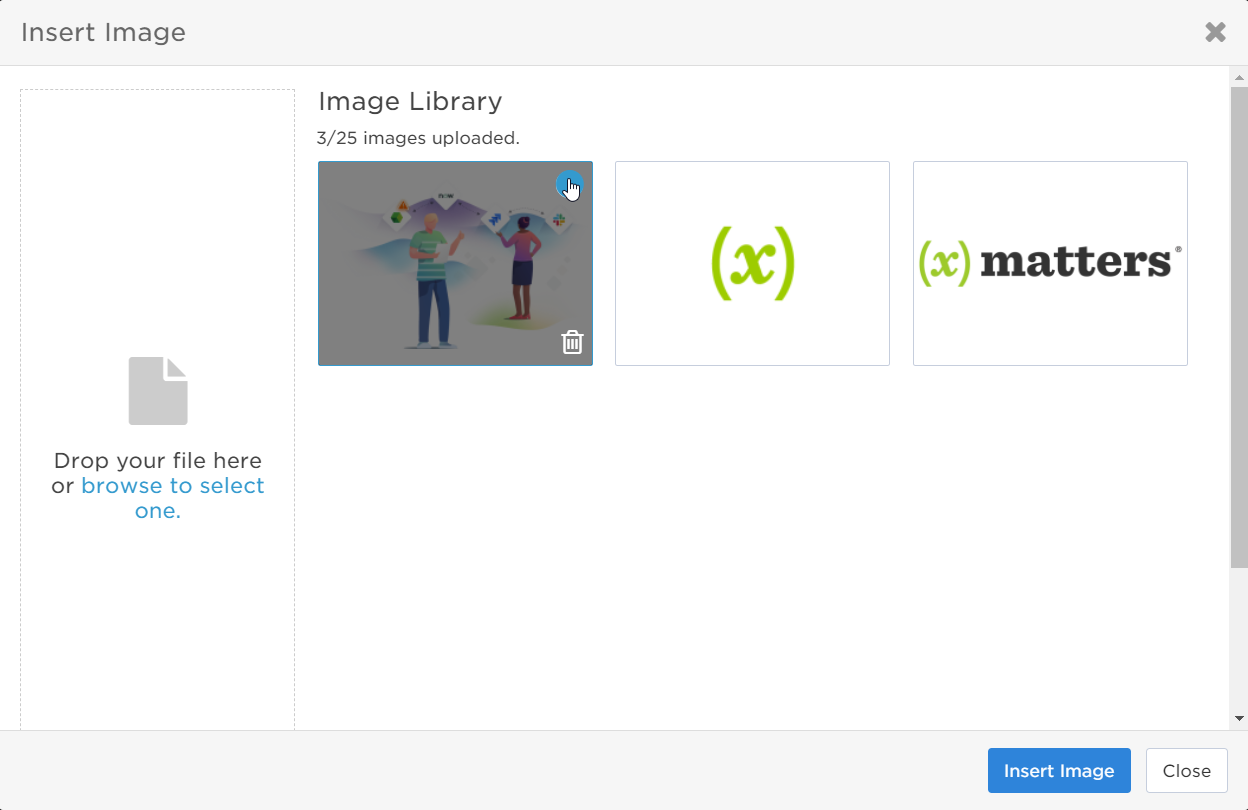
- Click the image to select it, and then click Insert Image.
- You can use the message editor to delete the image from the body of your message.
- To delete the image from the Image Library, move the pointer over the image you want to delete, and then click the trash can icon.
To insert an image from the web:
- On the Email / App Message editor, click Insert Image (the picture icon).
- On the Web Address (URL) tab, type in the web address for the image and click Insert.
- You can use the message editor to delete the image from the body of your message.
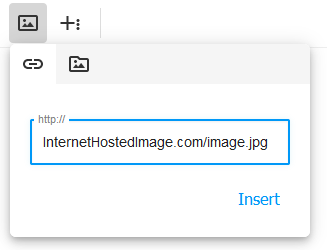
If you delete an image from the library that is used in other forms, or an image is unavailable, some messages may display broken or missing image icons.
To ensure optimal system performance, we recommend keeping your message body length under 20,000 characters (this includes any code formatting). If your message exceeds 20,000 characters, any HTML comments will be automatically removed when you switch from code to regular view.
Best practices for formatting Email / App messages
Using the options included in the message editor, you can quickly create content that fits most situations. However, in some cases you may want to use more advanced formatting techniques, such as when you want to align the look and feel of your messages to match your corporate style guidelines, or when you want to use tables to created advanced email layouts. In this case, you can directly edit the HTML source and apply Cascading Style Sheet (CSS) formatting to your messages.
The Email / App message editor uses standard buttons and keyboard shortcuts for common formatting tasks, such as changing the color and size of text, aligning components, and inserting lists, images, hyperlinks, and tables. If you are not sure what a formatting button does, move the pointer over the button to display its tooltip.
You can apply formatting to property placeholders but you cannot apply formatting to the message subject.

You can apply advanced formatting to your message content directly in code view. This enables you to reuse content available from other sources. It also allows you to remove the borders and background colors from tables so you can use them to define the layout of your message.
xMatters messages contain embedded default styles. You may want to manually override these styles to change the look and feel of your message. To view the default styles that are active on your system, send yourself an email notification and view the email message source. The default styles for your system are included between the <style> and </style> tags. You can then apply different styles directly to HTML elements.
It is not recommended to add an inline <style> tag to the email message code view. This causes a second <style> section to be added to your email message. Email programs do not have a standard way of formatting messages with duplicate <style> sections, and your message may look different in different email programs.
To use custom CSS to format your message:
- On the Email / App message editor, click Code View.
- From this view, you can edit the HTML to add custom styling. For more information about styling HTML, consult one of the many available resources online.
Example 1: Change hyperlink colors
The following text shows how to format a hyperlink to use green text:
<a href="http://www.xmatters.com/" style="color: green;">xMatters Home</a>
Example 2: Remove table lines
The following text shows how to remove the default xMatters table styling. This allows you to use tables to structure the layout of your message.
<table style="border:hidden;">
<tr>
<th style="border:hidden; background:none">Heading 1</th>
<th style="border:hidden; background:none">Heading 2</th>
<th style="border:hidden; background:none">Heading 3</th>
</tr>
<tr>
<td style="border:hidden;">Cell 1</td>
<td style="border:hidden;">Cell 2</td>
<td style="border:hidden;">Cell 3</td>
</tr>
<tr>
<td style="border:hidden;">Cell 4</td>
<td style="border:hidden;">Cell 5</td>
<td style="border:hidden;">Cell 6</td>
>
</table>
Example 3: Format the appearance of response options
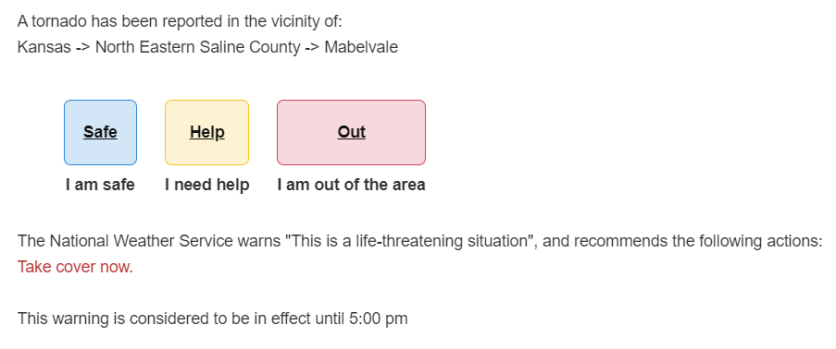
The following text shows an example of how you can change the appearance of response options inserted into email message content using the Responses property:
<style>
.first-responses .xm-response-option {
display: inline-block;
margin: 12px;
text-align: center;
}
.first-responses .xm-response-option > a {
display: block;
margin-bottom: 6px;
padding: 16px;
border-radius: 6px;
color: #111;
}
.first-responses .xm-response-option-description-separator {
display: none;
}
.first-responses .xm-response-option-1 a {
background: #D3E6F7;
border: 1px solid #2C88D9;
}
.first-responses .xm-response-option-2 a {
background: #FDF2D1;
border: 1px solid #F7C325;
}
.first-responses .xm-response-option-3 a {
background: #F6D8DD;
border: 1px solid #D3455B;
}
</style>
<br>
A tornado has been reported in the vicinity of:
<br>Kansas -> North Eastern Saline County -> Mabelvale
<br>
<div class="first-responses">${other.responseOptions}</div>The National Weather Service warns "This is a life-threatening situation", and recommends the following actions:
<br><span style="color: rgb(184, 49, 47);">Take cover now.</span>
<br>
<br>This warning is considered to be in effect until 5:00 pm
If you usually use a word processor to create and format your messages, you can copy and paste content into the message editor. xMatters automatically detects and removes unnecessary program-specific HTML code from your message to reduce character count and improve system performance when you send the message.
As formatting may be inconsistent between word processors and the message editor, we recommend using the Email/App message editor to format your messages.
When including special characters in your messages, we recommend using the UTF-8 code instead of CSS and HTML escape sequences. For example, for the paperclip character, use 0x1F4CE instead of \1F4CE. Alternatively, you can paste the special character directly into the message editor.