Schedule on-call shifts
The on-call shift schedule defines when shifts are active and able to receive notifications. Use different series to represent your team's real-world shift schedule and to create on-call coverage during off-duty hours.
If your on-call group is configured to use site holidays, you can create shift occurrences that only happen on holidays. For more information about creating a holiday shift occurrence, see Schedule holiday shifts.
Once you have created a shift series, you may want to configure the series to use escalations and rotations. These allow the first shift members time to respond to a notification before the remaining shift members are notified, thereby reducing the overall number of notifications sent to the on-call group. For more information about configuring the escalation timeline, see Escalate alerts within a shift. For more information about defining shift rotations, see Rotate positions within a shift.
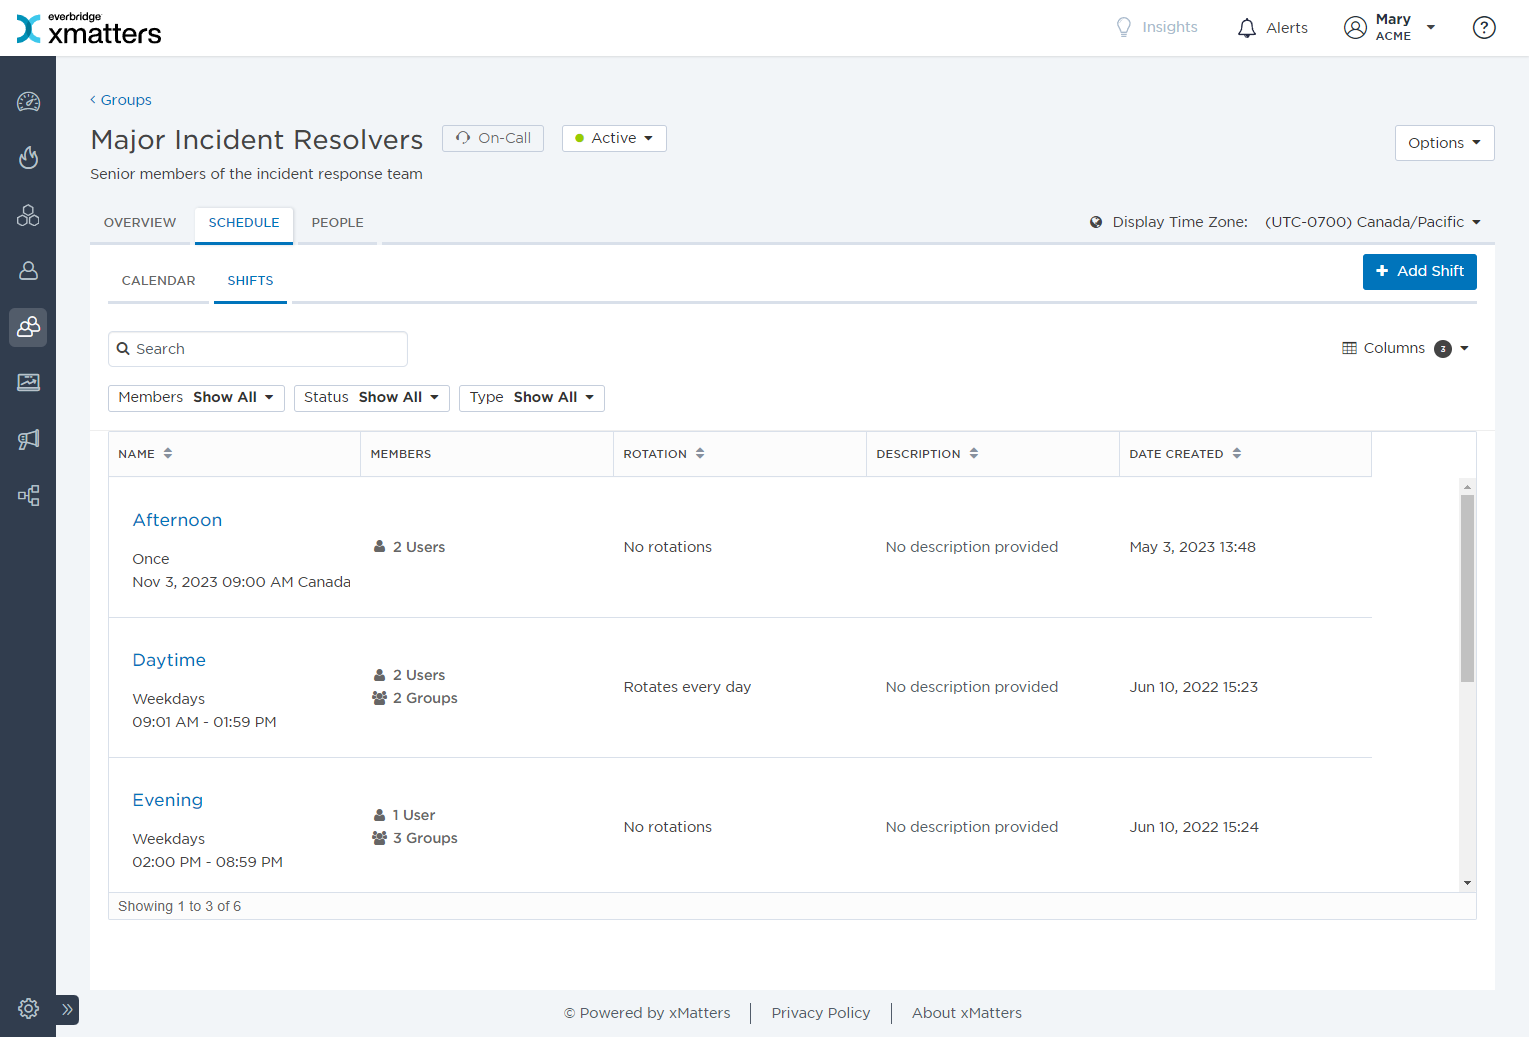
The Shifts page displays a list of all the shifts for the group, so admins can clearly review and manage shift information (such as member and rotation details). Individual shifts can be viewed and edited by clicking the name to display the shift side panel. From here, you can view it's frequency, the members within the shift, the order in which they're contacted, any escalation wait times, and if there is a set rotation.
The Shifts page includes the following columns:
| Column | Description |
|---|---|
| Column | Description |
| Name | The name of the shift, how often it repeats, and the start and end time of each occurrence. |
|
Members |
How many of each member type (users, groups, etc.) within the shift. |
| Rotation | The type of rotation the shift uses. |
| Description | A description of the shift. |
| Date Created | The date the shift was created. |
The available filters allow you to narrow the shifts list based on matching specific criteria. You can apply one or more filters to narrow down the list of shifts (such as only unscheduled (past) shifts or shifts you belong to). If you apply multiple filters, xMatters only returns shifts that match all of the specified filter criteria. For detailed instructions on how to use filters, see Filtering data tables.
The following table describes the available filters in the Shifts section and their values:
| Name | Values |
|---|---|
| Members |
|
| Status |
|
| Type |
|
Create, delete, and rename shifts
You can create a new empty shift series or you can copy an existing series to reuse its members and escalation timeline. The on-call group interface allows you to delete an entire series or just a single occurrence, which may help you adjust a shift schedule around special events.
You can add a shift occurrence to the schedule by clicking Add Shift from the Schedule tab. When you add a shift, you can specify the start, duration, and how often it repeats (to create a series).
You can also add a shift occurrence by drawing it directly on the calendar. For more information about adding a shift occurrence in the calendar view, see Add a shift by drawing on the calendar.
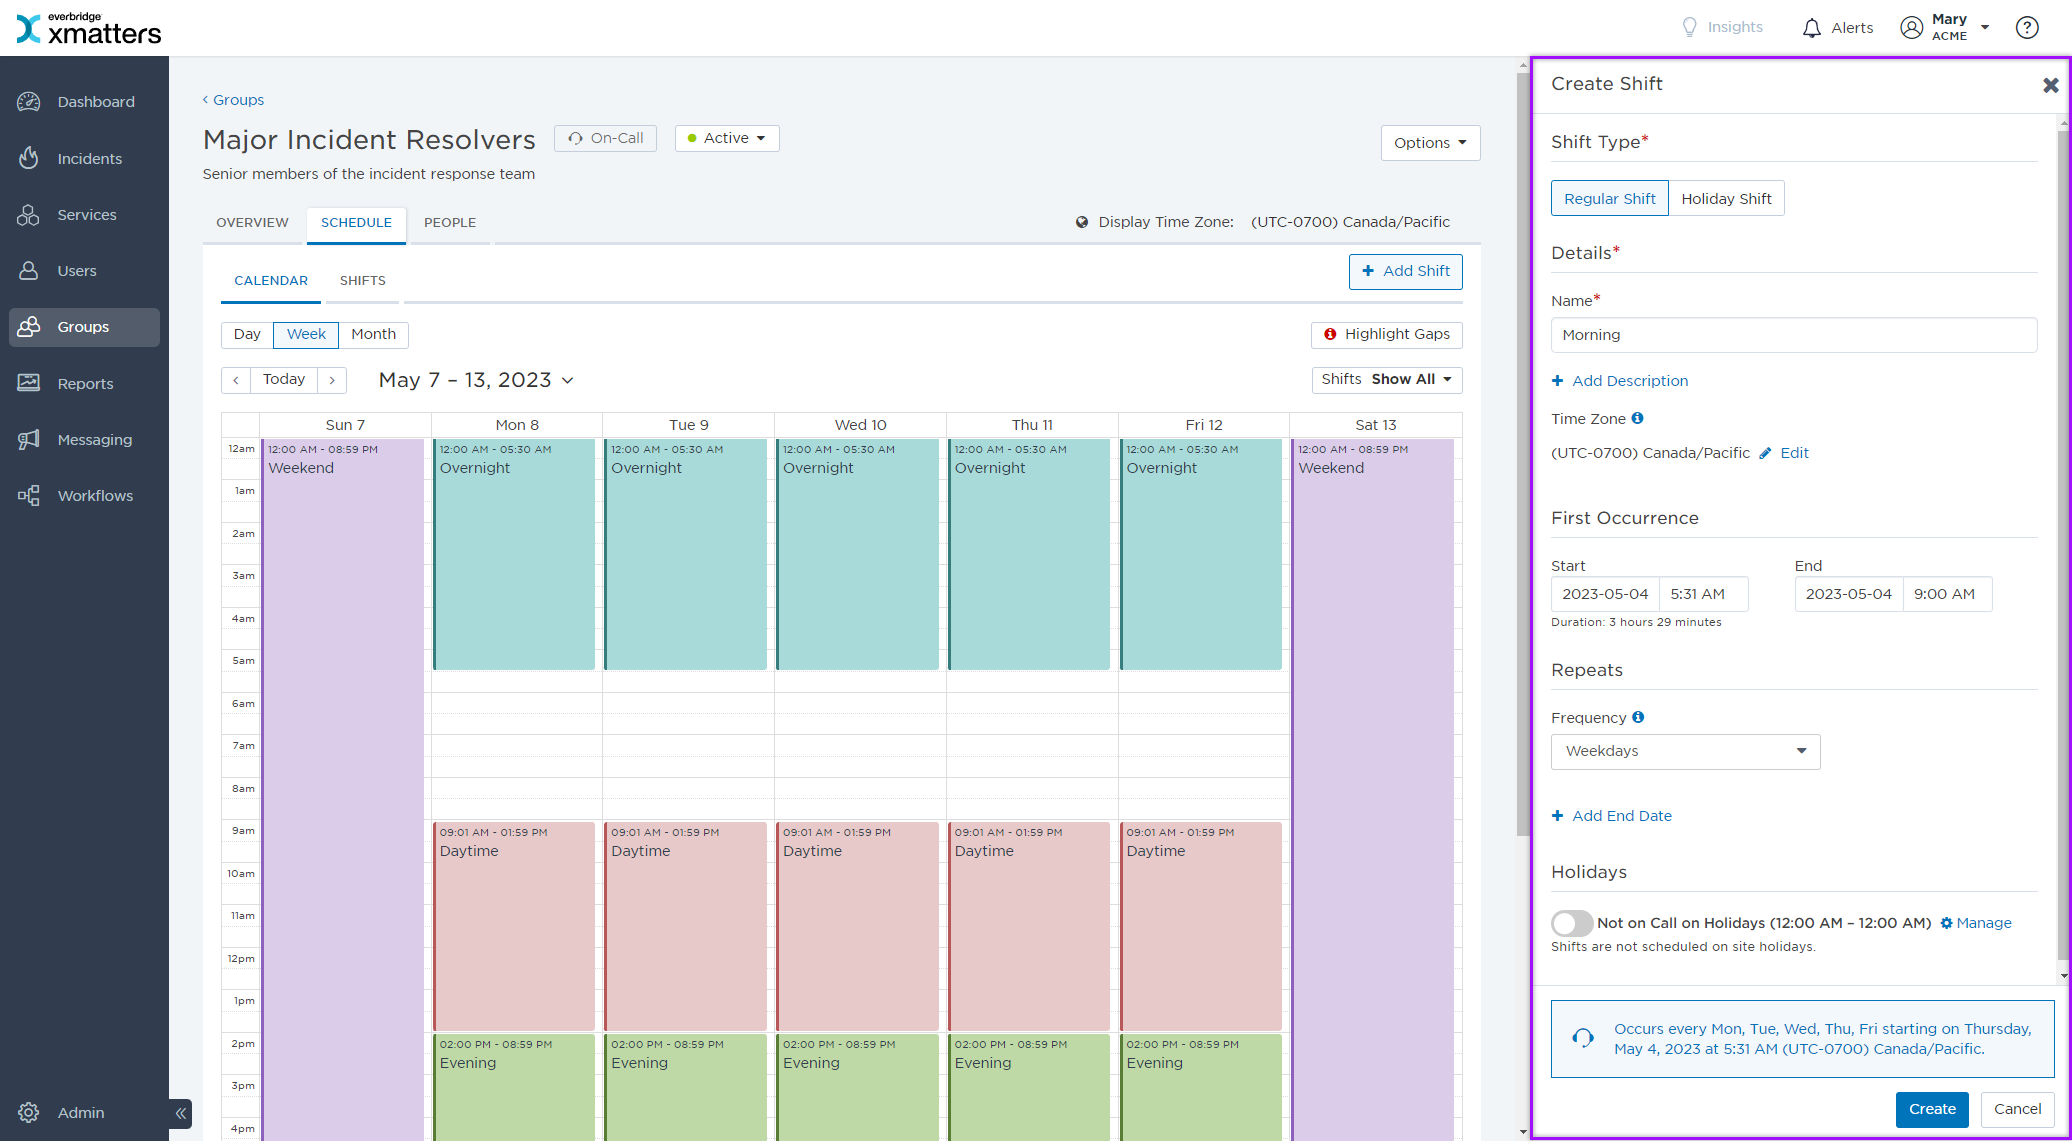
To add a shift occurrence or series to the schedule:
- Click the Add Shift button.
- Type the name of the shift occurrence in the Name field, and add an optional description.
- Choose the Time Zone you want to use for this shift.
- To set the shift's duration, select a Start and End date and time.
- You cannot choose a start date earlier than the current date.
- The Create Shift screen will indicate if you have specified a shift occurrence that is longer than 24 hours.
- Create a series by adjusting how frequently the shift repeats. For more information about working with shift recurrence options, see Advanced shift recurrence options.
- Click Save.
- To add members to your shift and adjust the escalation timeline, see Escalate alerts within a shift.
Copying a shift occurrence or series allows you to create a new shift that has the same members, escalations, and rotation rules as the original shift. This enables you to more easily build out the shift schedule without having to re-enter the same member information every time you create a new shift.
When you copy an active shift occurrence or series, the newly-created shift includes the same members, escalation rules, and rotation rules (for alert- or schedule-based rotations) as the original shift, and is active all the time. Shift-based rotations are based on the newly-created shift (not the original shift).
If you copy an unscheduled (expired) shift occurrence or series, xMatters creates a new default shift that has the same members but does not copy other information.
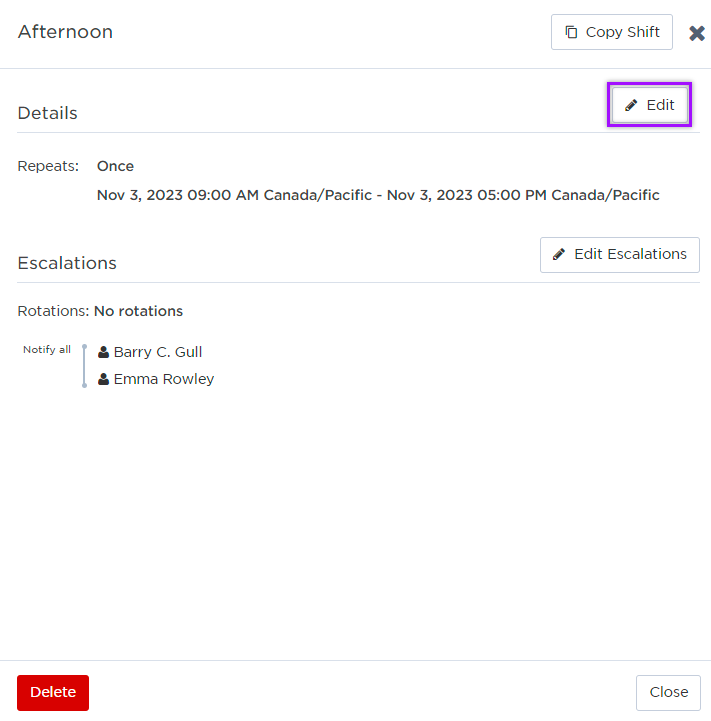
To copy a shift occurrence or series:
- From the Schedule tab, click Shifts.
- Click the name of the shift you want to replicate.
- Click Copy Shift.
- Type a name and optional description for the shift, and then click Copy Shiftto copy the shift settings, members, and escalation timeline to a new shift.
You can delete an entire shift series, a single occurrence (within a series), or a one-time shift to remove it from the on-call group.
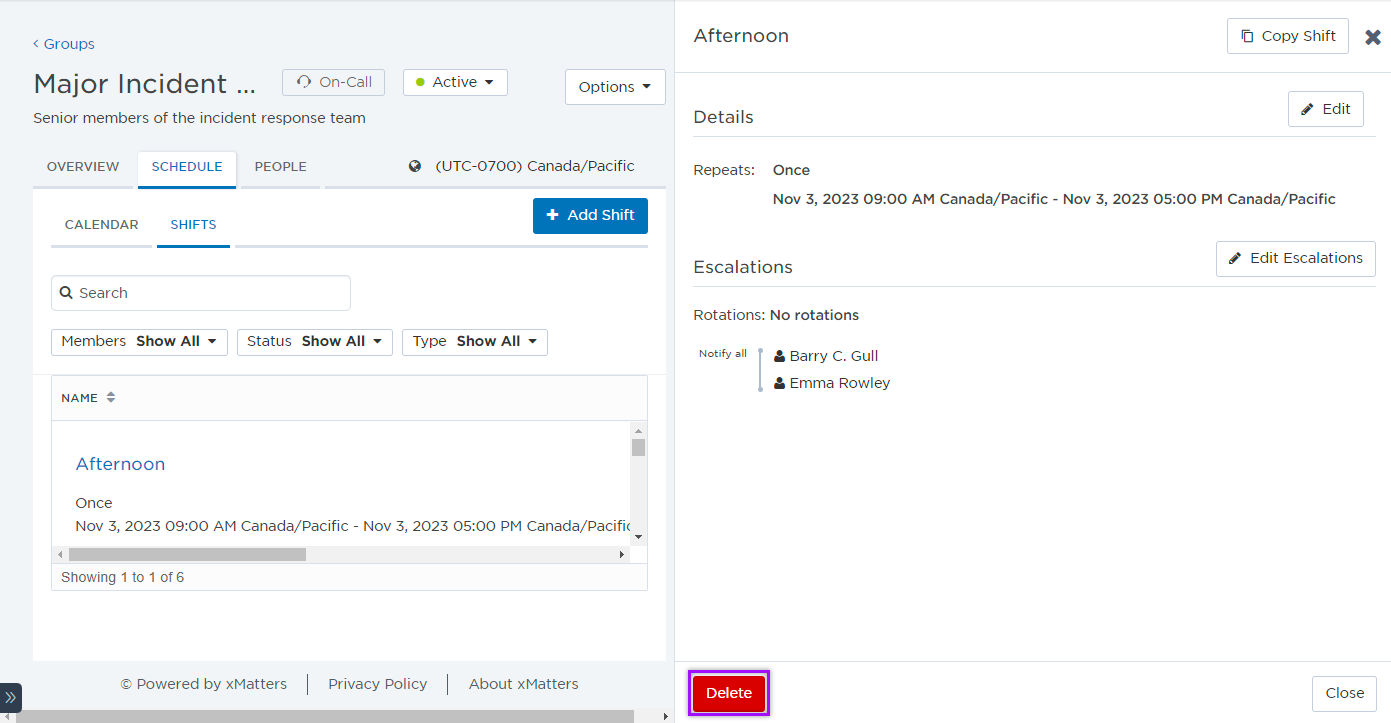
To delete a shift series or one-time shift from the Shifts tab:
- From the Schedule tab, click Shifts.
- Click the name of the shift you want to delete.
- Click Delete and then confirm the deletion to permanently remove it from the group.
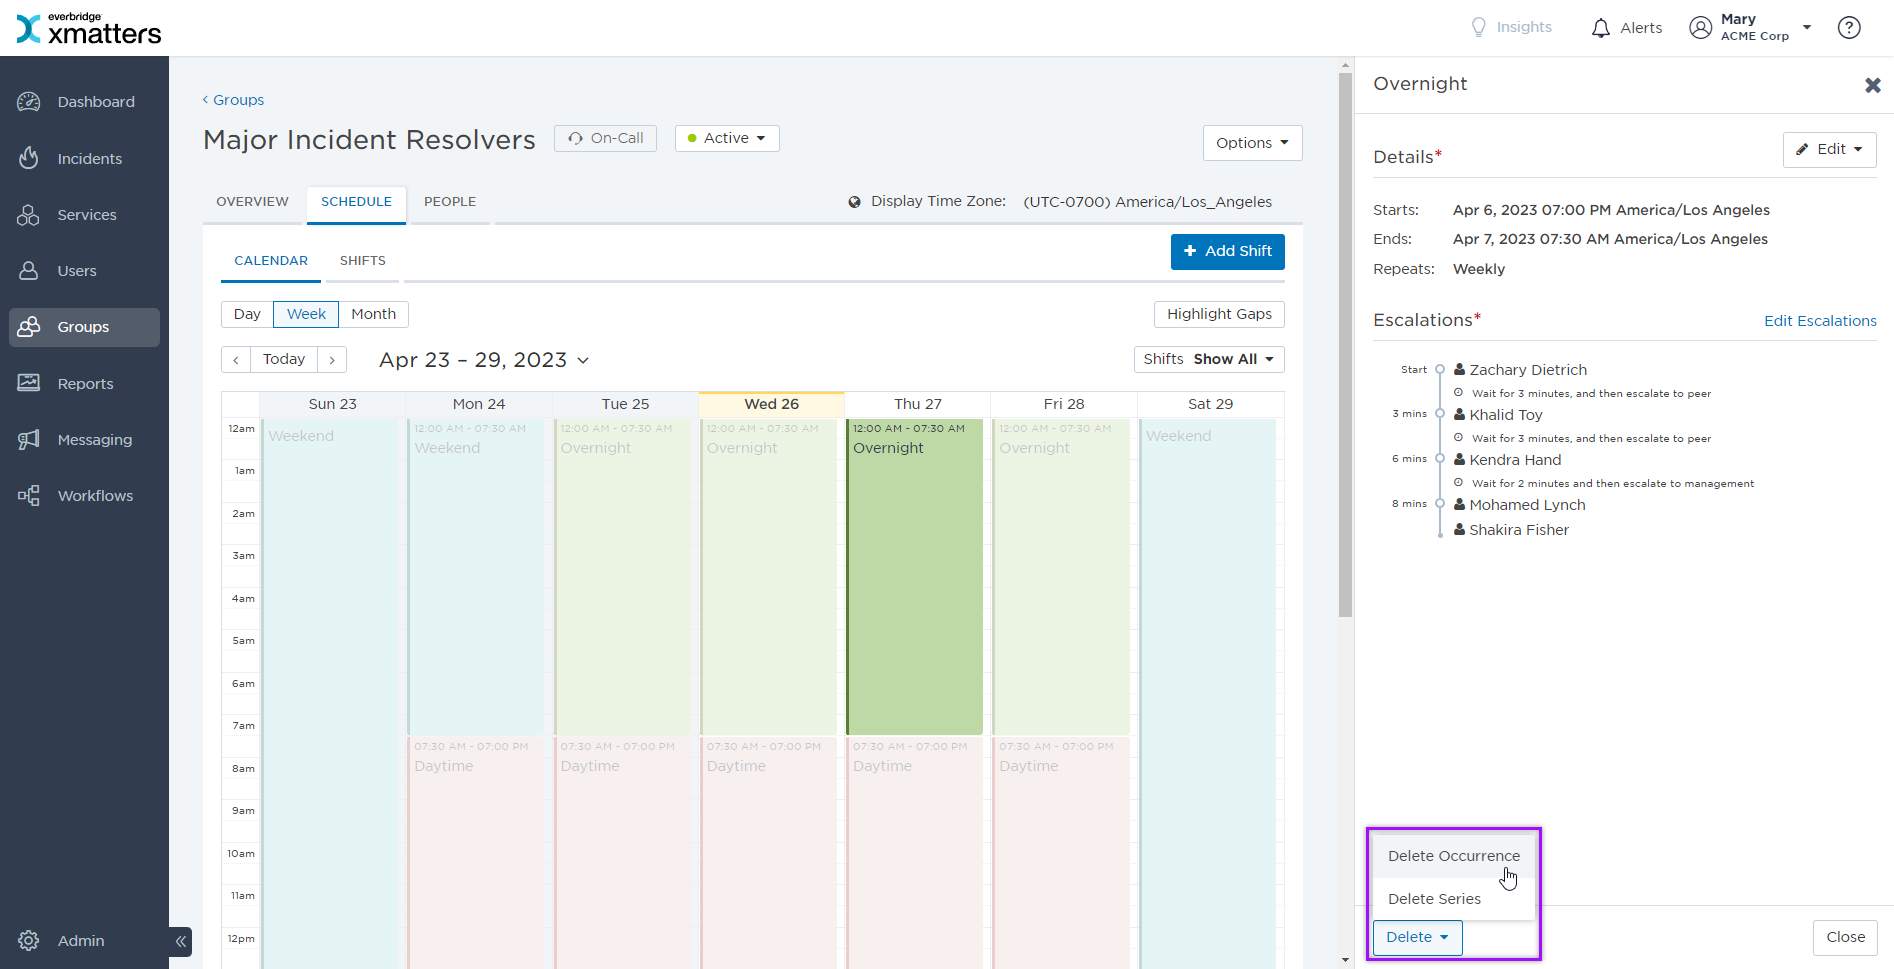
To delete a shift series or one-time shift from the Calendar view:
- From the Schedule tab, locate the shift series in the calendar view and click the name.
- Click Delete.
- From the menu, select Delete Series or Delete Shift (for one-time shifts) and then confirm the deletion to permanently remove it from the group.
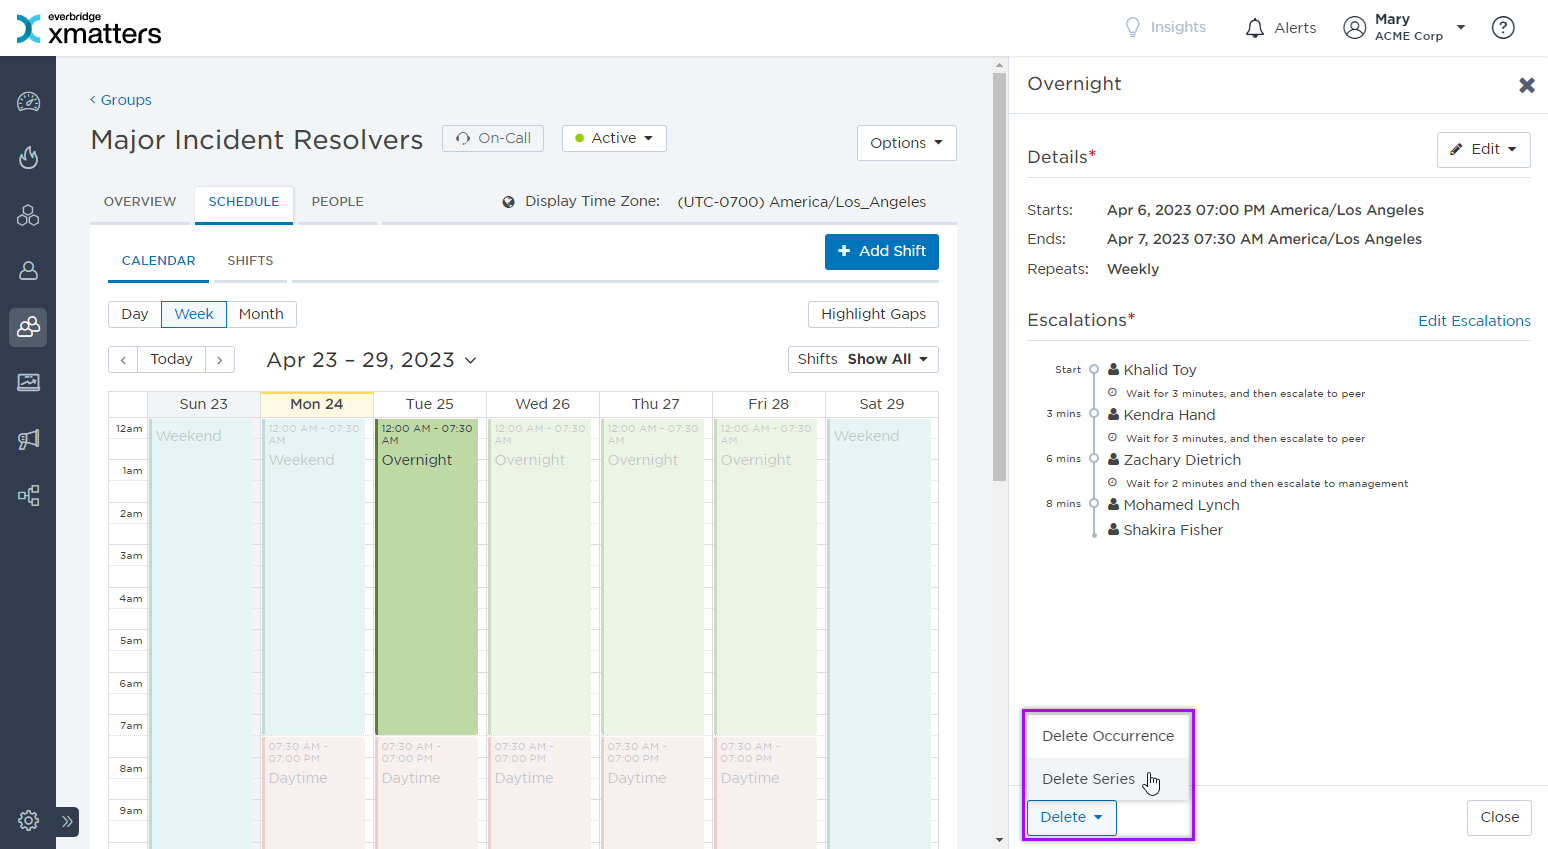
To delete a shift occurrence:
- On the Calendar tab, locate the shift occurrence you want to delete.
- Click Delete.
- From the menu, select Delete Occurrence and then confirm the deletion to permanently remove it from the group
Deleting an occurrence does not affect the rest of the series, or change its recurrence schedule.
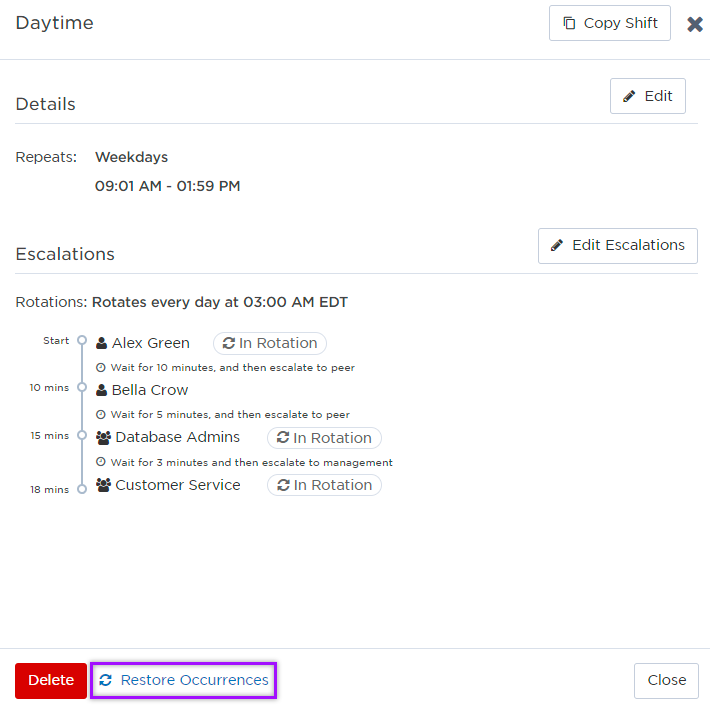
If the time a deleted occurrence was originally scheduled for has not already passed, you can restore it.
To restore a deleted shift occurrence:
- From the Schedule tab, click Shifts.
- Click the name of the shift the occurrence was deleted from.
- Click Restore Occurrences.
- In the Restore Shift Occurrences dialog box, select the occurrences you want to restore, or select all deleted occurrences.
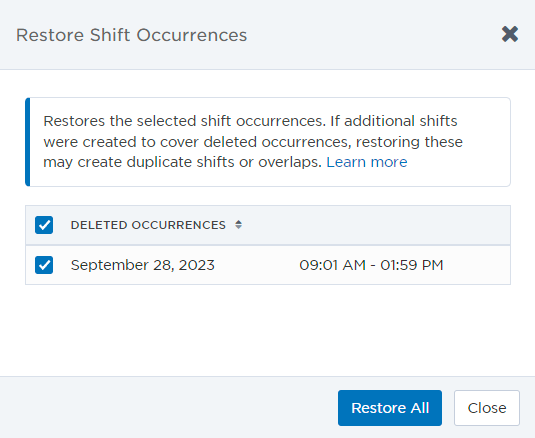
- Click Restore All or Restore Selected to restore the deleted occurrences.
You can edit the shift's details (such as type, name, description, time zone, first occurrence, frequency, and if it's scheduled during a holiday) to make it easier to understand how the xMatters shift schedule corresponds to your organization's shift schedule.
To edit the details of a shift series or one-time shift from the Shifts tab:
- From the Schedule tab, click Shifts.
- Click the name of the shift you want to edit.
- Click Edit.
- From the side panel, update the relevant information.
- Click Save.
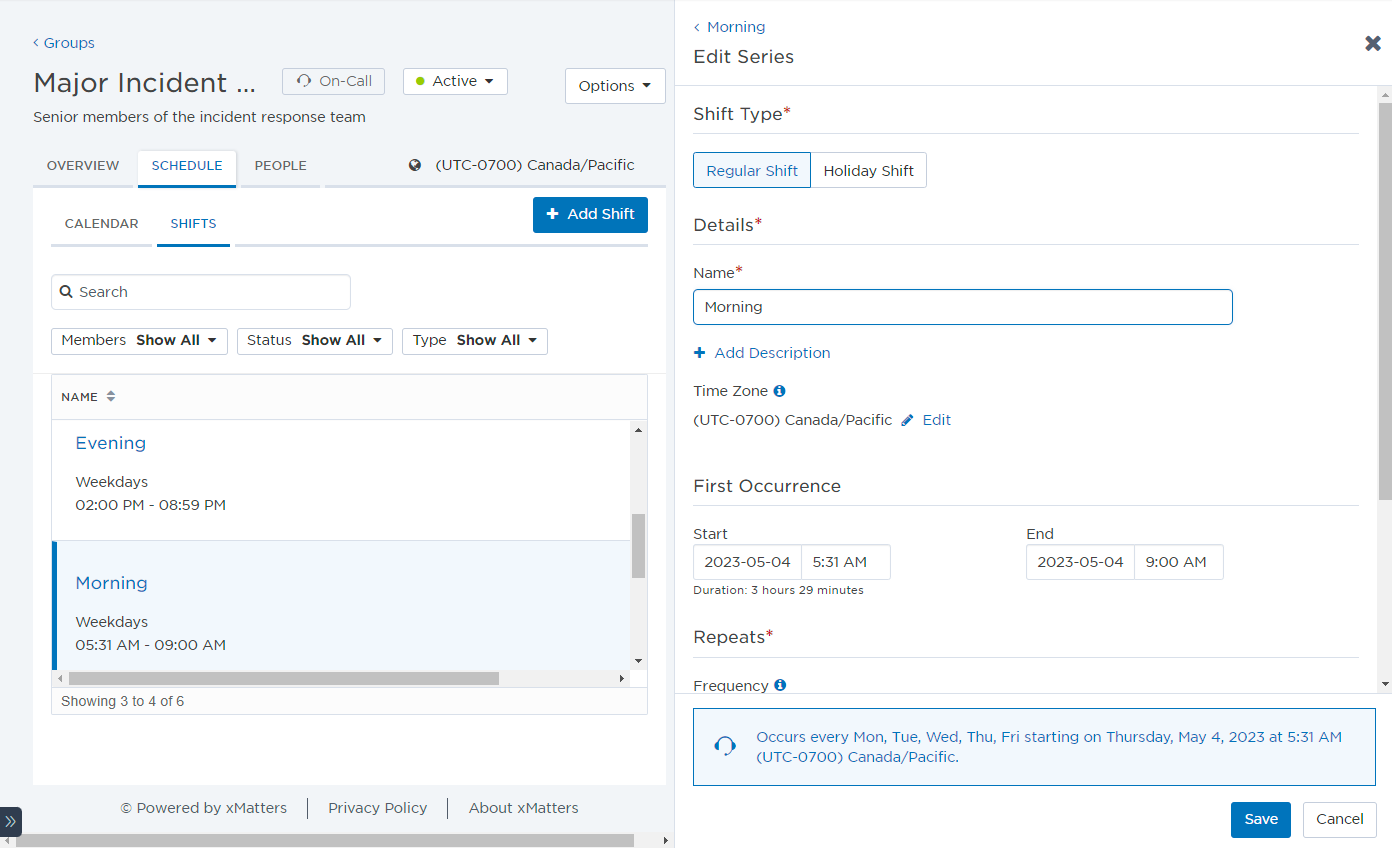
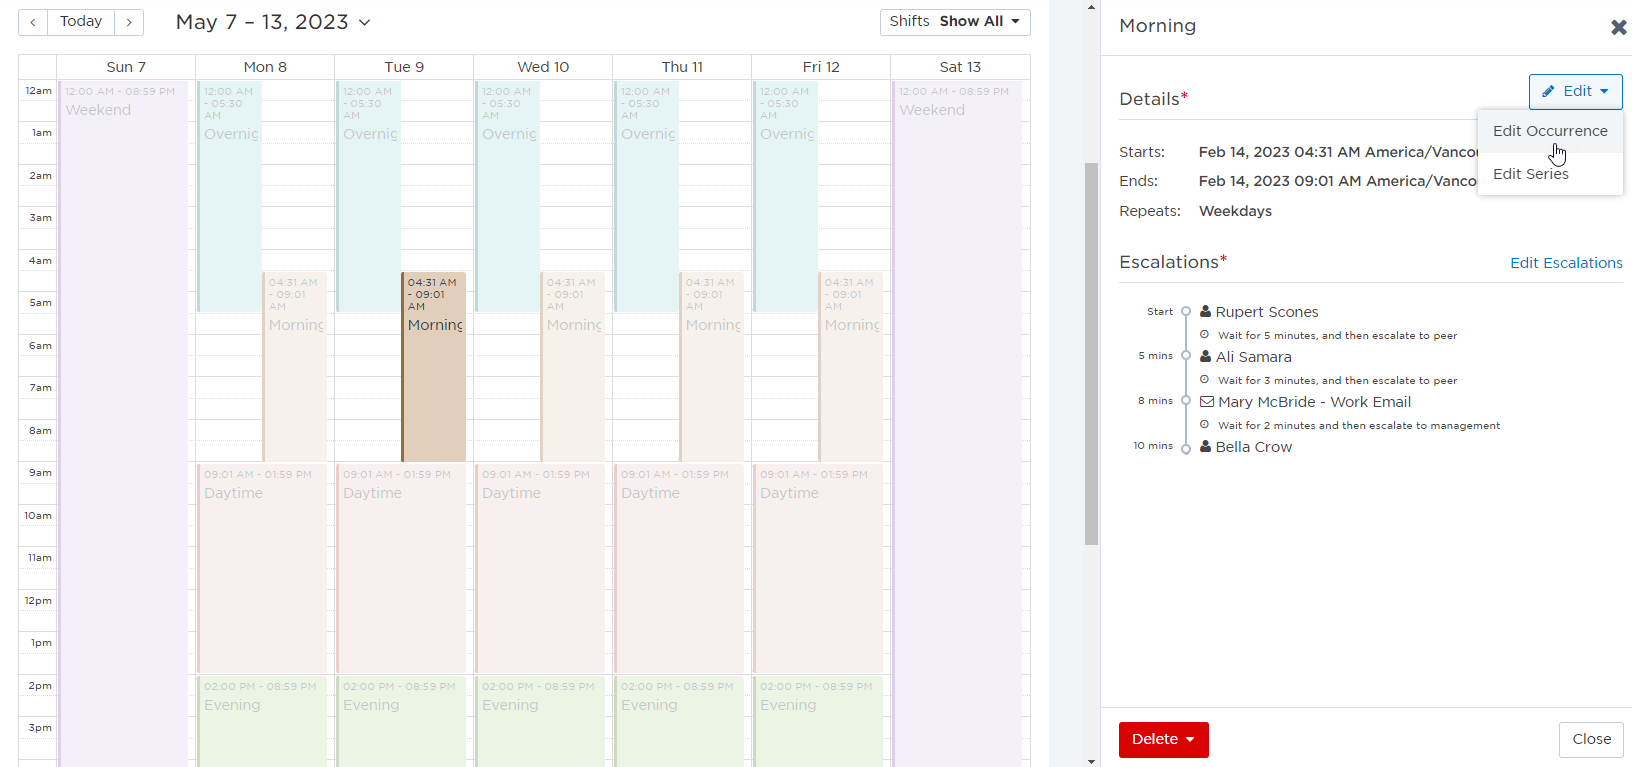
To edit the details of a shift series, occurrence (within a series), or one-time shift from the Calendar tab:
- From the Schedule tab, click Calendar.
- Click the shift that you want to edit.
- From the side panel, click Edit. (If the shift is part of a series, select Edit Series or Edit Occurrence from the options.)

- Update the relevant information (for occurrences, only the Start and End time can be changed).
- Click Save.
For shift series and one-time shifts, if the First Occurrence date or time is updated, any past shifts (occurrences that happened prior to the updated date and time) are removed from the calendar.
Configure shift timeframes
The shift timeframe and recurrence options define when a shift occurrence is active and can receive notifications. The shift's recurrence options are based on common calendar applications you may already be familiar with; for example, you could define a shift occurrence to recur on weekend days, weekly on Fridays, on the 15th of the month, and so on.
Once you have created a shift occurrence you can adjust its start and end times and repeating pattern (to create a series), to reflect your organization's real-world shift schedule.
To adjust the occurrence duration from the calendar view:
- From the Schedule tab, click Calendar.
- Click an occurrence of the shift on the calendar.
- To edit the occurrence duration, click Edit, and then Edit Occurrence.
- To adjust the start time of the occurrence, click the date or time in the Start section, and then select the date and time at which the occurrence starts.
- You cannot choose a start date earlier than the current date.
- To adjust the end time of the occurrence, click the date or time in the End Date section, and then select the date and time at which the occurrence ends.
- Default occurrences end at 00:00 on the day after the start date; if you are adjusting a default you may need to adjust the day as well as the time.
- Click Save.
To adjust the occurrence or series duration from the Shifts tab:
- From the Schedule tab, click Shifts.
- Click the name of the shift you want to adjust.
- Click Edit.
- To adjust the start time of the shift, click the Start date and time in the First Occurrence area, and then select the date and time at which the shift starts.
- You cannot edit the start date and time to a date or time earlier than the current date.
- To adjust the end time of the shift, click the End date and time in the First Occurrence area, and then select the date and time at which the shift ends.
- Verify the shift start and end date. Default shifts end at 00:00 on the day after the start date; if you are adjusting a default shift you may need to adjust the day as well as the time.
- Click Save.
- Changes to the shift duration will apply to the entire series. You can change the duration of a single shift occurrence from the calendar tab.
You can also edit the shift occurrence duration by clicking the shift timeframe summary link below the name and description of the selected occurrence on the Shifts tab.
You can create a shift series by configuring a shift occurrence to recur on a regular basis. This enables you easily replicate a real-world shift schedule, instead of creating multiple one-time shift occurrences.
xMatters provides many options for defining the frequency of a shift. For more information about working with these advanced recurrence options, see Advanced shift recurrence options.
To adjust shift frequency from the calendar view:
- From the Schedule tab, click Calendar.
- Click an occurrence of the shift on the calendar.
- To edit the series duration, click Edit, and then Edit Series.
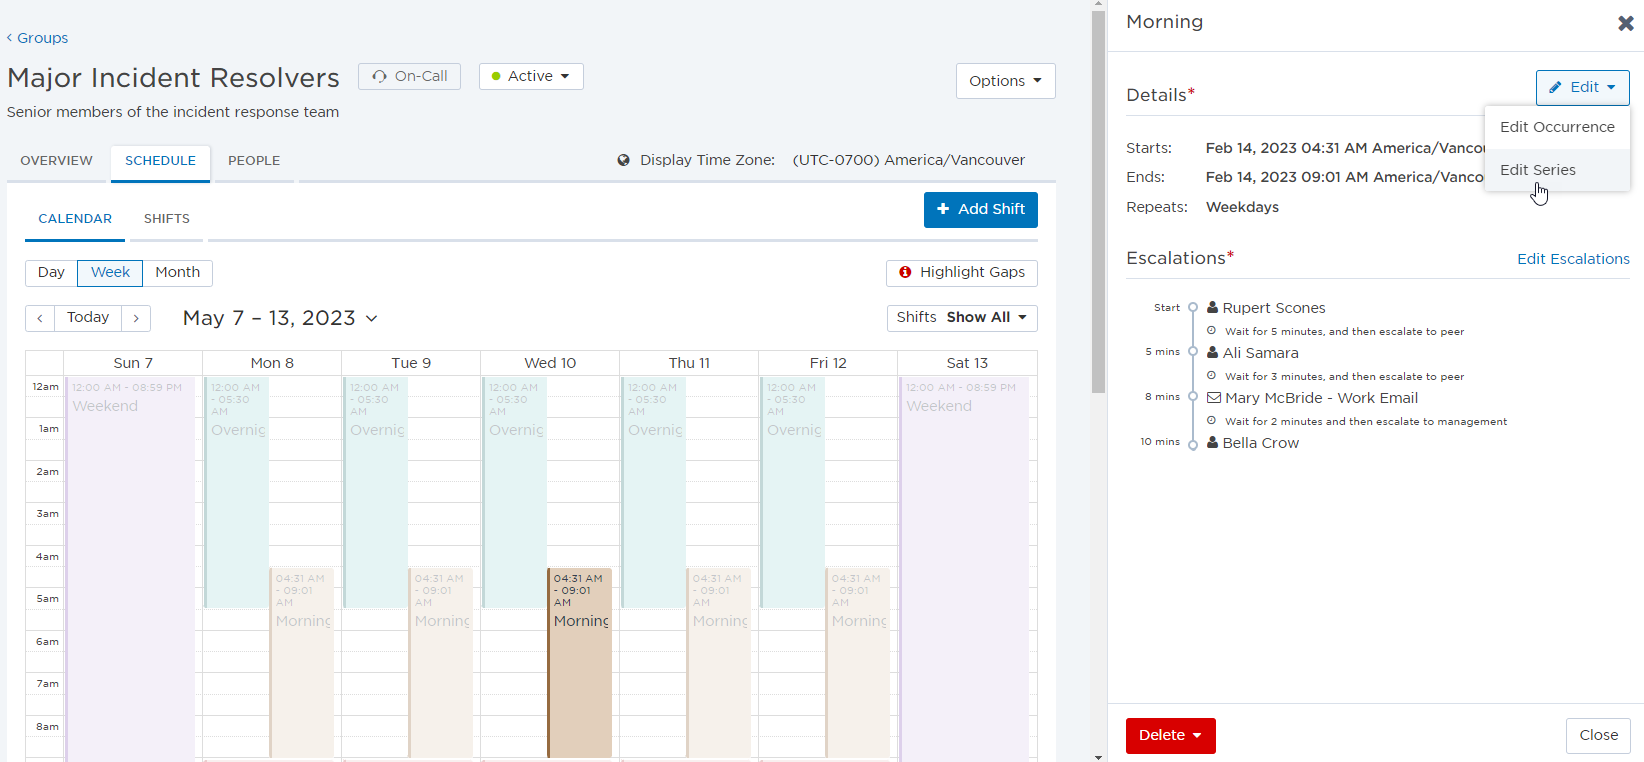
- Adjust the values in the Edit Series dialog to reflect your shift options. For more information about working with shift recurrence options, see Advanced shift recurrence options.
- Click Save.
To adjust shift frequency from the Shifts tab:
- From the Schedule tab, click Shifts.
- Click the name of the shift you want to adjust.
- Select Edit.
- In the repeats section, adjust the shift frequency for your shift series. For more information about working with these options, see Advanced shift recurrence options.
- Click Save.
You can configure shifts to be off duty on holidays such as civic holidays and special events. When a shift is not on call on holidays, shift members do not receive notifications sent on holidays during the specified holiday hours. After you configure a shift to be off-duty on holidays, you may want to create a separate holiday shift to handle holiday notifications. To learn more about how to configure on-call group holidays, see Schedule holiday shifts.
To set a shift to be off duty on holidays:
- Click the Calendar tab.
- Locate the shift on the calendar and click it.
- In the pop-up dialog box, in the area that describes the current holiday settings, click Edit and then Edit Series.
- Holiday information is displayed only when the on-call group is configured to use site holidays. For more information about setting site holidays for a group, see Site to use for holidays.
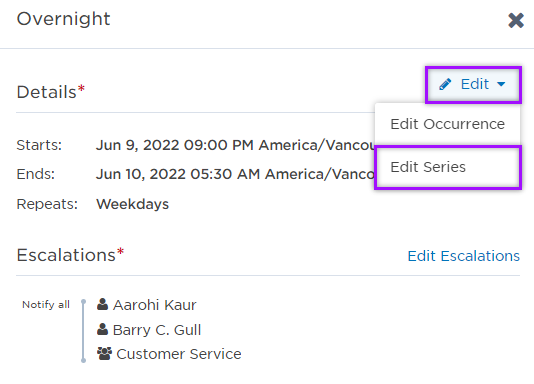
- Toggle On Call On Holidaysoff.
- Click Save.
Review the shift schedule
Once you have created the shift schedule, you may want to review it to see if there are gaps in coverage or shifts without assigned members. This helps you ensure that somebody will receive notifications regardless of when they are sent. You might also want to check out how DST changes affect your calendar.
Empty shifts do not contain any members. When a notification is sent to an on-call group with an empty shift, there are no members assigned to receive the notification (members of other active shifts may still receive the notification). Shifts may be empty when they are initially created or may become empty when you adjust the roster.
Empty shifts are clearly identified in the calendar so you can quickly locate shifts without any members and adjust the schedule.
![]()
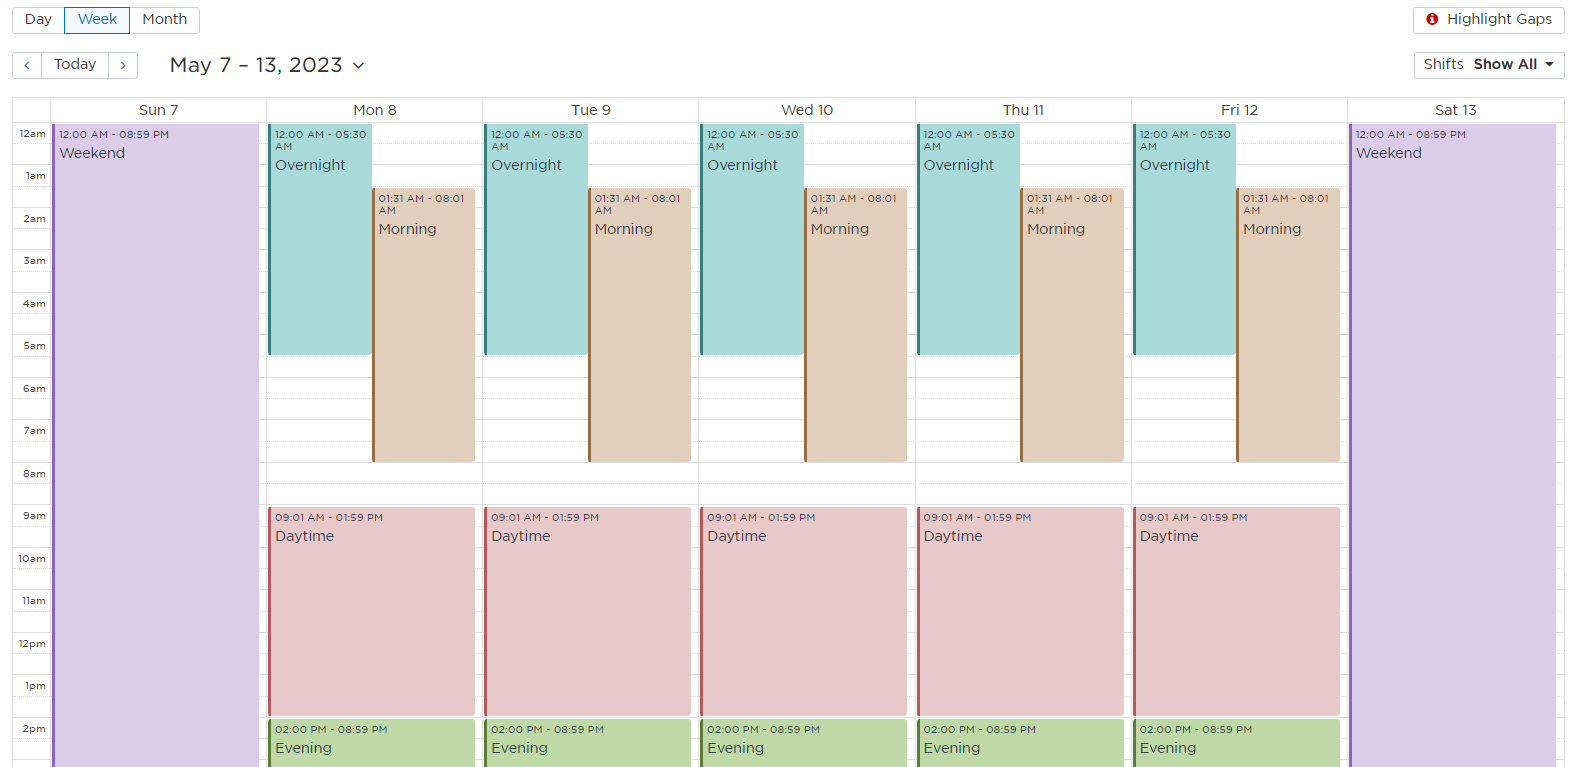
The calendar view allows you to identify empty areas that are not covered by any shift. If a notification is sent to an on-call group at a time when it does not have an active shift, group members are unable to receive the notification.
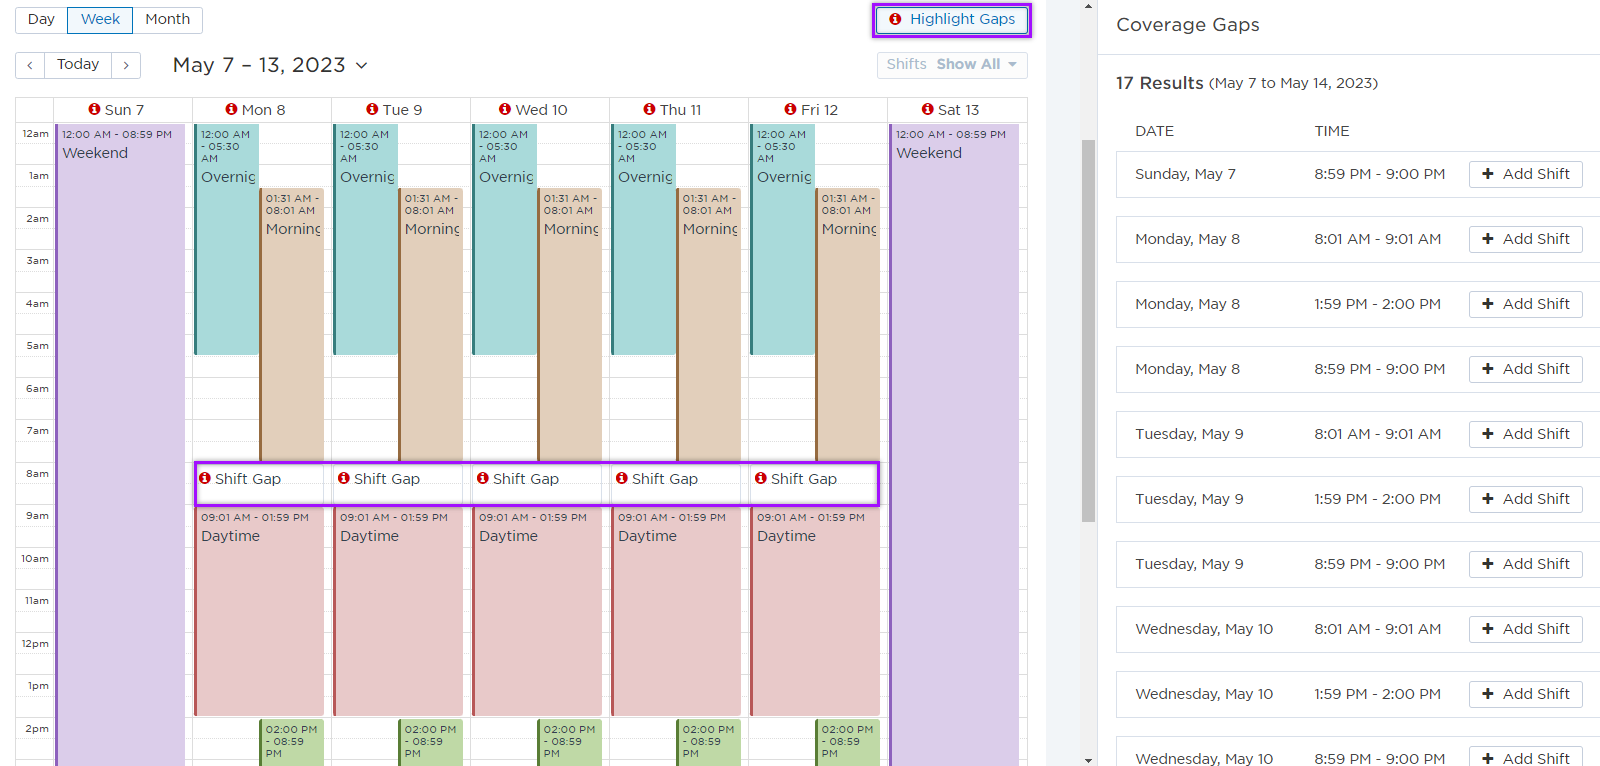
When the Highlight Gaps check box is selected, gaps in the calendar are identified with a 'Shift Gap' warning. You can then adjust the surrounding shifts to cover this gap or click the highlighted area to add a new shift that covers the missing time.
The following image displays the weekly view of a calendar that contains several shifts. There are coverage gaps between 8 AM and 9 AM on weekdays.
Selecting Highlight Gaps highlights the gaps in coverage for the selected time period (day, week, or month) are displayed on the calendar and highlighted in the side panel. Here, you can add additional recurring shift to cover any future gaps.
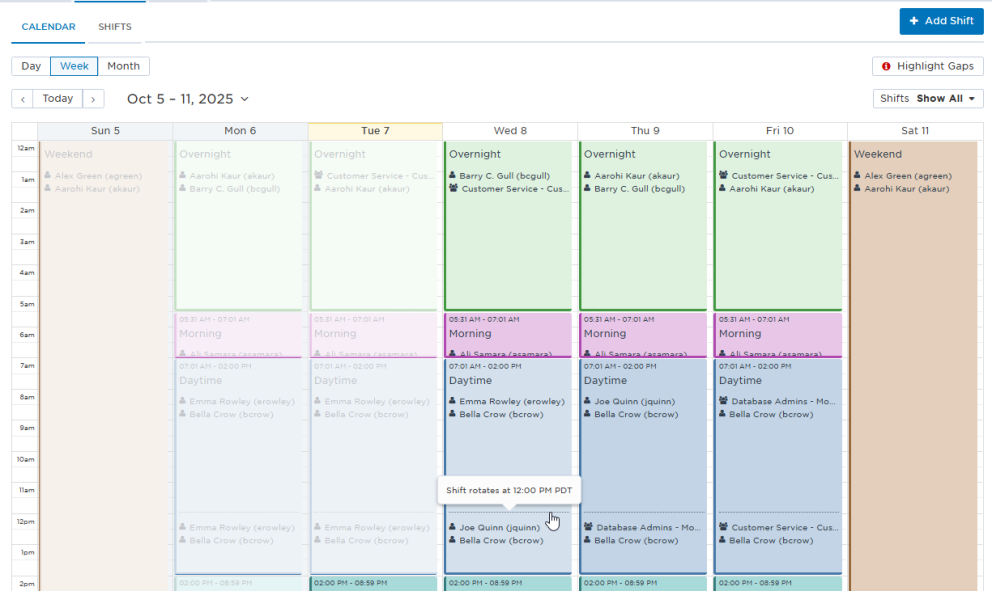
If a rotation happens in the middle of a shift, it is displayed in the group's schedule as a dotted line. To see more information, hover over the line to view the rotation details.
Holiday and unscheduled shifts
There are some unique shift types in xMatters that are used differently than standard shifts. Holiday shifts are automatically scheduled for days that are defined as site holidays. Unscheduled shifts are shifts that have already completed but are left in the system so they may be viewed or copied.
For more about creating a holiday shift, see Schedule holiday shifts.
Unscheduled shifts are one-time shifts or shift series that have passed their end date and are not scheduled to occur again. A shift with an end date becomes unscheduled after midnight on the date specified in the recurrence settings, even if the shift does not occur on that day. If your group contains one or more unscheduled shifts, the Shifts tab can be filtered to display all shifts, or a list of scheduled or unscheduled (past shifts).
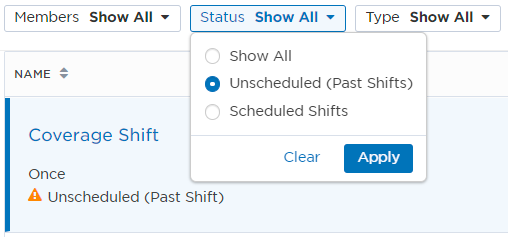
You can edit an unscheduled shift to reschedule it again in the future, copy it to create a new scheduled shift with the same settings, members, and escalation timeline, or delete it to remove it from the list of unscheduled shifts.