Manage groups
In xMatters, you can use groups to organize people with shared skills or responsibilities. There are three types of groups you can create: on-call groups, broadcast groups, and dynamic groups. On-call groups are used to determine how and when each person should be notified through shift schedules, escalation timelines, and rotations. Broadcast groups are used to notify all group members at the same time. Dynamic groups notify members based on selected criteria at the time of an alert.
The Groups page displays a list of all the groups that you have permission to view. The groups list displays information about each group, including the group name and description, whether it's active or inactive, a summary of its shift schedule, and warning badges when a group or shift doesn't have any members yet.
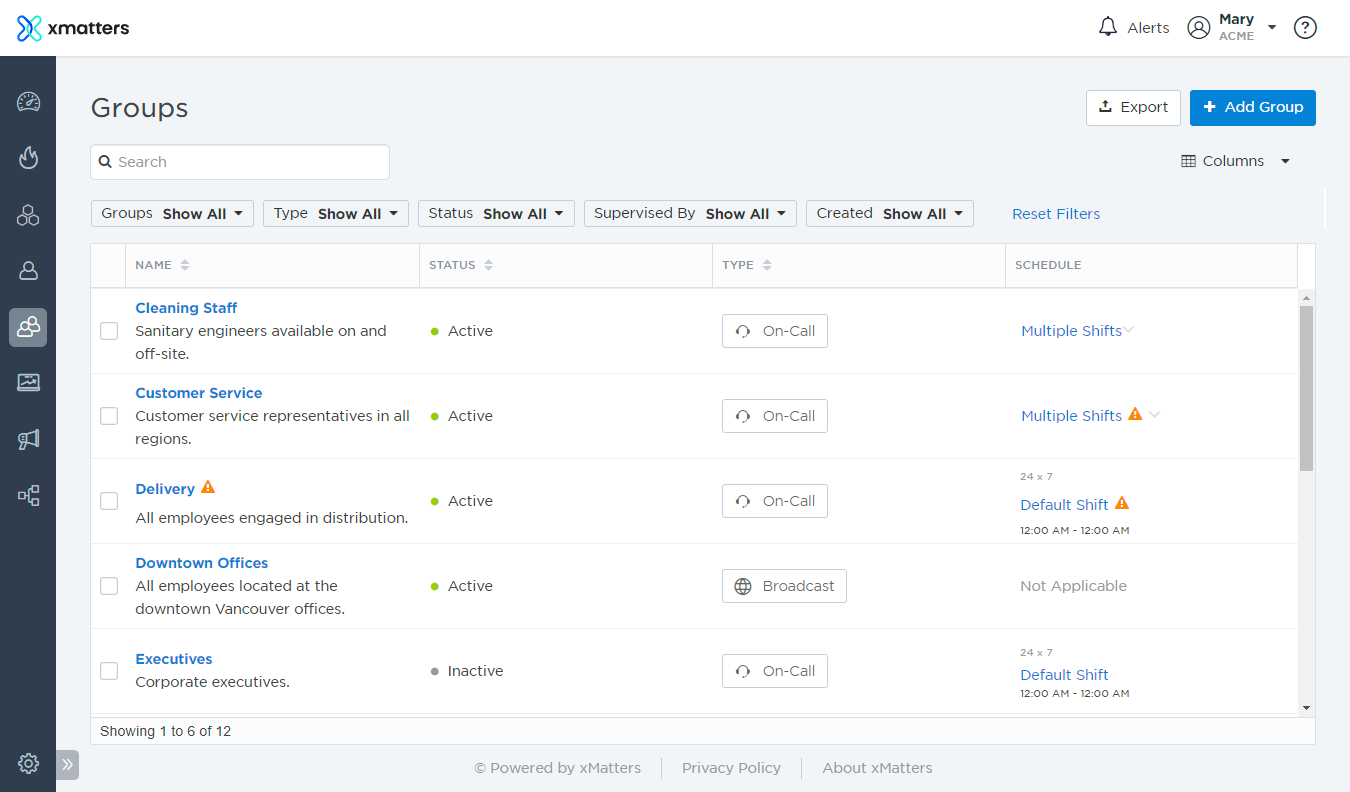
The following image illustrates how different groups may appear on the Groups page:
- Both the Cleaning Staff and Customer Service groups contain multiple shifts and are active.
- One or more of the shifts in the Customer Service group does not have any members, so it displays a warning badge next to its schedule information.
- The Delivery group displays a warning badge next to its name because it does not contain any members.
- The Downtown Offices group is a broadcast group and displays no shifts.
- The Executives group uses a 24x7 shift, but is inactive and therefore cannot receive notifications.

You can use the search bar and filters to refine the list of groups displayed in the table. For example, you could view only groups that you supervise, groups that have no members, or groups with a keyword in their name or description. You can also export the list of currently displayed groups to a spreadsheet file.
The following sections describe the actions you can perform on the Groups page:
On the Groups menu, under Manage Groups, click Groups.
This page isn't available if you don't have permission to view groups in xMatters.
To more easily view data in the list, do one or more of the following:
- To sort the content of a column in alphabetical or chronological order, click the column header. (Click the header again to reverse the sort order.)
- To change the width of a column, move the pointer over the edge of the column and when the re-size icon appears, click and drag the column to the desired size.
- To rearrange the columns, click and drag a column header to a new location on the table.
- If the list contains more entries or columns than can be displayed on your screen, scroll horizontally or vertically. The system automatically loads more data as you scroll down the page.
- To include or exclude columns, click the Columns drop-down menu and select or clear the columns that are included. When you've hidden a column and want to see it again, it is added as the last column of the table.
The Groups list includes the following columns:
| Column | Description |
|---|---|
| Name | The group's name and description. |
|
Schedule |
A summary of the on-call group's schedule (this is not applicable for broadcast or dynamic groups). For more information see View a group's schedule. |
| Status | Whether the group is active and able to receive notifications, or if it's inactive. |
| Date Created | The date and time the group was created. |
| Type | The group type (such as, on-call or broadcast). |
You can use the search bar to find groups that contain the search term in their name or description.
Start typing in the search bar (a minimum of two characters is required). xMatters automatically updates the list to display items that contain (partially match) the search term, and highlights the portion of each item that matches the specified criteria. If you search multiple terms, xMatters returns groups that match all of the terms.
To clear your search, click the 'x' in the right corner of the search bar.
The available filters allow you to narrow the groups list based on matching specific criteria. For example, you can use filters to locate groups that do not have any members, the groups that you supervise, or groups that are supervised by a particular user.

You can apply one or more filters to narrow down the list of groups. If you apply multiple filters, xMatters only returns groups that match all of the specified filter criteria. For detailed instructions on how to use filters, see Filtering data tables.
The following table describes the available filters on the Groups page and their values:
| Filter | Values |
|---|---|
| Groups |
|
| Type |
|
|
Status |
|
| Supervised By |
|
| Created |
|
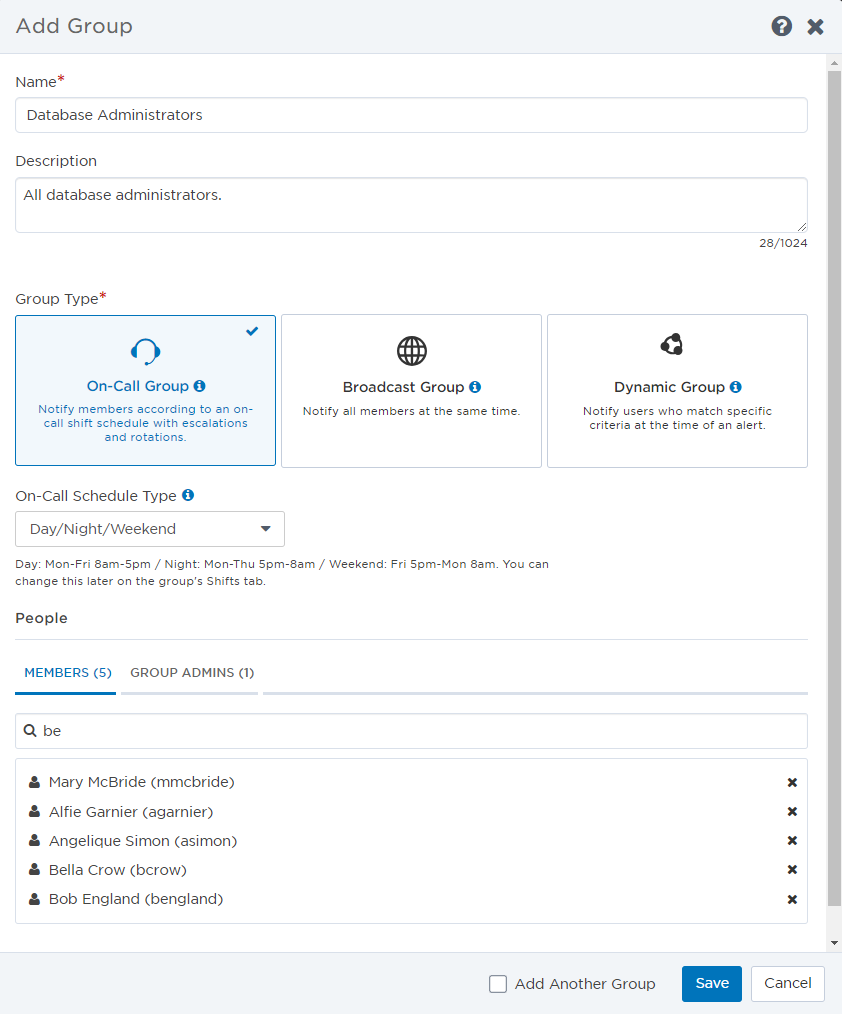
You can use the Add Group dialog box to quickly create a broadcast, dynamic group, or simple on-call group containing a single shift, and then modify it further by adding more shifts and members to make it as complex as you want. For a complete, step-by-step example of how to create an on-call group with multiple shifts, see Create a sample group.
To create a group:
- Click the Groups tab.
- Click the Add Group button.
- xMatters displays the Add Group dialog box.

- Type a name for the new group in the Name field.
- Click + Add Description and type a brief description (maximum 1024 characters) of the group.
- Even though the Description field is optional, giving the group a description can make it easier for users to understand their schedule and why they have been assigned to this group.
- Select the Group Type.
- If you select the On-Call group type, you can also choose an On-Call Schedule Type (this can be changed later from the group's Shifts tab):
- 24x7: A 24x7 shift schedule
- Day/Night/Weekend: A daytime, evening, and weekend shift schedule
- Empty Schedule: No pre-configured shifts
- If you select the Dynamic group type, in the Criteria area, specify the search criteria you want to use to determine the members for this group. xMatters will perform this search each time an alert is sent to this dynamic group.
- From the Property drop-down list, select a search field.
- From the Condition drop-down list, select the condition of the search. Available values are:
- begins with
- ends with
- contains
- does not contain
- equals
- does not equal
- In the Value field, type one or more values for the property.
- To add additional fields, click + Add Criteria.
- If you select the On-Call group type, you can also choose an On-Call Schedule Type (this can be changed later from the group's Shifts tab):
- If selecting the On-Call or Broadcast group type, in the Members tab, type a name to search for and add the users or groups you want to add to this group.
- If you're creating an on-call group, these members are added to a default shift that is always active and notifies all group members at the same time. You can later change the shift parameters or move these members to another shift.
- Broadcast groups can be added as members of on-call groups, but you can't add on-call groups as members of broadcast groups.
- On the Supervisor tab, type a name to search for and add the users you want to supervise this group.
- Only users with the correct permissions are displayed in the search results. For more information about group supervisors, see Group supervisors.
- To remove a supervisor or member from a list, click the red X beside their name.
- You cannot remove the last supervisor from the list.
- If you want to add another group immediately after creating this one, select the Create Another Group check box.
- Click Add to create the group.
To delete a group, select the check box next to the group or groups that you want to remove, and then click Delete.
- If the deleted group is a member of any other groups, it is removed from their rosters and shifts.
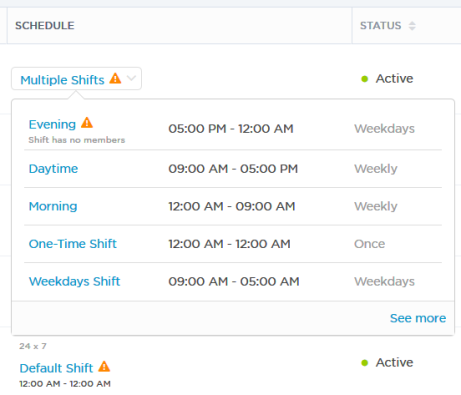
The Schedule column displays a summary of the on-call group's schedule. If the on-call group contains only one shift, the column displays the shift's frequency, name, and duration. If there are multiple shifts, click Multiple Shifts to view an info card with information about individual shifts.
If you have permission to view a shift, its name appears as a link to that shift's details on the Shifts tab of the group interface. If there are more than five shifts in an on-call group, you can click See more to link to the full list of shifts on the Shifts tab.

If you have permission to view a group, its name will appear as a link on the Groups page and you'll be able to link to the group interface. The group interface allows you to access detailed information about a group such as who its members are, the services it owns, advanced group details, and (if it's an on-call group) it's calendar, shifts, and whose on duty.
To view a group, click its name in the group list. xMatters then displays the Overview tab of the group interface for that group.
The groups export feature allows you to export information about on-call groups' shift members.
Exporting group details to a comma-separated values (CSV) file enables you to store a copy of on-call group details including information about the group members (such as name and user license type) and the configured devices for each group member. You can use this information to verify group membership, review the assigned user license type for each member, and ensure that individual users have configured their devices. Some device information is only available to company supervisors. If you see "(privileged)" beside a device name and asterisks instead of a phone number, email address, or country name it means you don't have permission to view or edit that information. For more information, see Device Management
When an exported group does not contain any members, the member-specific columns in the report display the text "Empty Group". If the user performing the group export does not have permission to view certain fields, the fields display an asterisk (*) to indicate that there is data for the field but it cannot be viewed.
To export group details:
- Click the Groups tab.
- Refine the list of groups that you want to export. xMatters exports information for all groups that are displayed on the page, regardless of whether the check box next to the group name is selected.
- Click Export.
- The groups are exported to a file named Groups Export <date/time>.csv, where <date/time> is a time stamp of when the file was created.
Broadcast groups are listed in the group export, but are marked as "Empty Group" because they do not contain any on-call shifts. You can verify the membership of broadcast groups on the People tab of the broadcast group interface, and use the available filters on the Users page to look up users' assigned license type and whether they have any device configuration issues.