Create Alert step
The Create Alert step is the improved version of the Create Alert Using a Form step. It lets you create an alert at any point in your flow in response to previous steps, using information from those steps to populate alert details and targeted recipients. Unlike the Create Alert Using a Form step which requires a messaging form and properties to create the alert, the Create Alert step has its own message and response builders built directly into its configuration screens in Flow Designer. You can use any variables from previous steps in the flow to configure your messages and responses right on the step without having to set up a messaging form and properties outside Flow Designer.
For example, you might want to use the Create Alert step to:
- Quickly and easily build automated alerts into your flows (without having to configure a messaging form).
- Send automated messages after an App, Custom HTTP, or Email trigger, or based on responses to a notification.
- Send an update during your flow that iterates on an existing message.
- Configure alerts with alternative messages and response options for the different paths of your flows.
Set up a Create Alert step
Over time, we'll update the Create Alert step with the full functionality of messaging forms. Currently, if you want to use recordings in voice messages, configure response counts, and support features like subscriptions, scenarios, or attachments, use the Create Alert Using a Form step and a messaging form instead.
To configure a Create Alert step:
- Add the step to the canvas
- Compose messages to send for the alert
- Configure recipients and incidents settings
- Configure a conference bridge to use for the alert
- Configure response options to include with your notifications
- Set devices to target for notification
- Configure notification handling settings
- Add activity triggers to the canvas
After you've finished configuring the step, click Done, then save the canvas.
Step 1: Add the step to the canvas
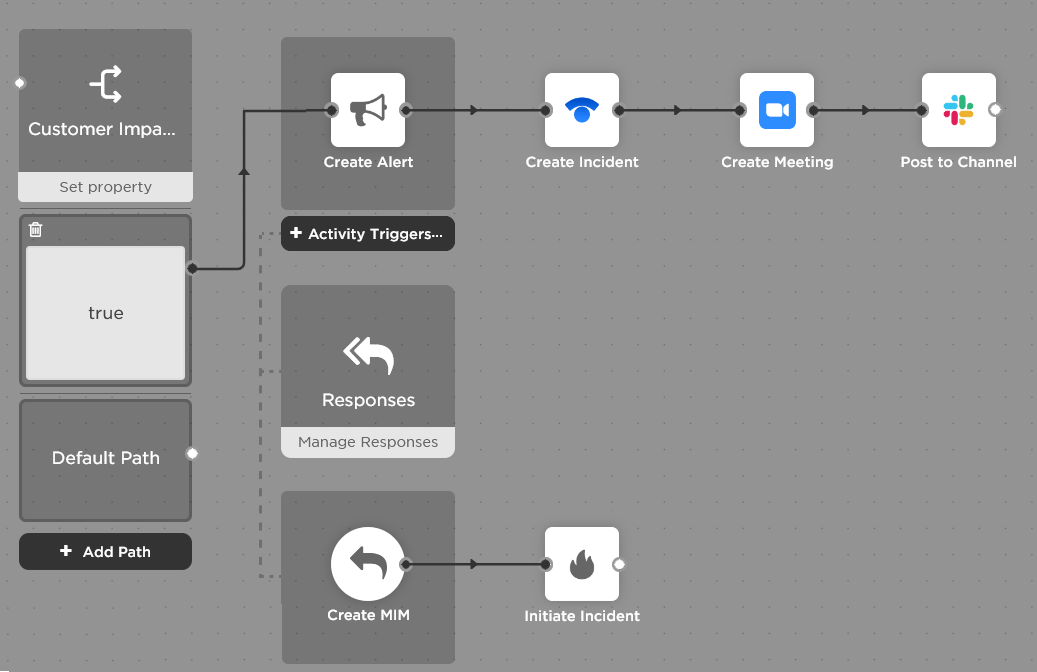
Drag an xMatters Create Alert step onto the canvas and double-click the step to open the setup screen (or hover over the step and click the pencil icon). Update the step label to reflect the purpose of the alert. For example, if the step follows a "Customer impacting=true" path on a switch step, you might name it "Create Customer Care Alert".
| Property | Description | Example |
|---|---|---|
| alert.id | The unique identifier (UUID) of the alert. | e930e32d-b863-4c55-a528-1d2829e3690e |
| alert.alertId | ID assigned to this alert by xMatters and used to track its progress through the system. (Also the number used to reference this alert in the Alerts and Tracking reports.) | 889003 |
Step 2: Compose messages to send for the alert
The Create Alert step message editors do not currently support multiple languages. If your system has more than one language defined and you want to create message content in multiple languages, use the Create Alert Using a Form step instead.
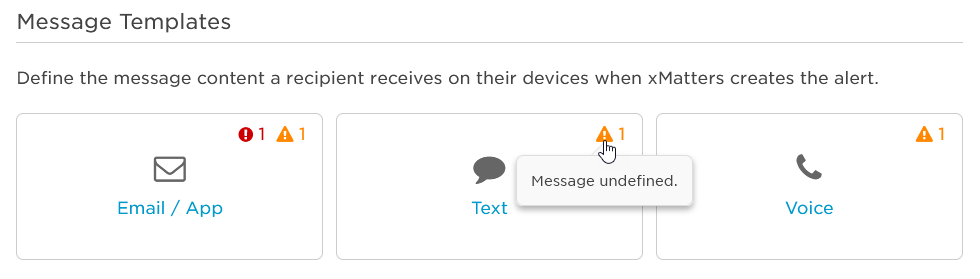
The Setup tab of the Create Alert step includes a Message Templates section that lists the type of messages you can compose for your alert: Email / App, Text, or Voice. The name of each template is a hyperlink to that tab of the message builder. Flow Designer displays warning and error badges for any messages that are missing content or contain invalid variables.
The following sections describe how to compose messages for each template type:
The Email / App tab of the message editor allows you to create content for email and xMatters mobile app notifications. It includes a WYSIWYG editor with inline editing and formatting features that will be familiar to most users.
To compose Email / App messages:
- Add content to the Subject field, including message and flow variables. For helpful tips on creating a message subject, see Write a helpful message subject.
- Add content to the message body. For more information about including variables in message content, see Include properties in message content.
- If you make a mistake, use Undo to step back or Redo to step forward.
- Add images to the message body. For more information about inserting images into email messages, see Include images in email messages.
- Format the message using the available options in the inline editor, or click Code View to format the underlying HTML. For formatting tips, see Best practices for formatting Email / App messages.
- Click Save.
Use the Message Content field to build your text (SMS) message by typing in text and using message and flow variables. Due to length limitations of text messages, it's important to keep messages short, as they need to also include the value of variables, carrier information, and responses.
Messages longer than 459 characters, including variable values at runtime, may be truncated to accommodate responses and carrier information. Messages longer than 160 characters are broken into smaller segments that are sent individually and reassembled on the recipient's device. Because SMS messages are subject to these and other inherent limitations, we recommend taking some extra time when building out your messages for text devices to ensure you're creating effective, useful SMS notifications.
For other tips, tricks, and recommendations for using xMatters to send text messages, see Best practices for SMS messages.
The voice message builder of the Create Alert step does not currently support voice recordings.
You can build voice messages by composing phrases for xMatters to read to recipients using text-to-speech (TTS).
To compose a voice message:
- Type text or drag variables to create a phrase.
- Select a playback option for the phrase. xMatters can either speak the value as a phrase or spell out the individual letters.
- To add additional phrases, click + Add Phrase.
- To change the order of the listed phrases, grab the handle icon to the left of the phrase and drag it to a new position in the list.
Messages that do not contain any content or response options are considered empty notifications. They are not sent to the targeted devices and are logged as failed notifications.
Step 3: Configure recipients and incidents settings
On the Setup tab, fill in the recipients and incident settings using text, outputs from previous steps, trigger properties, constants, or a combination of these. You can quickly find outputs with the Search bar.
If this step is notifying resolvers or stakeholders for an incident, make sure to populate the Incident ID field with the "Incident ID" output from the connected Initiate Incident step — this is what associates the recipients to the incident.
Specify recipients using the xMatters target name of the user, group, device, or service you want to target. For example, this can include mmcbride, AntaresDB-Support, Responders-Team, mmcbride|Work Email, or API. When you specify a service name, the group which owns the service is targeted.
Populate the Recipients field by mapping an output from a previous step, using a constant, by hard-coding the target name, or a combination of these. If using a constant or an output from a previous step, make sure it provides the information as an xMatters target name.
To target multiple recipients, use a comma between the input variables or target names. For example, to notify both the CustomerCare group and email the VP of Customer Support, use CustomerCare, mmcbride|Work Email. There is a 20,000 character limit for recipients, so if you need to notify a large number of recipients consider creating a group. Target names that contain commas aren't supported, and may result in targeting errors.
If there is an Initiate Incident step preceding the Create Alert step, use the "Incident ID" output from that step in the Incident ID field. This associates the notification with the incident in xMatters.
In the Incident Function field, select one of the following:
- Resolver Notification - Sends the alert to incident resolvers. Any recipients that aren't already resolvers will be added to the incident as a resolver.
- Stakeholder Update - Sends the alert to incident stakeholders. Any recipients that aren't already stakeholders will be added to the incident as a stakeholder.
Step 4: Configure a conference bridge to use for the alert
The Conference Bridge tab lets you configure whether the alert includes a conference bridge (xMatters Hosted Bridge or External Bridge). You can configure which responses connect recipients to the bridge on the Response Options tab.
You also have the option to dynamically set the type of conference bridge at runtime with the option to 'Use Output or Constant Value' to set the bridge type.
To configure an xMatters hosted bridge, select xMatters Hosted Bridge and provide the Bridge ID of an existing xMatters bridge.
The xMatters Bridge ID is available as an output of the Create xMatters Conference step. Include this step upstream to create a new xMatters Hosted bridge as part of your flow.
To configure an external bridge, select External Bridge as the bridge type and then do one of the following:
- Select the name of the conference bridge to use. You may need to provide the bridge number that identifies the conference to the conference bridge provider.
- Select Use Output or Constant Value to use text, the output of a previous step, or a constant value to define which external bridge to use. When you select this option, you'll need to provide the name of the bridge, and you can provide an external bridge number if your provider requires it.
Select the option Use Output or Constant Value to set the type of bridge you want to use at runtime (valid values are BRIDGE for xMatters hosted or EXTERNAL for external bridge), then provide the details for the xMatters hosted or external bridge.
Step 5: Configure response options to include with your notifications
On the Response Options tab, you can create response options that allows recipients of the alert to respond by text, mobile app message, email, or phone. Response options are highly flexible and allow you to:
- Configure actions the system should take for a response (e.g., Unavailable = Escalate).
- Assign contribution values for reporting (e.g., Accept = Positive).
- Redirect users to a web address (URL) after they respond.
- Specify the response number a recipient should press, regardless of the order they're listed.
- Build automated workflows triggered by a response option. For example, a "Create Major Incident" response could initiate an incident in xMatters, create a conference bridge, post to a chat channel, and create a post to a status website, all as a result of selecting the response in the notification. Adding a new response option automatically creates a corresponding trigger on your canvas.
- On the Responses tab, click Add Response Option.
- In the Response Option field, provide the response option to display in text, xMatters mobile app, and email messages.
- In the Email Description field, provide an additional description to include in email messages.
- In the Voice Prompt field, type a phrase to be read to voice device users using text-to-speech, before prompting the user to press a digit. For example, "To respond with <Voice Prompt>, press <Digit>." Click the number in the voice prompt field to select the number a recipient of a voice notification should press to select this response option.
- From the Action drop-down, select the action the system takes when a recipient selects this response option. The actions you assign affect how (and when) xMatters continues to notify other recipients in the escalation path.
| Value | Action |
|---|---|
| Record Response | Record the user's response and stop notifying them, but continue notifying other recipients. When this response action is selected, xMatters does not delink the user from the alert. The user can change their response by responding to the notification again. |
| Stop Notifying User | Stop notifying the user, but continue notifying other recipients. |
| Stop Notifying Target | Stop notifying the user (and any other members if notified as part of an on-call or dynamic group), but keep notifying other users and members of other groups. |
| Escalate | Stop notifying the user and immediately escalate the alert to the next scheduled recipient. |
| Assign to User | Record the user's response and stop notifying other recipients. The user can change their response; however, they are limited to responses that don't notify other recipients: 'End' or 'Record Response'. |
| End | Stop notifying all recipients and immediately terminate the alert. This stops notifications whether the responses came from an individually targeted user, a user in a group, or from within a nested group. |
The behavior of "Stop Notifying Target" and "Escalate" can be complicated for 'nested' groups (i.e., when groups are members of other groups), and when other recipients are also targeted by the same alert. For examples that outline the behavior of these actions for common situations, see Response action examples.
- From the Contribution drop-down, select how to categorize the response for user and group performance reports.
| Value | Action |
|---|---|
| None | Response is not used when calculating contributions for performance reports, but is still displayed on Events reports. (This value does not have the same meaning as a 'Neutral' contribution value.) |
| Positive |
Response used for reporting. For example, you might assign a positive value to a response of "Accept" or "Own". For alerts related to incident management, only responses with a Positive response contribution will show the responder as Engaged in the Incident Console and add them as a resolver to the incident. |
| Neutral | Response used for reporting, but has no negative or positive connotation. For example, you might assign a neutral value to a response of "Acknowledge" or "Unavailable". (This value does not have the same meaning as a 'None' contribution value). |
| Negative | Response used for reporting. For example, you might assign a negative value to a response of "Reject" or "Escalate". |
- To redirect the user to a URL after they respond, in the URL Redirect field, enter a valid URL address. When users select the response option in an email, xMatters Inbox, or mobile app notification, they can choose to open the URL in a new browser window.
- You can include constants or flow variables in the URL address. To access the variables available to you to drag into this field, click the Show flow variables link below the URL Redirect field.
- To enable or disable a response option to join the conference bridge configured for the alert, select or clear the Joins conference bridge check box. If selected, users automatically join the conference bridge when they select this response in a voice message.
- To enable or disable the ability to comment when users respond to notifications in email or the xMatters Inbox, select or clear the Enable comments for this response check box. To control commenting for all response options, select or clear the Enable comments for all response options check box in the left side bar.
- To add additional response options, click Add Response Option.
- To change the order of the response options, grab the handle icon to the left of a response option and drag it to a new position in the list.
The order response options are listed in the Create Alert step determines the order they're presented to recipients. The digit you assign to a response corresponds to the button the recipient of a voice notification should press to select that response choice.
While text phone devices also present the response options based on the number assigned to them on the number pad, the actual number required for each response may be different. For example, if you create three response choices of ACCEPT, IGNORE, and CLEAR, numbered 1, 2, and 3, all voice notifications will prompt recipients to press 1 to accept, 2 to ignore, and 3 to clear. Each text message will present the response choices in the same order, but may require a different number, due to the way simple SMS responses are processed by xMatters; e.g., "Press 5 to ACCEPT, 6 to IGNORE, or 7 to CLEAR."
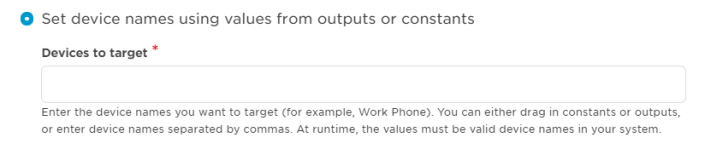
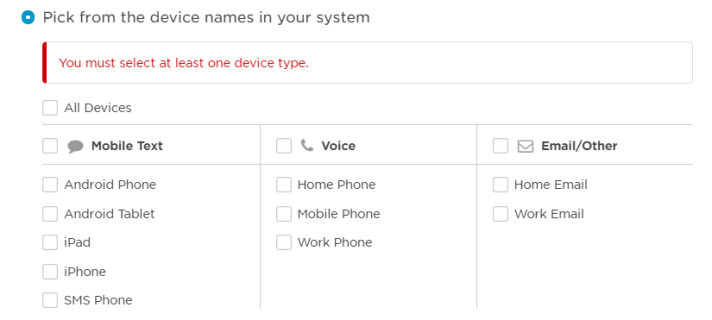
Step 6: Set devices to target for notification
The Devices tab lets you set which device names the Create Alert step targets for notification. For example, you can use these settings to specify that this step only notify mobile devices and work phones.
If a recipient doesn't have one of the specified devices, they won't get notified (unless you've configured failsafe devices for your users and groups).
There are two ways you can specify which device names to target for notification:
You can specify a comma-separated list of device names to target using the outputs of previous steps, constants, or text - or a combination of these. The value that's provided at run-time must match a valid device name (you can see a list of the available device names when you select the next option, to pick from a list of device names).
This is the default option that's selected when you add a new Create Alert step. By default, xMatters selects all devices.
Step 7: Configure notification handling settings
The Handling & Overrides tab includes settings to control how the alert behaves and how recipients interact with voice notifications (for example, you can specify the alerts's priority and expiration, as well as several override, password, and voicemail options), and they allow you to override the Caller ID and display name associated with the alert.
When you add a Create Alert step to the canvas, it uses default handling and override values. To edit a setting, select or specify a new value. For some settings, you have the option to Use Output or Constant Value. This allows you to use text, the output of a previous step, or a constant as the value for the setting. The value that's provided at run-time must match one of the valid values listed for that setting.
For example, the value that's passed into the Alert > Priority property as part of your flow must be LOW, MEDIUM, or HIGH when the step is initiated to be a valid input for the Priority alert handling setting.
Step 8: Add activity triggers to the canvas
Once you're done setting up the Create Alert step, you can then add activity triggers to your canvas. Activity triggers kick off flows based on different alert lifecycle activities, including status updates, device delivery updates, responses, comments, escalations, and targeted recipient failures. Each of these different triggers includes a common set of properties, and additional properties specific to the type of activity.
If you want to associate a conference bridge for any of your response options, you can add the Create xMatters Conference step to one or more Responses activity triggers.
For detailed descriptions of activity triggers and their properties, see Alert activity triggers.
To add an activity trigger to a Create Alert step:
- Click + Activity Triggers below the Create Alert step.
- From the drop-down list that appears, select the type of activity trigger to add.
- The trigger appears below the Create Alert step on the canvas.
- Each activity trigger can only be used once, so when you add one of these triggers to a Create Alert step, it disappears from the list; when you delete it from the canvas, it reappears in the list so it's available for future use.
- Double-click the trigger on the canvas (or hover over the step and click the pencil icon) to view its outputs, or to enable or disable it.
- Connect the flow you want trigger when this type of activity occurs for the alert.