Engage and manage resolvers
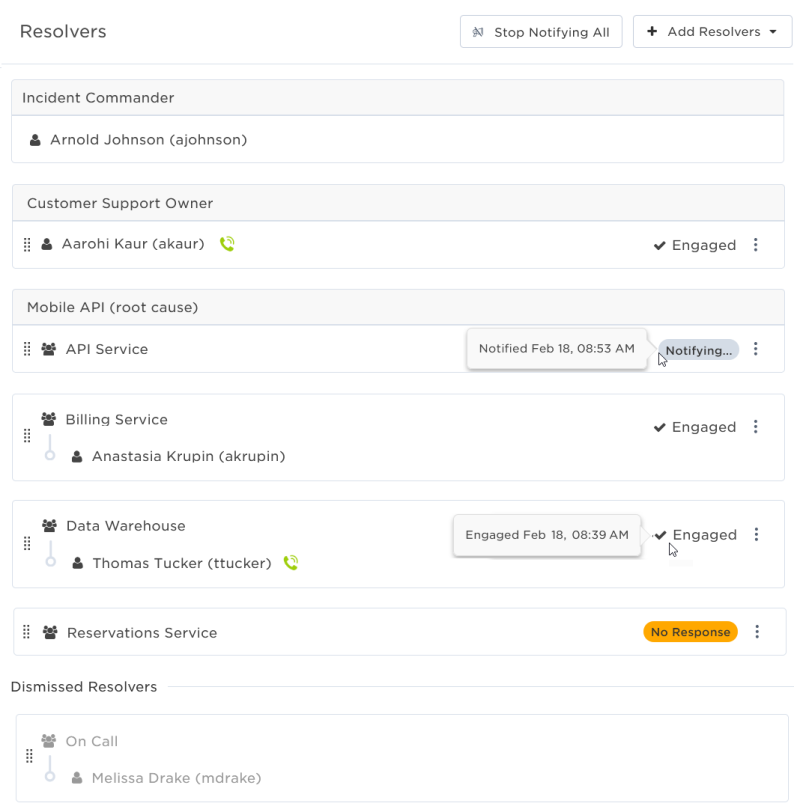
The Resolvers section of the Incident Console lets you see at a glance which subject matter experts and service owners are engaged in the incident resolution process.
You can use this section to add additional resolvers as the incident progresses, renotify users or teams that haven't responded, stop notifying people to engage if you have the resources you currently need to work the incident, and dismiss resolvers when you no longer need them to actively engage in resolving the incident.
The following sections describe the actions you can perform from the Resolvers section:
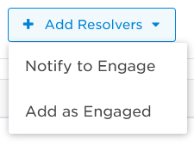
You can add resolvers to an incident by sending them a notification requesting they engage ('Notify to Engage') or by adding them directly to the resolvers list without sending them a notification ('Add as Engaged'). Adding resolvers directly is useful when someone is already working an incident and you want to add them to the Resolvers list without making them stop to acknowledge a message.
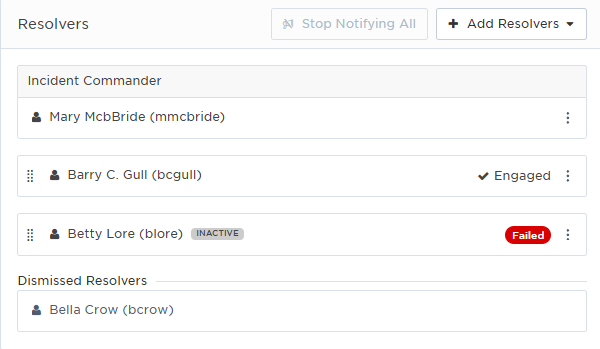
When you notify a resolver to engage in the incident, the Resolver's list displays their name and the status of the notification process: whether xMatters is 'Notifying' them, if the request is 'Escalating' to the next member of a group, if there was no 'No Response', or if the notification 'Failed'. Resolvers who accept the request to engage or those who were added directly are marked as 'Engaged' in the incident. (If you're using a custom workflow, the response option's contribution value must be "Positive" for the resolver to be added to the incident.)
To add resolvers:
- In the Resolvers area of the console, click Add Resolvers.
- From the drop-down menu, select one of the following options:
- Notify to Engage: Send a notification to users, groups, or services, requesting they engage in the incident.
- Add as Engaged: Skip the notification process and display a user as engaged in the incident.
- Under Available, select a resolver type from the drop-down menu and begin typing a name in the search bar (or type two spaces to see a list of all resolvers you have permission to add).
- If you have insights enabled, you can also select resolvers from the Suggested Resolvers section. These recommendations are derived from AI-driven algorithms based on user-determined insights and incident links. This section is only available if you selected 'Notify to Engage' in the previous step.
- If you selected 'Add as Engaged' in the previous step, then you'll only have the option to select users (not groups or services).
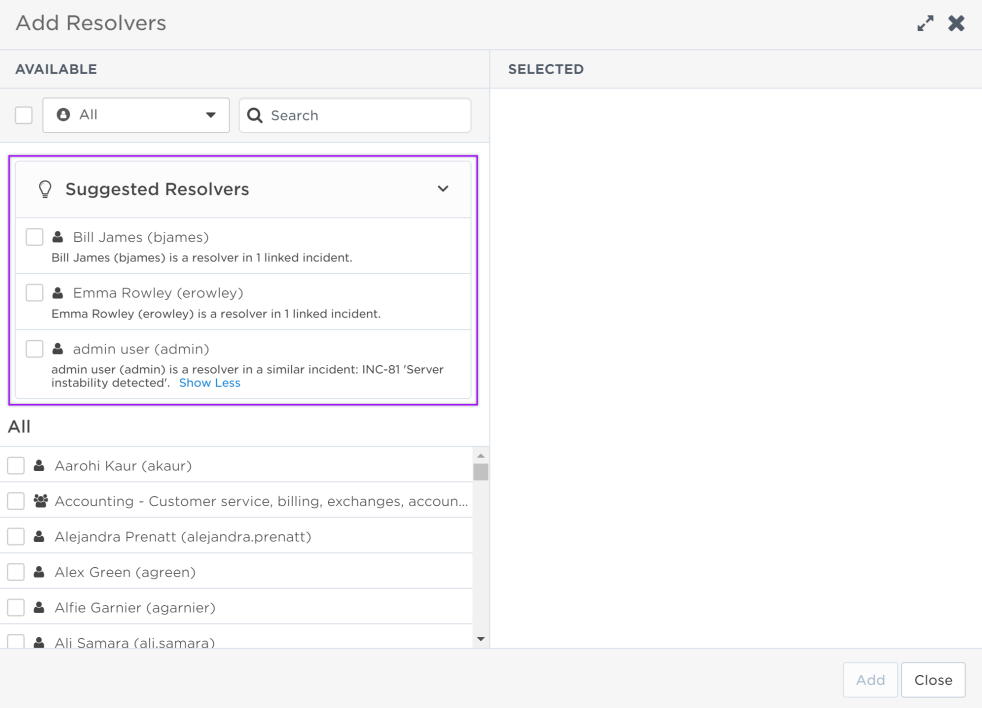
- Select the check box next to a resolver's name to add them to the Selected window.
- If a service is reported as impacted by the incident, you can also easily notify the service owner to engage from the Impacted Services section of the console or from the service dependencies map. If you notify to engage the service owner, the name of the service will automatically be added as a resolver role at the top of the group resolver card in the Resolvers section of the Incident Console.
- Once you've finished selecting the resolvers you want to add, click Add.
Only the first on-call resource to respond from a group or service is added as a resolver. If there are additional people from a group you'd like to engage, you can notify them directly.
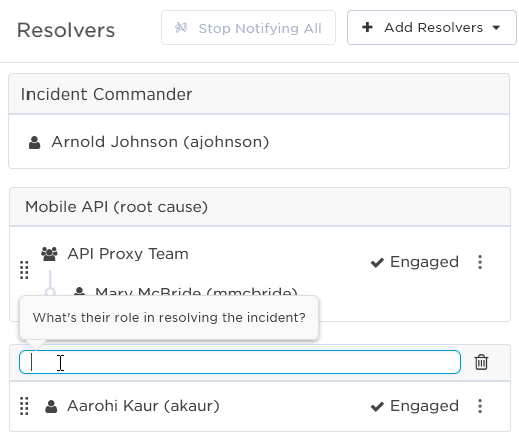
You can add a description to each resolver detailing their role or responsibilities in resolving the incident.
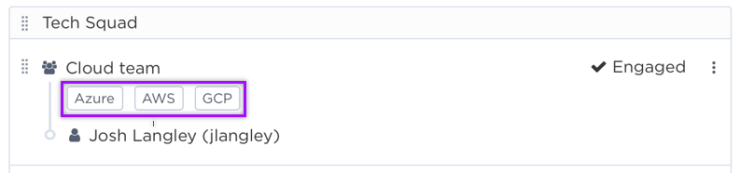
When you add a role to a resolver, it appears at the top of their resolver card in the Resolvers section of the Incident Console. If you notify to engage a service owner from the Impacted Services section of the console or from the service dependencies map, the name of the service will automatically be added as a role to the group resolver.
If multiple resolvers share the same role in resolving the incident, you can drag and drop them into the same role.
To add a resolver role:
- Move your pointer over a resolver card in the Resolvers section of the Incident Console.
- Click + Role when it appears above the resolver.

- Type in a description of that resolver's role in resolving the incident.
To edit a resolver role:
- Move your pointer over the resolver role you want to edit.
- Click in the highlighted field to edit the role description.
:
To delete a resolver role:
- Move your pointer over the resolver role you want to delete.
- Click the trash can icon when it appears.
- Deleting a role removes the descriptive header from the top of the resolver card; it does not delete the resolver from the incident.
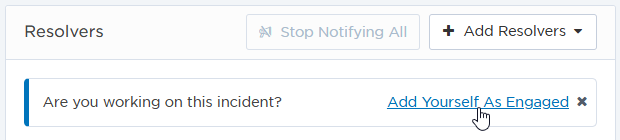
If you have permission to update an incident, instead of waiting to be added or navigating extra menus, you can add yourself as a resolver directly from the Incident Console. If you are viewing an incident where you're not currently engaged, a prompt is displayed in the Resolvers section allowing you to mark yourself as engaged in one step.
To add yourself as a resolver:
- Navigate to the Resolvers section of the Incident Console.
- Click Add Yourself As Engaged. Your name is immediately be added to the resolvers list and the incident timeline is updated.
The Incident Commander is the resolver in charge of the incident. It's their responsibility to guide the incident to resolution, oversee resolution activities, and make the final call on decisions related to the incident. By default, the user that initiates the incident is assigned as the Incident Commander. If you need to hand off responsibility of the incident during the resolution process, you can replace the current commander with any engaged resolver.
To reassign the Incident Commander:
- Do one of the following:
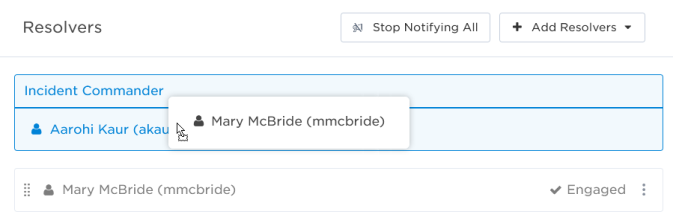
- Drag an engaged resolver into the Incident Commander role. In the Reassign Incident Commander dialog box that appears, confirm you want to make the change by clicking Reassign.
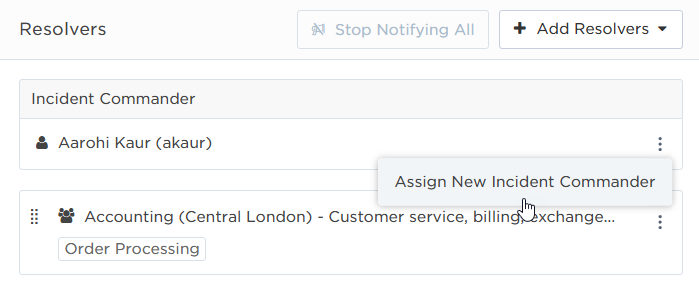
- Click the options icon (three dots) next to the name of the incident commander and click Assign New Incident Commander. Assign yourself or search for and select a new incident commander from the list of engaged resolvers and click Assign.
- Click the options icon (three dots) next to the name of an engaged resolver, select Assign as Incident Commander, and click Reassign.
- Drag an engaged resolver into the Incident Commander role. In the Reassign Incident Commander dialog box that appears, confirm you want to make the change by clicking Reassign.
When you reassign the Incident Commander, the replaced resolver is added or returned to the list of resolvers. If the resolver was part of a group before they became the Incident Commander, they'll be listed under that group when they're returned to the list.
Move your pointer over a resolver's status to view when they engaged in the incident or when they were notified:


If you notified a group to engage, the 'Notifying' status changes to 'Escalating' when the request escalates, either manually via a response or automatically after a configured wait time. A 'No Response' status is displayed 5 minutes after the notification reaches the last user in the escalation path. If the notification cannot be delivered (e.g., a user has no active devices, a group has no members or shifts, or a service has no group owner to notify), a 'Failed' status is displayed. You can troubleshoot failed notifications from the incident timeline.
If the notification failed because a targeted service has no owner, the resolver card will show the service as the resolver, and it will also be added as a resolver role at the top of the card.

If a resolver is currently participating in an xMatters conference bridge for this incident, a phone icon appears next to their name. Move your pointer over the icon to view the name of the bridge:
![]()
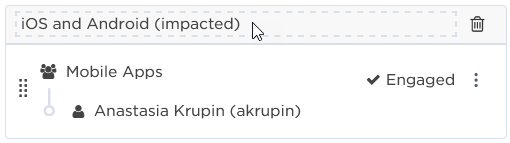
If a group owns any services impacted by the incident, the names of the impacted services are displayed below the group:
If a resolver is deleted from the system, they are listed as 'Deleted Resolver' in the Resolvers section, and the text is struck through. If the Incident Commander is deleted, they are listed as 'Deleted User'.
If a resolver is inactive, the 'Inactive' pill is displayed next to the user or group's name in the Resolvers and Stakeholders section, under task assignees, in the incident timeline, and when selecting recipients.
If you have appropriate permissions, you can click the name of a resolver to view more detailed information about them (except when the user or group resolver has been deleted). When you click the name of a user, xMatters displays their user contact card with device details and group membership information. Clicking on a group name displays a 'Who Is On Call' dialog box with a summary of the group's current on-call shifts, members, and escalations.
This information can be helpful if you're troubleshooting why a resolver hasn't engaged. For example, you may identify that a user doesn't have any devices configured, or that there's currently no one on call in a group.
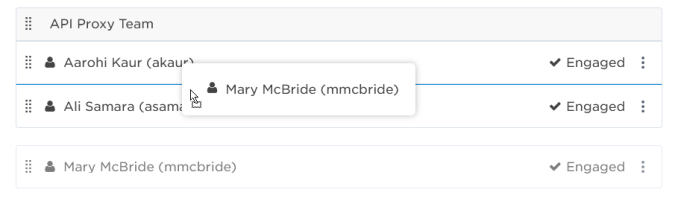
To change the order that resolvers are displayed in the Incident Console, grab the handle icon next to a resolver's name or a role and drag the resolver or role to a new position in the list.
![]()
The Incident Commander role always appears at the top of the Resolvers section; you cannot drag it to a new location in the list.
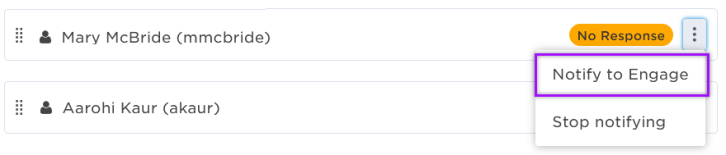
To stop notifying a single user or group, click the options menu (vertical ellipses icon) and select Stop notifying.

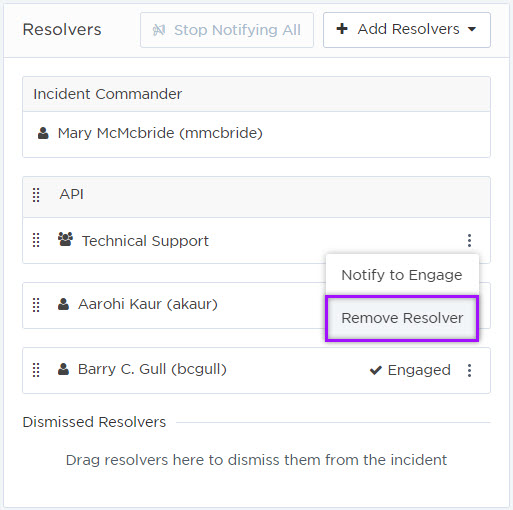
To stop notifying all resolvers, click Stop Notifying All at the top of the resolvers area.

If an incident's status is changed to Resolved, notifications to resolvers will stop automatically.
If a resolver hasn't responded to a notification, or you previously stopped notifications to them, you can notify them again by clicking the options menu (vertical ellipses icon) and selecting Notify to Engage. The option to renotify is also available if notification delivery failed.
You can dismiss resolvers from an incident. This is helpful for indicating which resolvers are no longer needed to actively engage in resolving the incident, and for keeping an accurate record of when and how long each resolver was engaged.
To dismiss a resolver from the incident:
- Do one of the following:
- Click the options menu (vertical ellipses icon) for the resolver you want to dismiss and select Dismiss Resolver.
- Drag and drop the resolver under 'Dismissed Resolvers' at the bottom of the Resolver section.
- Provide a reason for dismissing the resolver to add a note with your rationale to the incident timeline (optional).
- Click Dismiss Resolver.
- An entry is added to the timeline for their dismissal, including the optional note.
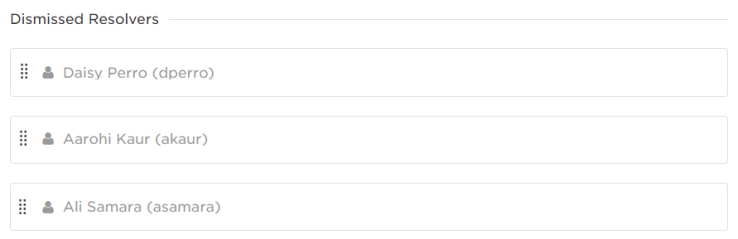
Dismissed resolvers appear grayed out and are listed under 'Dismissed Resolvers' at the bottom of the Resolvers section:
If a resolver is no longer needed, or was added by mistake, you can remove a resolver from the incident.
To remove a resolver from the incident:
- In the Resolver section of the Incident Console, click the options icon (three dots) next to the name of the resolver you want to remove.
- Select Remove Resolver.
If a resolver user account is deleted from the system their name appears grayed out in the Incident Console.
When you notify resolvers to engage in an incident, it's important to know when the notification could not be delivered so you can find another way to notify the resolver or engage a different resolver instead.
The Resolvers section of the Incident Console displays a 'Failure' badge when the notification to engage was unable to be delivered to a resolver. Delivery failures can occur for several reasons, including missing or misconfigured devices, empty or inactive groups or shifts, or services without an owner.
The incident timeline includes an entry for the delivery failure, with a direct link to the alert log where you can find out the exact reason and details for the failure.
If incident commanders, resolvers, or stakeholders are added to the incident but become inactive (for example, their xMatters's profile is marked as 'Inactive' or they're deleted from the system) they are displayed as grayed-out and struck-through in the Incident Console.