Custom workflow guide
The easiest way to integrate xMatters with a third-party application and get started building automated toolchains is to use one of our available workflow templates. Our Workflow Templates collection includes built-in and packaged custom workflows for many applications used in today's IT resolution processes.
Workflow templates have their own specific guides to help you through the set up and configuration process. If you're using a workflow template, you can find its guide at xMatters Integrations.
Can't find a template for the application you're looking for?
No problem! You can easily design your own workflow from scratch - this guide shows you how.
When you design a workflow from scratch, you can completely customize your incident resolution process by building your own forms, properties, messages, and responses. This means you can tailor your communications to suit the situation, recipient, and required action based on any business process, emergency, or technology, and you can use Flow Designer to create orchestrated toolchains and automate incident management.
If you've converted a built-in workflow or imported a custom workflow to use as a starting point, then this guide gives you a good overview of the different things you can customize, such as changing the properties brought into xMatters from the source system, editing the content and appearance of messages, and adapting response choices and their actions.
Get to know custom workflows
Congratulations, you've just created a custom workflow! We're guessing you're looking at the following screen and wondering what you should do next.
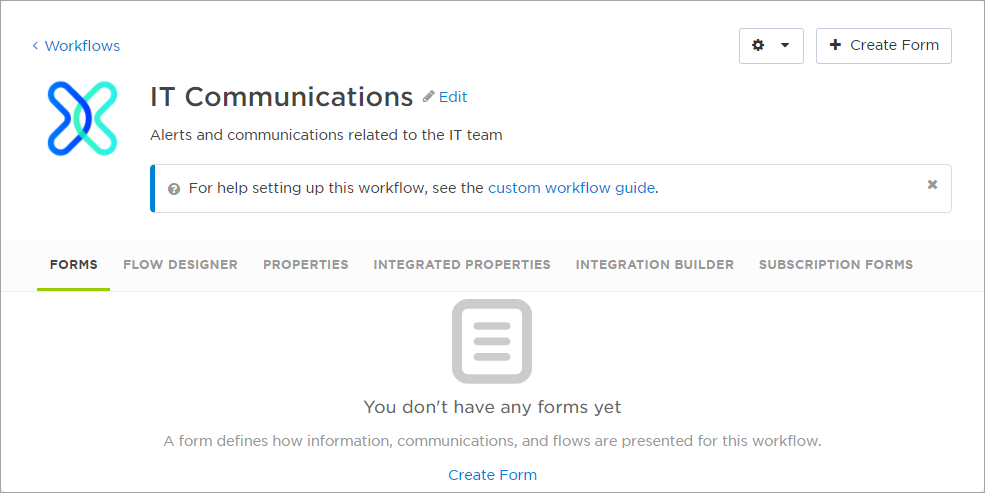
Well you've come to the right place. Let's start with a quick overview of the different things you see on this screen:
- Forms: Define the information that's contained in messages, how a message is presented to a recipient on their devices, and the response options that are available. Forms are used to create alerts in xMatters, and you can't build a flow in Flow Designer until you've created a form. Learn more.
- Flows: Access Flow Designer, which allows you to build automated toolchains for each of your forms that connect xMatters with your DevOps and IT applications. Learn more.
- Properties: Create check boxes, option lists, and number selectors to include data into your forms and messages, and which are available to flow steps for forms that include them. Learn more.
- Integration Builder: Build integrations between xMatters and another application. (The Integration Builder is in the process of being replaced by Flow Designer.) Learn more.
- Subscription Forms: Allow users to be notified about alerts even if they're not one of the alert's targeted recipients. Learn more.
- Workflow Settings: Click the gear icon at the top of the screen to access settings for your workflow.
- Export: Use your workflow as a template or to import to another xMatters environment. Learn more.
- Notification Flood Control: Prevent users from being flooded with multiple notifications when they're already working on resolving the issue. Learn more.
- Edit Permissions: Control which users or groups can edit your workflow. Learn more.
- Delete: Permanently remove the workflow from your system. Learn more.
Design a custom workflow
We've got comprehensive documentation for all of the different components that make up workflows. This guide isn't intended to replace that documentation - it's designed to walk you through an example workflow to highlight the main tasks you'll need to perform when setting up your own workflow from scratch, and to point you to the resources that can help you along your way.
To do that, let's look at a sample workflow created for the pirate ship "Poseidon's Barnacle".
Step 1: Create a form
One of the first steps in creating any custom workflow is to create a form. Workflows typically include one or more forms based on a business need or unifying theme. For example, a workflow named "IT Incidents" might include forms with names like "Failover Status", "Incident Conference Bridge", and "Initial Incident".
For a pirate ship, a workflow might include the following forms:
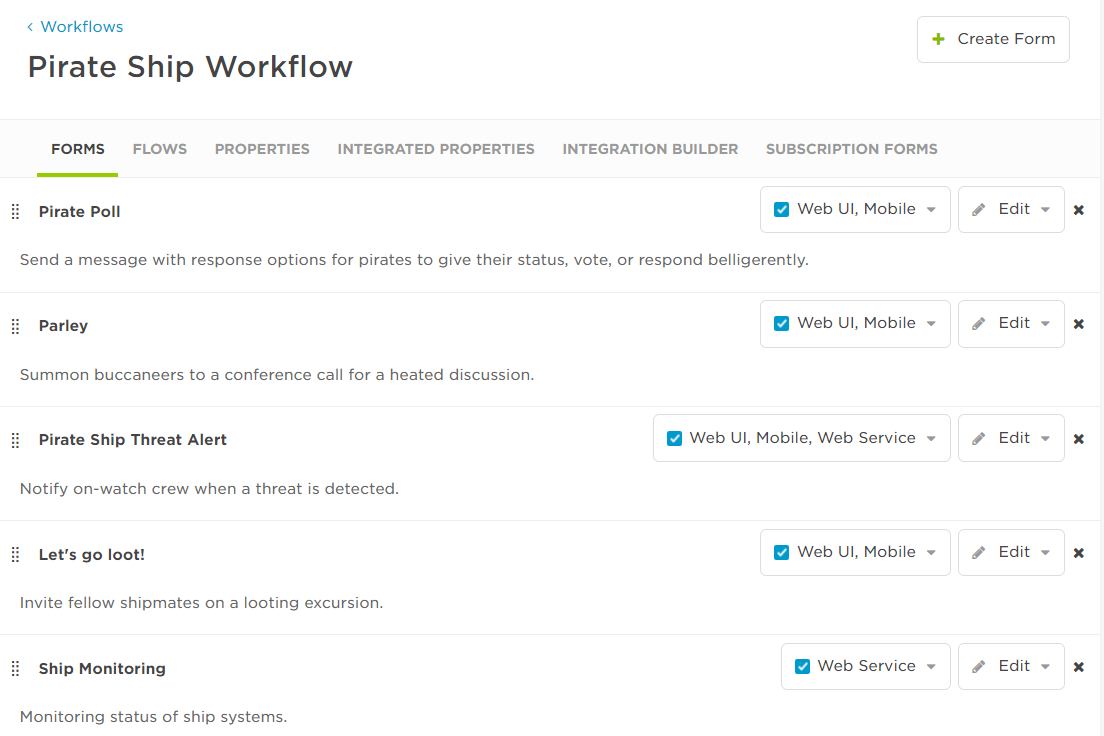
To add a form to your workflow, click Create form.
This adds an empty form to your workflow. In the upcoming steps of this guide, we'll talk about how to build out your form by creating properties, defining message content, configuring delivery options, and defining who has permission to use it.
Step 2: Create properties
Properties allow users, or applications you're integrating with, to input values into xMatters so they can be used in messages or flows. These can include boolean check boxes, option lists, or number selectors.
Here's a sample of some of the properties included in our Pirate Ship workflow:
| Name | Type | Details |
|---|---|---|
| Action | Combo Box |
Declare Mutiny Fire Cannons Pillage Plunder Scuttle |
| Details | Text | Up to 20,000 characters |
| Part of Ship | List |
Bow Crow's Nest Galley Gunwhale Head Hull Port Starboard Stern |
| Poll Description | Text | Up to 2,000 characters |
| Port of Call |
Hierarchy |
Haiti Tortuga Jamaica Fort Royal Madagascar Libertalia St. Mary's Island Île Sainte-Marie Malta Comino St. Paul's Island Valetta |
| Priority | List |
High Medium Low |
| Value | Number | - |
Properties are available to any of the forms in your workflow. When you insert a property in a message, its value replaces the property name when the form is initiated. To use properties in a message or flow, they first need to be associated with the form by dragging them onto the form layout. That's what we'll look at in the next section.
Step 3: Design the form layout
The form layout is where you define what's included on your message form, like predefined recipients, the type of devices that are targeted, a conference bridge, attachments, and more. You can drag-and-drop predefined or custom sections onto your form layout. By default, the form layout includes the Recipients section and a Custom section. Beyond that, form elements and layout are very flexible.
To include the properties we created in our messages, we'll add them to a custom section on our form layout. Here's how this would look for the Pirate Poll form layout, where we're dragging the 'Poll Description' property onto our layout:
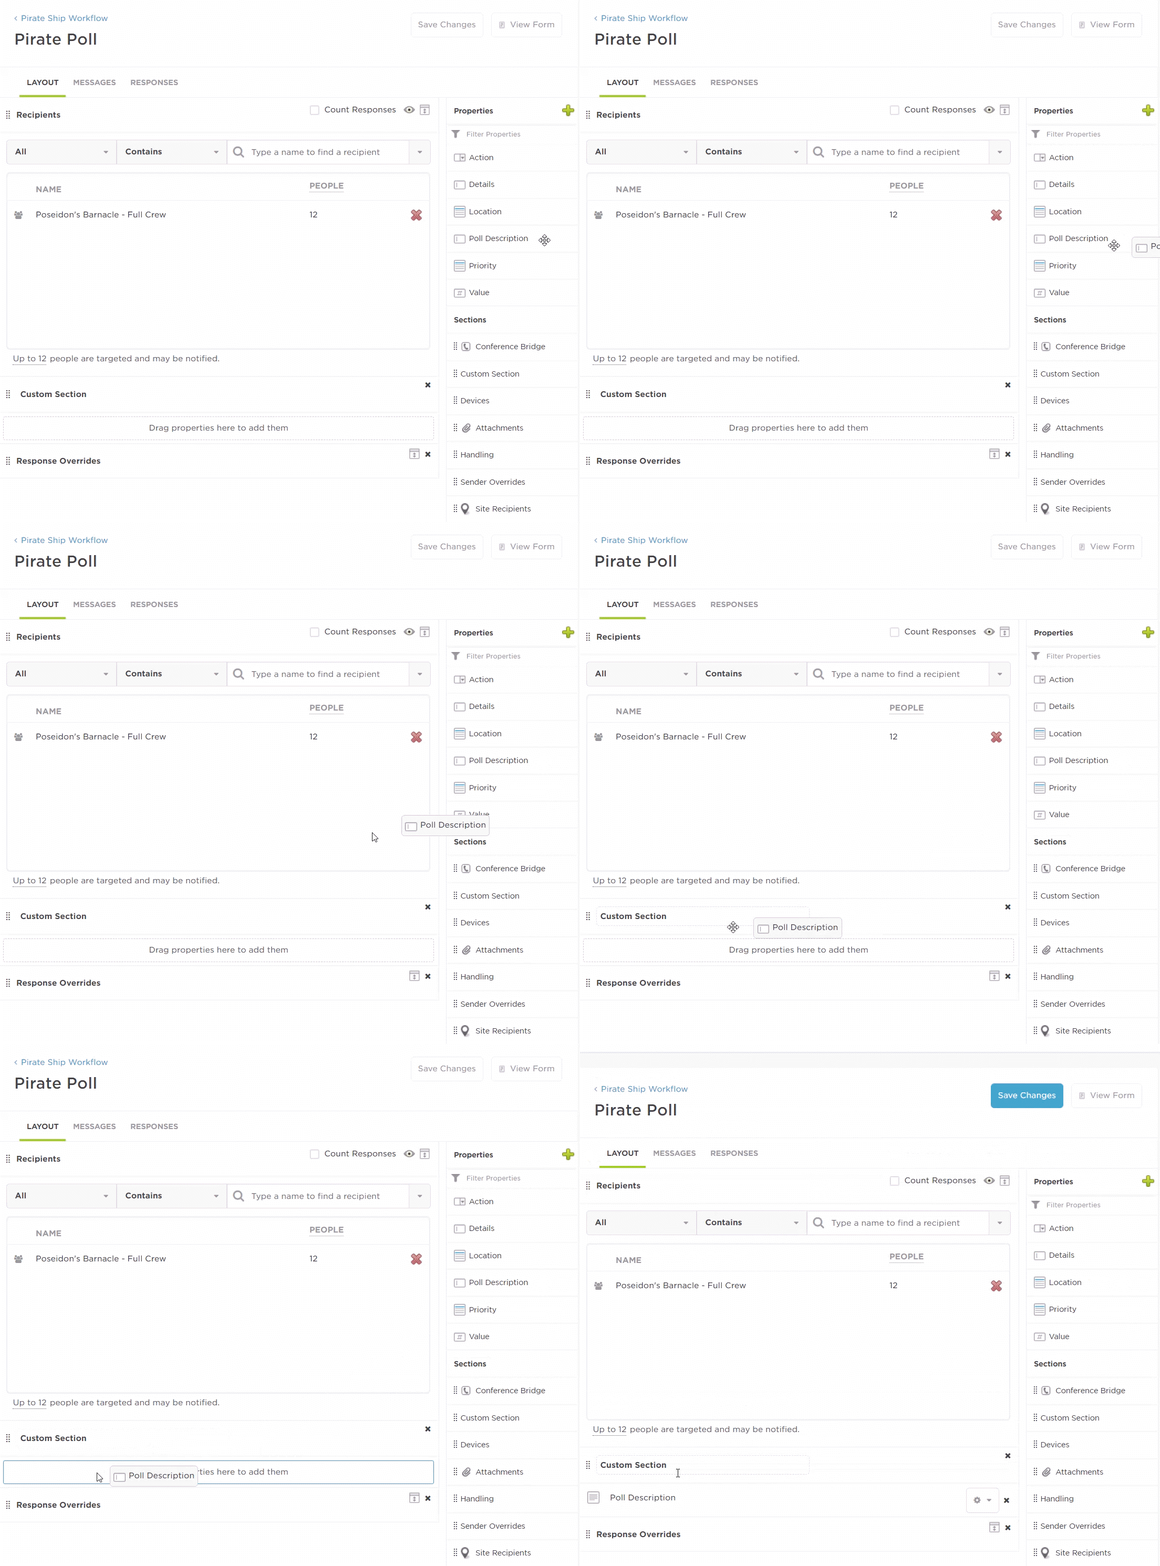
You may notice that we've added the 'Poseidon's Barnacle - Full Crew' group as default recipients. It's not mandatory to have predefined recipients for your forms, but it's good practice to include them when you typically notify the same people each time, because it can improve the message sender's speed and accuracy.
We've also added the Response Overrides section to our form layout. This allows the message sender to change the response options for the poll, in case they want to edit the existing responses, or add new ones.
You can include a lot of options on your form layout in addition to the ones we've seen above. You can also control whether the elements of your form are visible to the message sender, the order they're presented in, and if form sections are expanded or collapsed when viewed by the message sender.
Examples of some of the additional sections you can add to your form layout include:
- Devices: Specify the types of devices that are be targeted for notification.
- Conference Bridge: Allow the message sender to specify new or existing conference bridge information to include with the notification.
- Handling: Control how recipients react with notifications by setting the notification priority and expiration, and several override, password, and voicemail options.
- Sender overrides: Set the values that are displayed for the Caller ID and sender Display Name.
- Attachments: Allow message senders to include documents with their notifications.
For more information about working with your form's layout, the different types of predefined sections that are available to add to your form, and how to add properties to custom sections, see Define the form layout.
Step 4: Define message content
Once you've got your form layout and properties in place, you can start designing the content of the email, text (SMS), and voice notifications that the form will be used to send.
While Mozilla Firefox is a supported browser, the Email / Fax / Push Message and Text (SMS) / Pager / Generic message editors are only supported in Explorer 11 and Google Chrome.
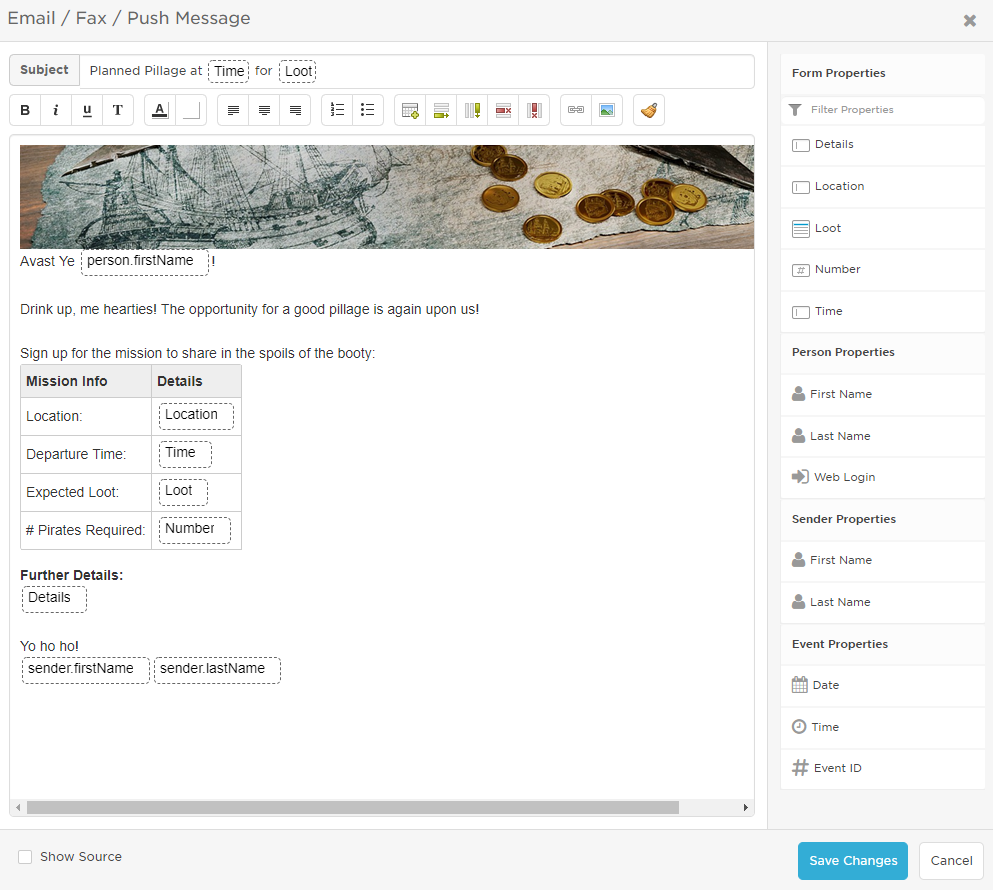
You've likely written more than a few emails in your life, so you've probably got this. But an important thing to know as you're creating your message content is that you can drag properties from the sidebar into your message body and subject. They'll be replaced with the values configured for the message when it's initiated by a message sender, a flow, or via the xMatters REST API.
For step-by-step instructions on how to access and use the Email / Fax / Push Message editor, and for best practices for creating message content, see Create message content for email, fax, and push notifications.
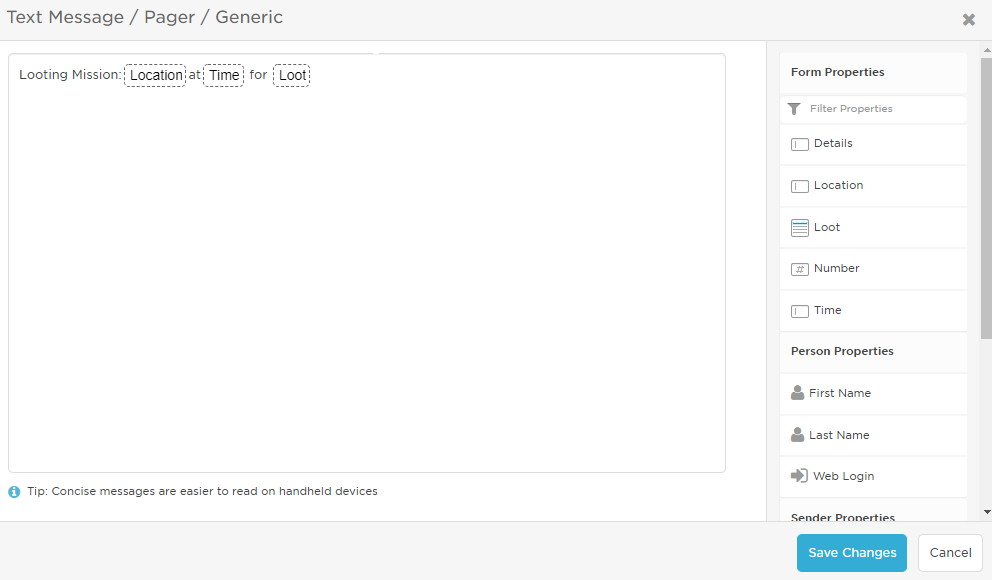
Text messages are typically much shorter and to the point than an email message, while still imparting important information. You can drag properties from the sidebar into your message content. They'll be replaced with the values the message sender selects when they send the form.
For step-by-step instructions on how to access and use the Text Message / Pager / Generic editor, and for best practices for creating SMS messages see Create message content for text (SMS), pager, and generic notifications.
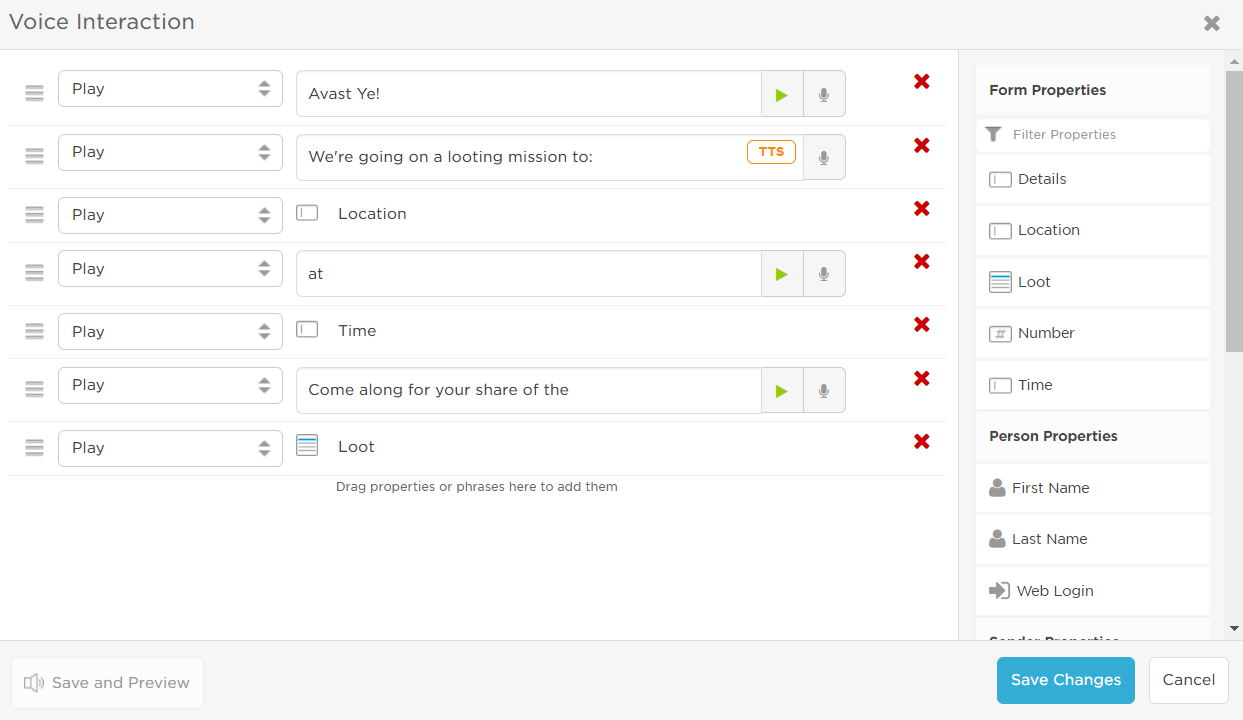
While we're all pretty familiar with how to format email and text messages, we're not typically as used to thinking about how to design voice interactions. The drag-and-drop interface and preview functionality of the Voice Interaction editor simplifies the creation of call scripts. You have the option to build your messages using text-to-speech or by creating your own recordings.
For step-by-step instructions on planning your script and using the Voice Interaction editor to build and preview your message, see Voice notification content.
If your company has multiple languages configured, the message editors include tabs for each supported language. You can create alternative message content on each of these tabs, and that content will be displayed to users with that preferred language. For more information, see Multi-language capabilities.

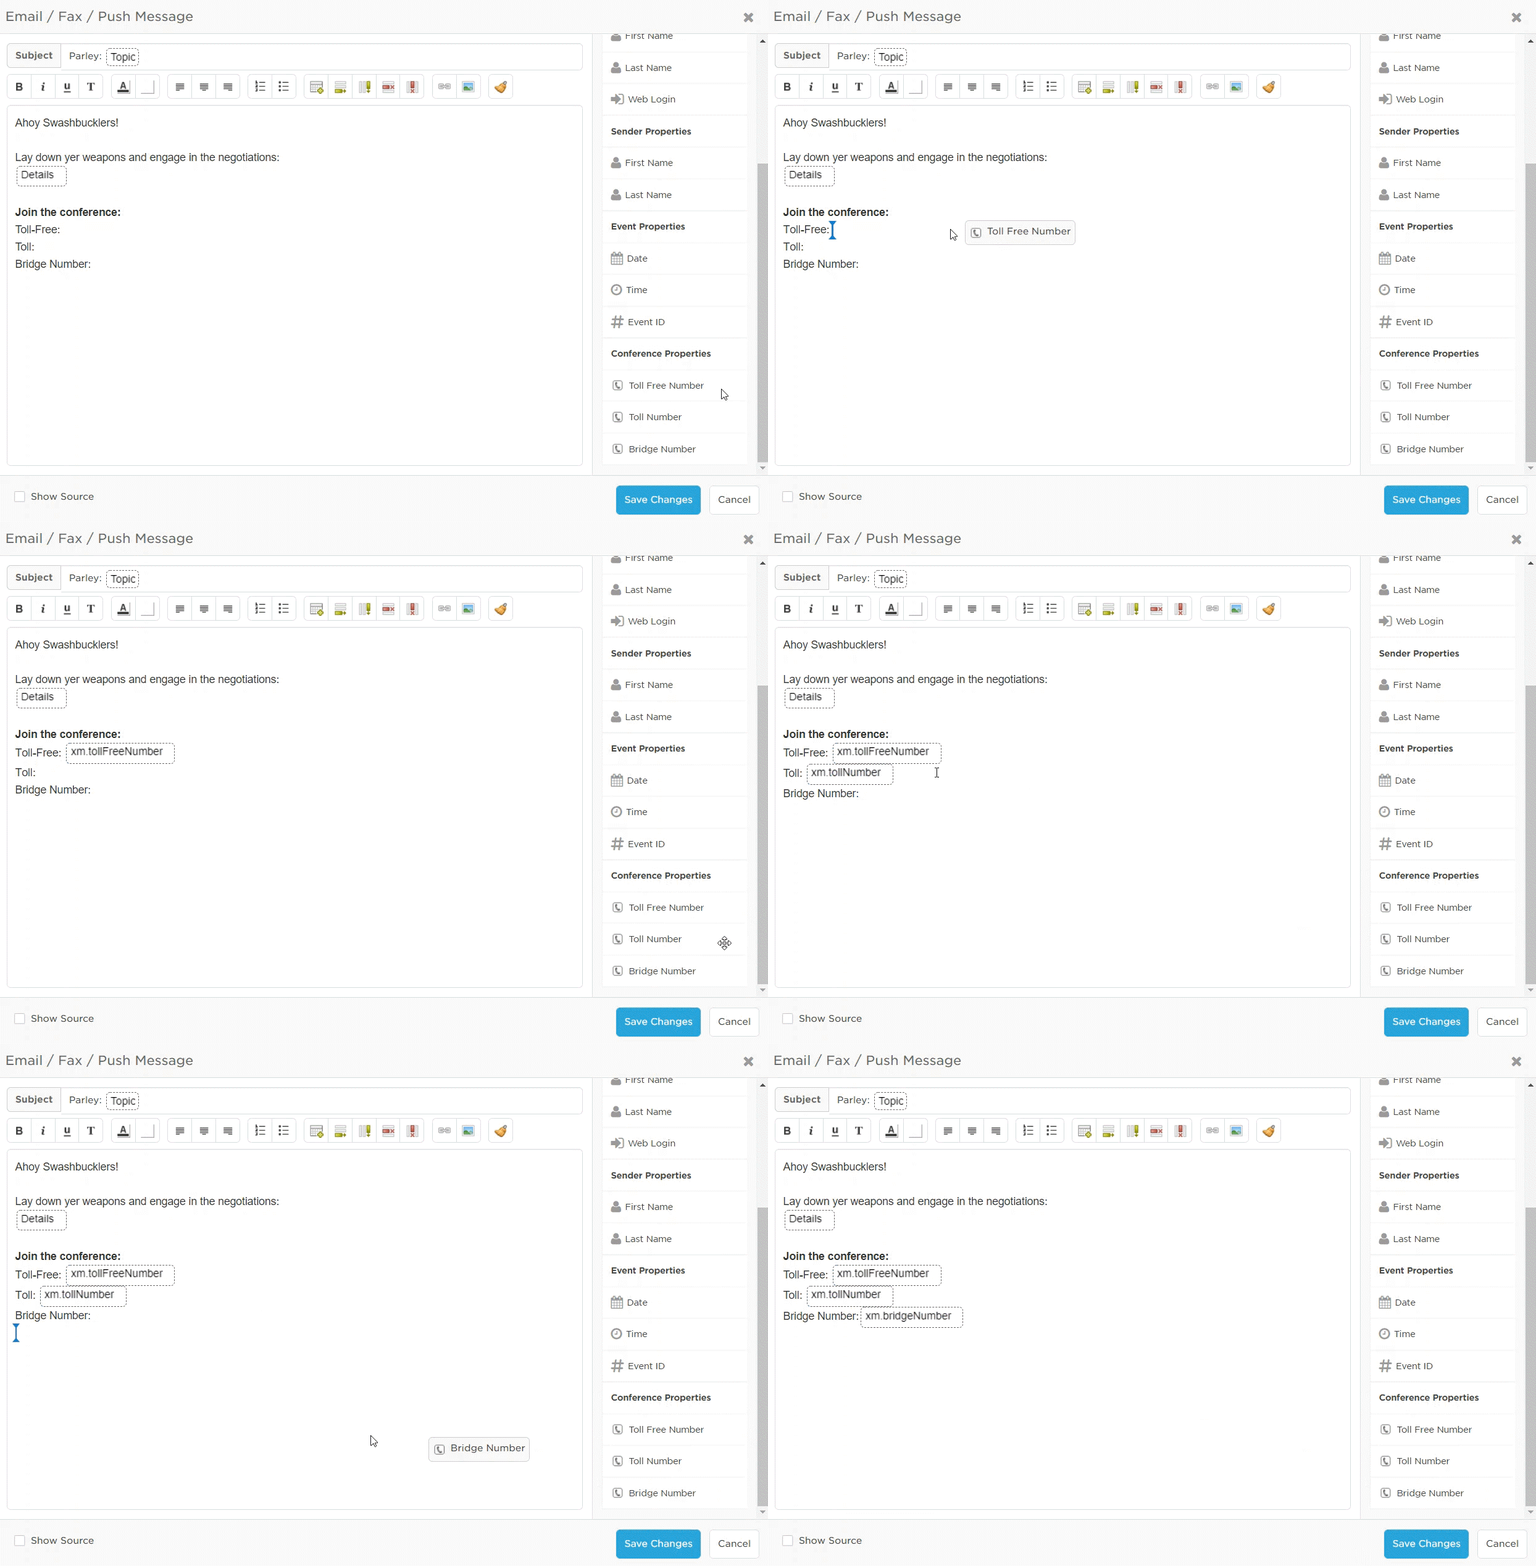
If you added a conference bridge to your form layout, the Conference Properties section is visible in the email and text editors. You can drag the conference bridge phone and bridge number properties to the body of your message. When the message is sent to recipients, the values of these properties are replaced with the numbers recipients can use to dial in to the conference.
The following example demonstrates how to add conference properties to an email message. For more information about adding a conference bride section to your form and including it in your messages, see Add a conference bridge to a form.
Step 5: Define response options
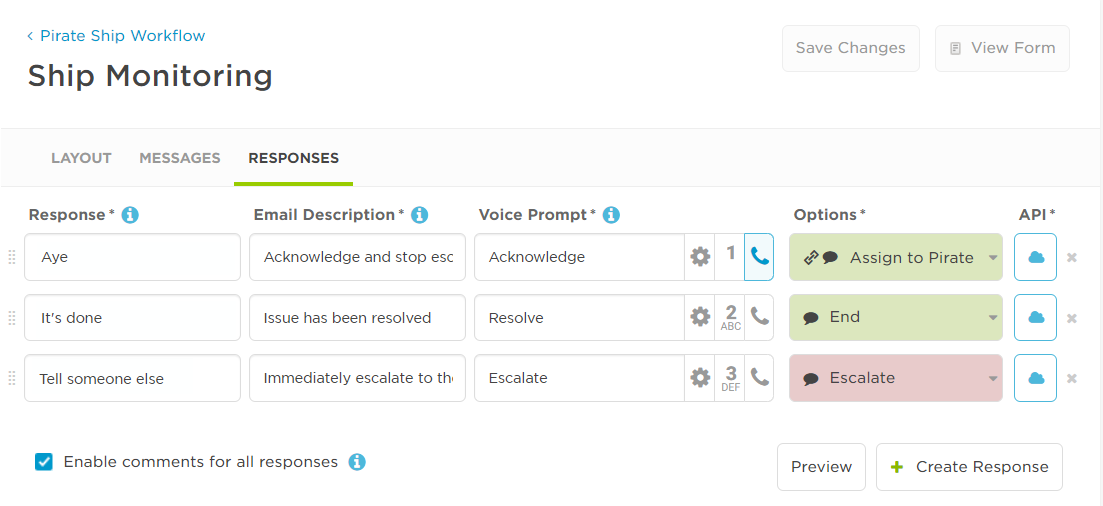
Response options allow recipients to respond using the mobile app, email, phone, or text, and define the action xMatters takes when each response is selected. These actions may include escalating or terminating the alert, or connecting the recipient to a conference bridge.
Response options are highly flexible. For a full overview of all the different ways you can use responses and how to add them to a form, see Define response options.
Step 6: Deploy forms and set sender permissions
Initially, only the user who creates a form access to it. For your forms to run and be available to message senders, you need to deploy them and grant sender permissions to the users that you want to be able to send them.
When you deploy a form, you can make available in the web user interface, the xMatters mobile apps, and the xMatters REST API. It's a best practice to deploy forms only to the locations where message senders need to access them.
To deploy your form to the web user interface, the mobile app, or for web services (the xMatters REST API), see Deploy a form.
Initially, only the user who created the form can access it and send notifications. You can grant sender permissions on a per-form basis to users or roles that have access to the form on the Messaging tab in the web user interface, in the mobile apps, or via the xMatters REST API.
To specify sender permissions for a form, see instructions in Configure form sender and scenario management permissions.
Step 7: Enable your workflow and set editor permissions
Before you can start testing your messages, you'll need to check that your workflow is enabled. And, if you'd like to let other users in your company be able to edit your workflow, you'll also need to assign them editor permissions.
New custom workflows are enabled by default, and a workflow only appears on the Messaging tab when at least one of its forms is deployed to the web user interface.
You can enable or disable a workflow by clicking its toggle on the Workflows tab.

Workflow edit permissions are granted on a per-workflow basis to individual users, to all users with certain roles, or to groups. Users that do not have permission to edit a workflow can see it in the list of all workflows, but they're not able to enable or disable it, modify it, access its settings, or delete it.
To specify workflow editor permissions, see Configure editor permissions.
Step 8: Test and troubleshoot your forms
As part of the process of building a custom workflow, you'll want to preview your forms, as well as add yourself as a recipient and initiate the form to check whether the message content you've created comes across to the message recipient as you intended.
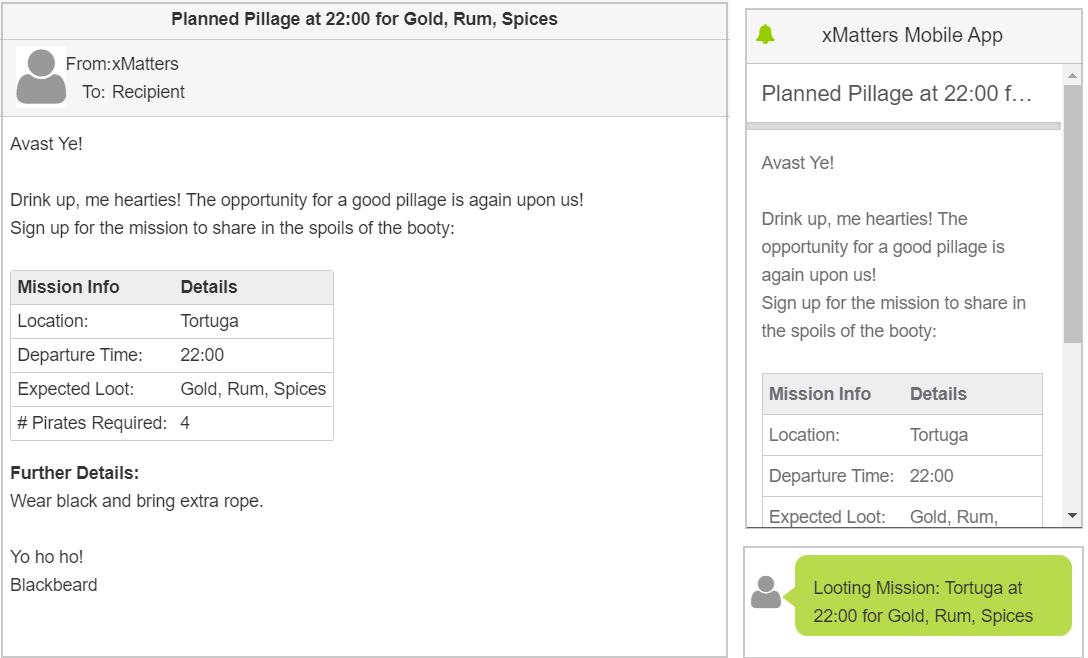
You can preview how email, SMS, and mobile app notifications appear before you send a message to recipients. This enables you to view how the text of the message appears when the properties are replaced with real values and verify that other fields are configured correctly.
To preview a message, see Preview a message (email, SMS, or mobile app).
Step 9: Other options
So far in this guide, we've covered the basics for building the foundation of a workflow. There are some additional options that you may want to take advantage of that can help message senders do their job more efficiently, and keep interested parties informed about events taking place in the organization even if they're not directly involved.
Scenarios
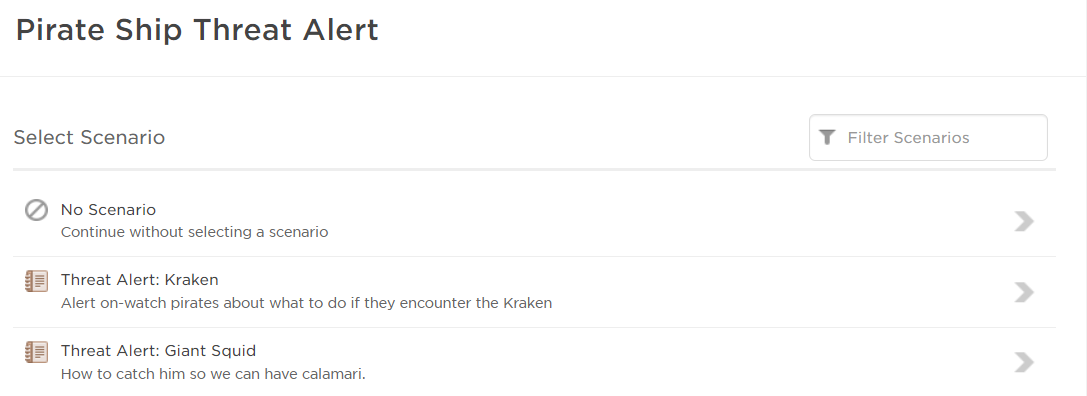
Scenarios allow you to save versions of a form with predefined values for common or anticipated situations, making it easier to send relevant messages quickly when those situations arise. For more information, see Define scenarios.
Subscriptions and Activity Updates
Often, there are people in your organization who would like to be notified about alerts even if they're not directly involved. For example, the captain of the Poseidon's Barnacle is interested in knowing about the treasure acquired by his crew, even if he's not involved in the looting mission.
There's a couple of ways to keep interested parties informed about alerts taking place in xMatters:
- Subscriptions: Allow users to subscribe to notifications for an alert, even if they were not targeted by the original notification. To allow people to subscribe to alerts, you must create a subscription form for your workflow. A subscription form defines who can subscribe to alerts, which properties they can subscribe to, and whether they can respond to notifications. Learn more.
- Activity updates: Notify recipients when a form is initiated and when notifications conclude. Learn more.
Step 10: Build Flows
Now that you've defined the underlying framework for your workflow, including its forms, properties, messages, and responses, you can use Flow Designer to build automated flows to facilitate your digital services availability and incident resolution processes.
For example, when our pirate monitoring system detects an incident - such as an imminent threat to the safety of Poseidon's Barnacle or her crew - it can inject that information into xMatters. We can then kick off a series of actions across different tools, transforming and passing information to steps further downstream.
To cast off on the adventure of creating flows to support your workflow, see Flow Designer 101.
