Incident triggers
Incident Initiation trigger
The incident initiation trigger (formerly known as the form trigger) lets you and your team initiate incidents by filling out and submitting a flow trigger form (you need a form of this type in your workflow to configure an initiate incident trigger). This lets you initiate an incident without sending notifications if your process doesn't require it.
 Incident initiation trigger
Examples of when to use this trigger: This step is primarily used when you want to initiate an incident within a custom incident management workflow.
What triggers it: When the associated flow trigger form is submitted. An Initiate Incident step must also be connected to the initiate incident trigger.
What information is in the outputs: Properties and parameters defined in the layout of the associated flow trigger form. The values at runtime depend on what's defined on the form layout and what's entered when the form is submitted.
Configure an incident initiation trigger
- Drag the Incident Initiation trigger from the palette onto the canvas. It is located under the Incidents section of the Triggers tab.
- Double-click the trigger to open its configuration screen (or select it and click the pencil icon).
- Select the form to use for initiating the flow and click Next.
- You can also create a form from the trigger configuration screen if you don't have any existing flow trigger forms available to use, or if the available forms don't suit your needs. You can customize the new form's layout later.
- You can't switch the form used by the step after you click Next; if you decide you want to target a different form, delete this instance of the step from the canvas and add a new incident initiation trigger.
- The step takes its label from the associated form.
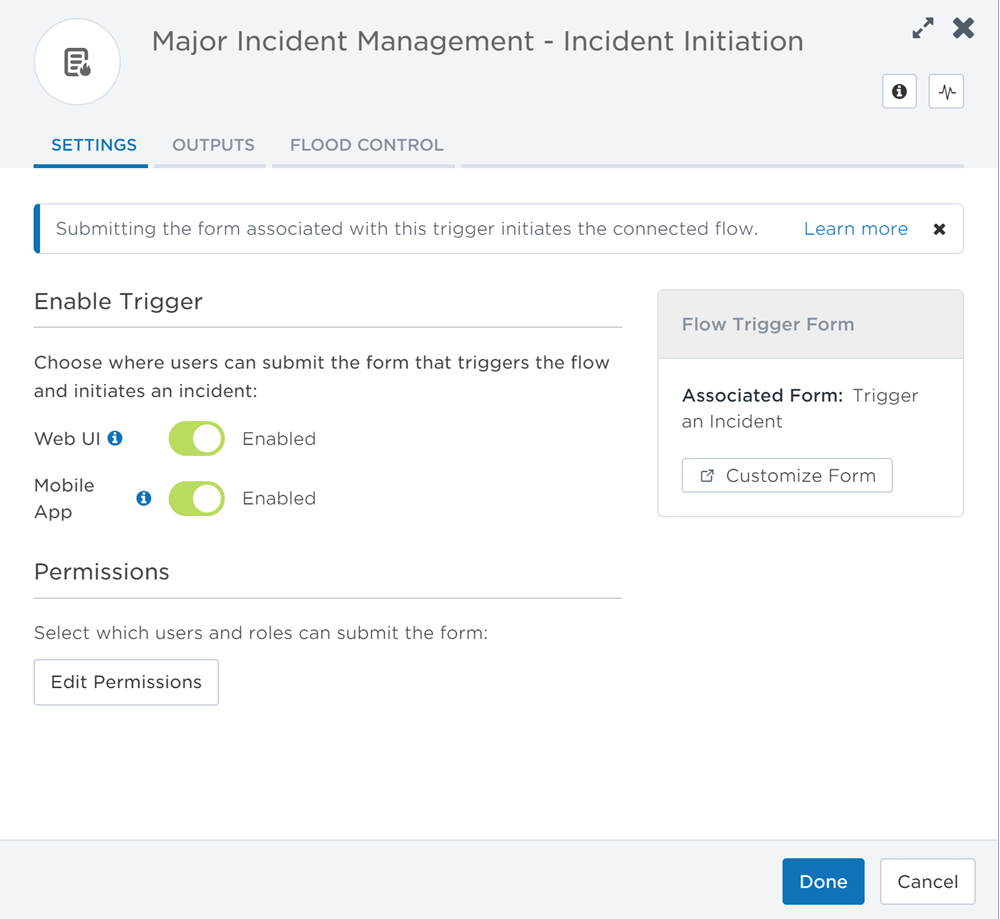
- In the Flow Trigger Form section, click Customize Form to open the associated form's layout page in a new tab — you can customize the form there.
- In the Enable Trigger section, choose whether to enable this trigger in the Web UI and Mobile App — this allows people to use the form to initiate an incident from the Incidents list and widget on the dashboard, the xMatters mobile app, and from within chat apps connected to xMatters.
- Sender permissions and enabling the form can also be set on the associated form.
- Enabling the form for mobile also controls if the form is available to initiate incidents from the xMatters bot in Slack and Microsoft Teams.
- In the Permissions section, click Edit Permissions to allow additional users to submit the associated form.
- You can select either users or roles; if you select a role, any users assigned that role can submit the form (for example, "Incident Managers"). If your flow includes a Create Alert Using a Form step, make sure you also set the same sender permissions on its associated messaging form, otherwise the flow might encounter errors at runtime.
- Click the Flood Control tab to edit the trigger's default flood control settings. For more information about these settings, see Trigger Flood Control.
- Click Done.
Incident Automation trigger
The incident automation trigger lets you and your team automate a flow from the Incident Console or on an incident service dependencies map. To configure an incident automation trigger, you need to associate it with a flow trigger form in your workflow. The name of the associated flow trigger form will be the name of your automation, which you can run from an incident or an impacted service without leaving your incident resolution process.
The ability to create and run automations is available in Base and Advanced plans.
Incident automation trigger
Examples of when to use this trigger: This step is primarily used by incident commanders and resolvers to run an automated process that can help to mitigate the effects of an incident or even resolve an issue. While they are viewing an incident or looking at an incident's impacted service, they can easily initiate flows (for example: send an alert, notify resolvers, or roll back a deployment) without navigating away from the incident or service.
What triggers it: When you select the automation on the Incident Console or on a service dependencies map. It is triggered when you submit the flow trigger form associated with the incident automation trigger.
What information is in the outputs:
- Form Properties: Properties and parameters defined in the layout of the associated flow trigger form. The values at runtime depend on what's defined on the form layout and what's entered when the form is submitted.
- Automation Context: Details of the incident from which the automation was triggered. The values at runtime represent the state of the incident when the automation was run.
Automation Context output details
| Property | Description | Example |
|---|---|---|
| Incident ID | The unique ID of the related incident. | INC-123 |
| Summary | The summary of the related incident. | Website is down |
| Description | The description of the related incident. | Customers can't access website |
| Severity | The severity assigned to the related incident in xMatters. | CRITICAL |
| Severity Level | The severity level assigned to the related incident in xMatters. | 500 (critical) |
| Status | The status assigned to the related incident. | In Progress |
Configure an incident automation trigger
- Drag the Incident Automation trigger from the palette onto the canvas. It is located under the Incidents section of the Triggers tab.
- Double-click the trigger to open its configuration screen (or select it and click the pencil icon).
- Select the form to use for initiating the flow and click Next.
- You can also create a form from the trigger configuration screen if you don't have any existing flow trigger forms available to use, or if the available forms don't suit your needs. You can customize the new form's layout later.
- You can't switch the form used by the step after you click Next; if you decide you want to target a different form, delete this instance of the step from the canvas and add a new incident automation trigger.
- The step takes its label from the associated form.
- In the Flow Trigger Form section, click Customize Form to open the associated form's layout page in a new tab — you can customize the form there.
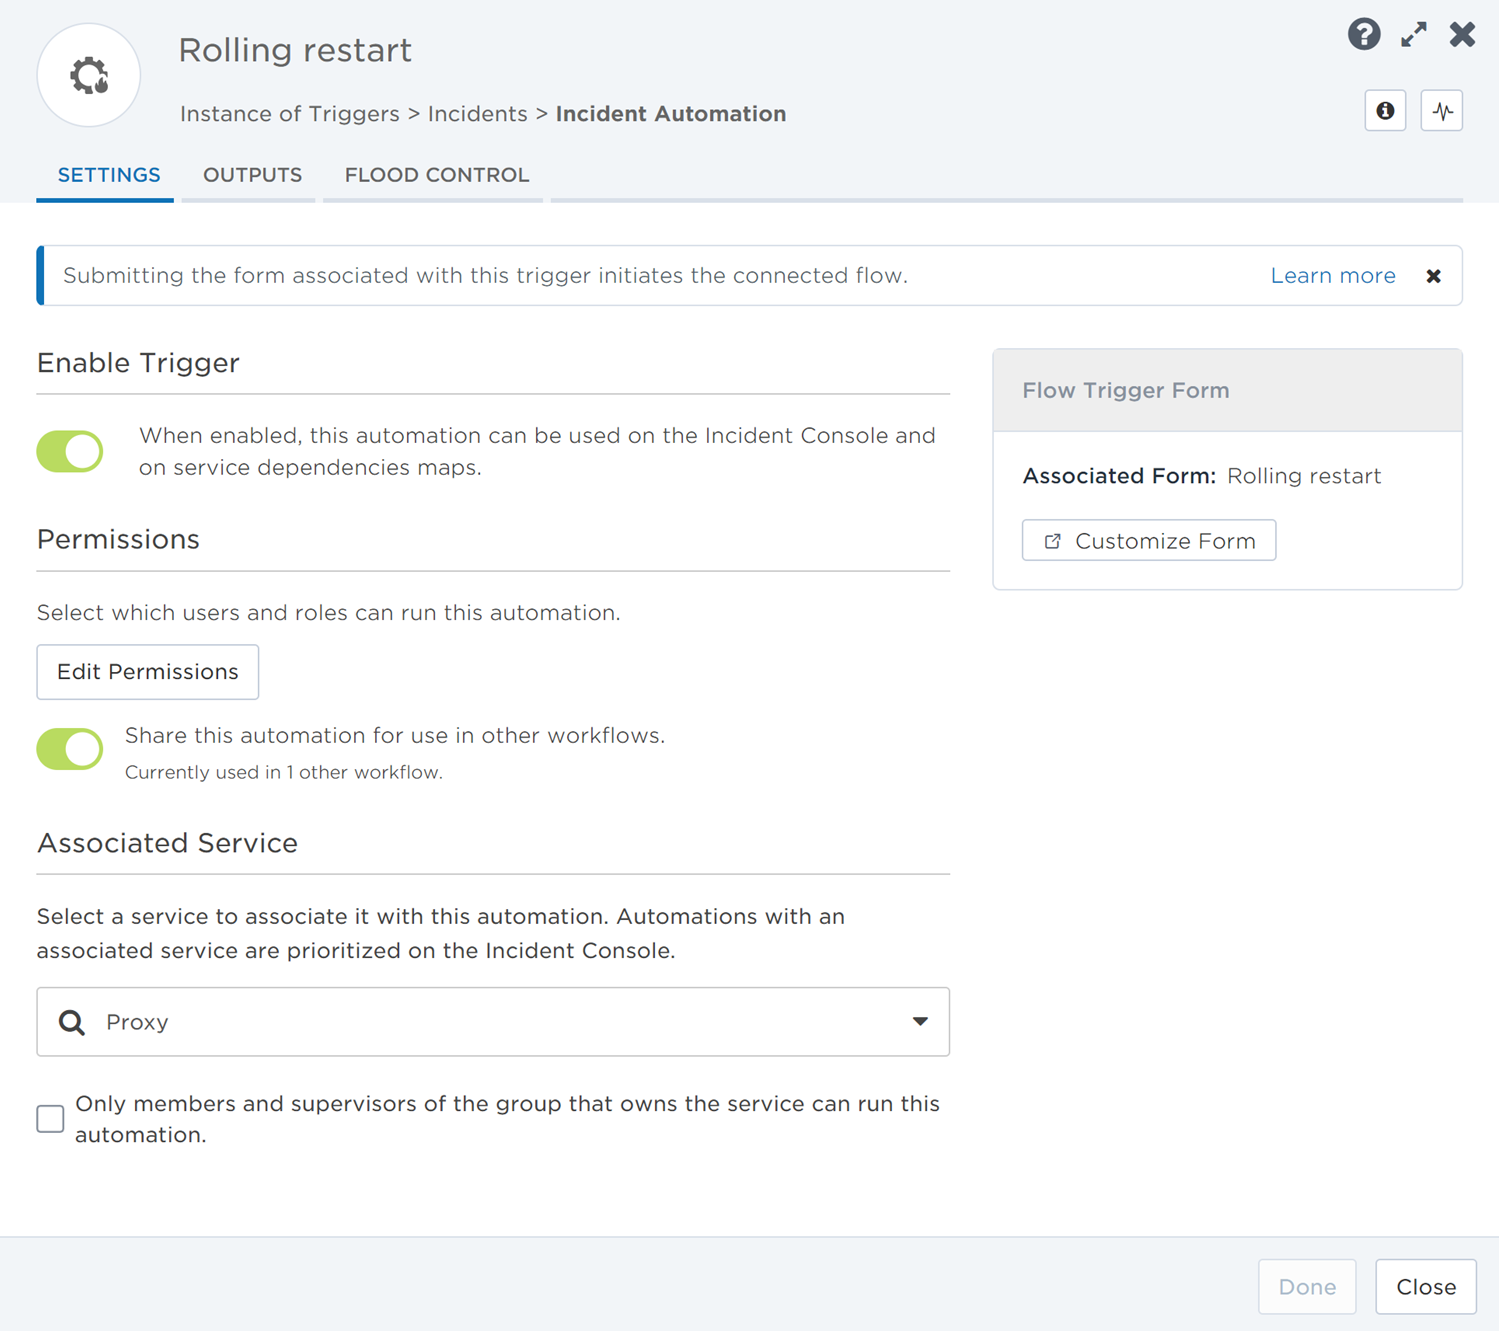
- In the Enable Trigger section, choose whether to enable this trigger and allow people to run the automation on the Incident Console and on incident service dependencies maps.
- Sender permissions and enabling the trigger can also be set on the associated form.
- In the Permissions section, click Edit Permissions to allow additional users to run the automation.
- You can select either users or roles; if you select a role, any users assigned that role can submit the form (for example, "Incident Managers"). If your flow includes a Create Alert Using a Form step, make sure you also set the same sender permissions on its associated messaging form, otherwise the flow might encounter errors at runtime.
- In the Permissions section, toggle on 'Share this automation for use in other workflows.' to allow other workflows to use this automation.
- If the toggle is turned on, it will indicate how many workflows are using the shared automation. To add the shared automation to a workflow, select Manage Shared Automations from the workflow settings on the main Workflows page.
- If you decide to turn off the toggle and stop sharing the automation, a modal will pop up with a list of the workflows that are using it and may potentially break if you disable sharing.
- In the Associated Service section, you can select a service to associate with the automation or leave this field blank. Note that you can only choose one service to associate with an automation. Associating a service with an automation will enable these features:
- If you sort by ‘Most Relevant’ in the Automation section of the Incident Console, the automation will be grouped together with other automations associated with the same service.
- You will be able to run the automation by selecting the associated service from the Impacted Services section of the Incident Console and the service dependencies map of the incident.
- Associating a service with an automation enables a checkbox option where you can choose to limit the usage of the automation to the members and supervisors of the group that owns the associated service. Note that if you select this checkbox, you still need to ensure that the group members and supervisors can run the automation under the Permissions section.
- Click the Flood Control tab to edit the trigger's default flood control settings. For more information about these settings, see Trigger Flood Control.
- Click Done.
Incident activity triggers
The Initiate Incident step includes built-in triggers that you can use to trigger flows when certain conditions change or a particular action is taken on an incident, including status changes, severity changes, and notifications to engage as incident resolvers. These triggers include a common set of incident context outputs, plus additional outputs specific to the type of trigger.
Add incident activity triggers to the canvas
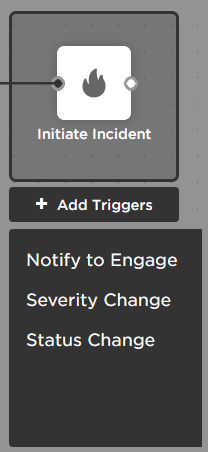
Incident activity triggers are associated with an xMatters incident. You can add incident activity triggers to the Initiate Incident step by clicking + Add Triggers below the step on the canvas.
Incident trigger context
Incident activity triggers share a common set of 'incident trigger context' outputs with details about the incident at the time the trigger fired. You can use these outputs to pass current incident details to steps further along in your flow.
Incident trigger context outputs
| Output | Description | Example |
|---|---|---|
| Incident ID | Unique ID of the related incident. | INC-47 |
| Incident UUID | UUID of the related incident in xMatters. | e930e32d-b863-4c55-a528-1d2829e3690e |
| Summary | Summary of the related incident. | Web Server Down |
| Description | Description of the related incident. | The web server is down. We've got 30 min to get it back up. |
| Severity | Severity assigned to the related incident in xMatters (CRITICAL, HIGH, MEDIUM, LOW, or MINIMAL). | MEDIUM |
| Severity Level | Numeric severity level assigned to the related incident in xMatters (CRITICAL - 500, HIGH - 400, MEDIUM - 300, LOW - 200, or MINIMAL - 100). | 300 |
|
Status |
Status assigned to the related incident. | In Progress |
| Incident Commander First Name | First name of the incident commander in xMatters. | Aarohi |
|
Incident Commander Last Name |
Last name of the incident commander in xMatters. | Kaur |
| Incident Commander User ID | ID of the incident commander in xMatters. | akaur |
| Initiator First Name | First name of the xMatters user who initiated the incident. | Ali |
| Initiator Last Name | Last name of the xMatters user who initiated the incident. | Samara |
| Initiator User ID | ID of the xMatters user who initiated the incident. | asamara |
| Impacted Services | Comma-separated list of the services reported as impacted by the incident. | API,Customer Quota,Proxy |
| Stakeholders | Target names of users or groups included as stakeholders of the incident. | mmcbride,DatabaseAdmins |
| Incident properties specific to incident type | Includes any incident properties defined for this type of incident and their values. |
Status Change trigger
The Status Change trigger initiates a flow when an incident's status in xMatters changes to a specified value. Outputs include the new status, old status, the name of the user who changed the status, the note the user added when the status was changed, and context about the incident at the time the trigger was initiated.
Status Change trigger
Examples of when to use this trigger:
- Automatically update a chat room to notify resolvers when an incident’s status is updated.
- Automatically update external applications to note when the incident's status is updated.
- Automatically close a ticket in external applications when an incident's status is changed to resolved in xMatters.
- Automatically send a new notification to resolvers when an incident's status has changed so appropriate action can be taken.
Status Change trigger outputs
| Output | Description | Example |
|---|---|---|
| New Status | New status assigned to the incident. | Resolved |
| Previous Status | Previous status of the incident. | In Progress |
| User ID | ID of the xMatters user who updated the incident's status. | mmcbride |
| User First Name | First name of the xMatters user who updated the incident's status. | Mary |
| User Last Name | Last name of the xMatters user who updated the incident's status. | McBride |
| Note | Reason for the change in status, if provided by the user. | The incident has been resolved. |
Configure a Status Change trigger
- Under the Initiate Incident step, click + Add Triggers.
- Hover over Status Change and select the status level you want to create a flow for. You can select each level once, so when you add one of the available status change triggers to the canvas, it disappears from the list of options; when you remove it from the canvas, it reappears and is available for your use in future.
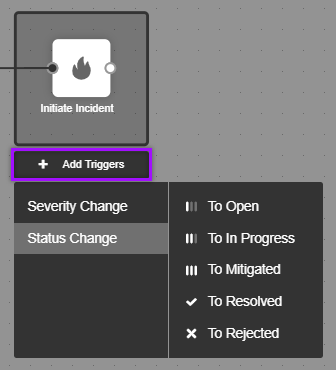
- Once added, the Status Change triggers are displayed below the step and can be connected to separate flows.
Status Change triggers are displayed in a predefined order on the canvas (Open to Rejected), and below any connected Notify to Engage and Severity Change triggers.
Severity Change trigger
The Severity Change trigger initiates a flow when an incident's severity in xMatters changes to a specified value. Outputs include the new severity, old severity, the name of the user who changed the severity, the note the user added when the severity was changed, and context about the incident at the time the trigger was initiated.
Severity Change trigger
Examples of when to use this trigger:
- Automatically update a chat room to notify resolvers when an incident’s severity is updated.
- Automatically update external applications to note when the incident's severity is updated.
- Automatically send a new notification to resolvers when an incident's severity has changed so teams can escalate or deescalate the incident response.
Severity Change trigger outputs
| Output | Description | Example |
|---|---|---|
| New Severity | New severity level assigned to the incident. | Critical |
| Previous Severity | Previous severity level of the incident. | High |
| User ID | ID of the xMatters user who updated the incident's severity. | mmcbride |
| User First Name | First name of the xMatters user who updated the incident's severity. | Mary |
| User Last Name | Last name of the xMatters user who updated the incident's severity. | McBride |
| Note | Reason for the change in status, if provided by the user. | The incident is causing a significant business impact. |
Configure a Severity Change trigger
- Under the Initiate Incident step, click + Add Triggers.
- Hover over Severity Change and select the severity level you want to create a flow for. You can select each level once, so when you add one of the available severity change triggers to the canvas, it disappears from the list of options; when you remove it from the canvas, it reappears and is available for your use in future.
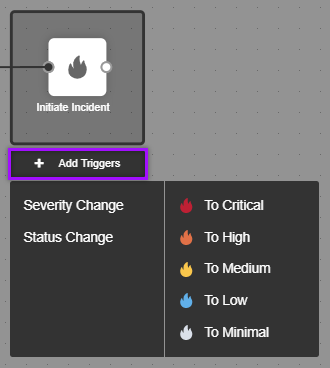
- Once added, the selected Severity Change triggers are displayed below the step and can be connected to separate flows.
Severity Change triggers are displayed in a predefined order on the canvas (Critical to Minimal), below the Notify to Engage trigger and above any connected Status Change triggers.
Notify to Engage trigger
The Notify to Engage trigger initiates a flow whenever someone selects 'Notify to Engage' to add resolvers to incidents created by the Initiate Incident step the trigger is connected to. The main purpose of the trigger is to modify the default message that's sent to resolvers when you invite them to engage in the incident.
When you add the trigger to the canvas, Flow Designer automatically connects a Create Alert step to the trigger with a version of the default message that you can customize to suit your organization's needs. The presence of the Notify to Engage trigger on your canvas signals Flow Designer to initiate the trigger and run any flow attached to it instead of sending resolvers the system's built-in notification to engage in the incident.
Notify to Engage trigger
When to use this trigger: To customize the design and content of the default messages sent to resolvers when they're notified to engage in an incident, or to trigger a custom flow when resolvers are notified to engage in an incident.
What triggers it: When someone selects 'Notify to Engage' and adds resolvers from the Resolvers section of the Incident Console, or when someone selects 'Notify to Engage' to notify a service owner from the service info card in the console or incident service dependencies map.
What information is in the outputs:
- Incident Trigger Context: Details of the incident from which the trigger was initiated. The values at runtime represent the state of the of the incident when the trigger was initiated.
- Outputs: Recipients selected in the form that's presented when someone selects 'Notify to Engage' for an incident
Notify to Engage outputs
| Output | Description | Example |
|---|---|---|
| Resolvers | Target names of users, groups, or services included as recipients on the form that triggered the flow. | mmcbride,DatabaseAdmins |
Configure a Notify to Engage trigger
- On your Flow Designer canvas, click Add Triggers below an Initiate Incident step.
- Select Notify to Engage.
- The trigger is added to the canvas below the Initiate Incident step with a Create Alert step automatically attached to the trigger.
- Double-click the Create Alert step (or select it and click the pencil icon) to edit the default Email / App, Text, and Voice messages that are sent to resolvers when they're notified to engage in the incident.
- In the Setup tab, set the Incident Function field to 'Resolver Notification'.
- Optionally, add additional steps before or after the Create Alert step.
Manually adding a Create Alert step from the palette and connecting it to your flow does not automatically populate the step's message content and settings. If you delete the Create Alert step that's created with the trigger, you can click 'Add Create Alert step' from the trigger's Setup tab to add a new one to your flow that includes the default messages.
While you do not need to include the Create Alert step in the flow attached to the Notify to Engage trigger, only recipients of a Create Alert step are added to the Resolvers section of the Incident Console – and those resolvers only display an 'Engaged' status when they respond to the message with a positive response option.
Stakeholder Update trigger
The Stakeholder Update trigger initiates a flow whenever an update is sent to the stakeholders of incidents created by the Initiate Incident step the trigger is connected to. The main purpose of the trigger is to modify the default message sent to stakeholders when an incident's severity is changed, or when you want to send an ad hoc update to stakeholders. You can optionally associate the trigger with a Flow Trigger form in your workflow to add more details to the stakeholder message in addition to outputs from previous steps in the flow.
When you add the trigger to the canvas, Flow Designer automatically connects a Create Alert step to the trigger with a version of the default message that you can customize to suit your organization's needs. The presence of the Stakeholder Update trigger on your canvas signals Flow Designer to initiate the trigger and run any flow attached to it instead of sending incident stakeholders the system's built-in stakeholder update message.
Stakeholder Update trigger
When to use this trigger: To customize the design and content of the default messages sent to stakeholders when they're updated about the incident, or to trigger a custom flow when an update is sent to stakeholders.
What triggers it: When someone sends an update to stakeholders about the incident. A stakeholder message can be sent by selecting the 'Notify stakeholders about this update' checkbox when changing the severity of an incident, or by clicking 'Send Update' on the Stakeholders section of the Incident Console. If you choose to associate a Flow Trigger form with the trigger, the default stakeholder message preview will be replaced with the flow trigger form layout.
What information is in the outputs:
- Incident Trigger Context: Details of the incident from which the trigger was initiated. The values at runtime represent the state of the of the incident when the trigger was initiated.
- Default outputs: The outputs of the trigger if there is no flow trigger form associated with it.
Stakeholder Update default outputs
| Output | Description | Example |
|---|---|---|
| Progress Statement as Text | Message sent to update stakeholders about the incident, in text format. | We are currently experiencing a full outage of our primary identity provider. To work around the issue, use your backup email login workflow. |
| Progress Statement as HTML | Message sent to update stakeholders about the incident, in HTML format. | <b>We are currently experiencing a full outage of our primary identity provider.</b> To work around the issue, use your backup email login workflow. |
Configure a Stakeholder Update trigger
- On your Flow Designer canvas, click Add Triggers below an Initiate Incident step.
- Select Stakeholder Update.
- The trigger is added to the canvas below the Initiate Incident step with a Create Alert step automatically attached to the trigger.
- Double-click the Stakeholder Update trigger to associate a flow trigger form with the trigger. Selecting a flow trigger form is optional. If you want to use the trigger's default outputs, leave the drop-down option as Use default stakeholder message details. If you select a form, the trigger's outputs will be replaced with the associated form's outputs.
- Double-click the Create Alert step (or select it and click the pencil icon) to edit the default Email / App, Text, and Voice messages that are sent to stakeholders when they're updated about the incident.
- In the Setup tab, set the Incident Function field to 'Stakeholder Update' to send the message to stakeholders. The recipients of the alert will be added as stakeholders in the incident's console.
- Optionally, add additional steps before or after the Create Alert step.

Manually adding a Create Alert step from the palette and connecting it to your flow does not automatically populate the step's message content and settings. If you delete the Create Alert step that's created with the trigger, you can click 'Add Create Alert step' from the trigger's Setup tab to add a new one to your flow that includes the default messages.